नमस्ते दोस्तों! 🙏
स्वागत है The Easy Master पर!
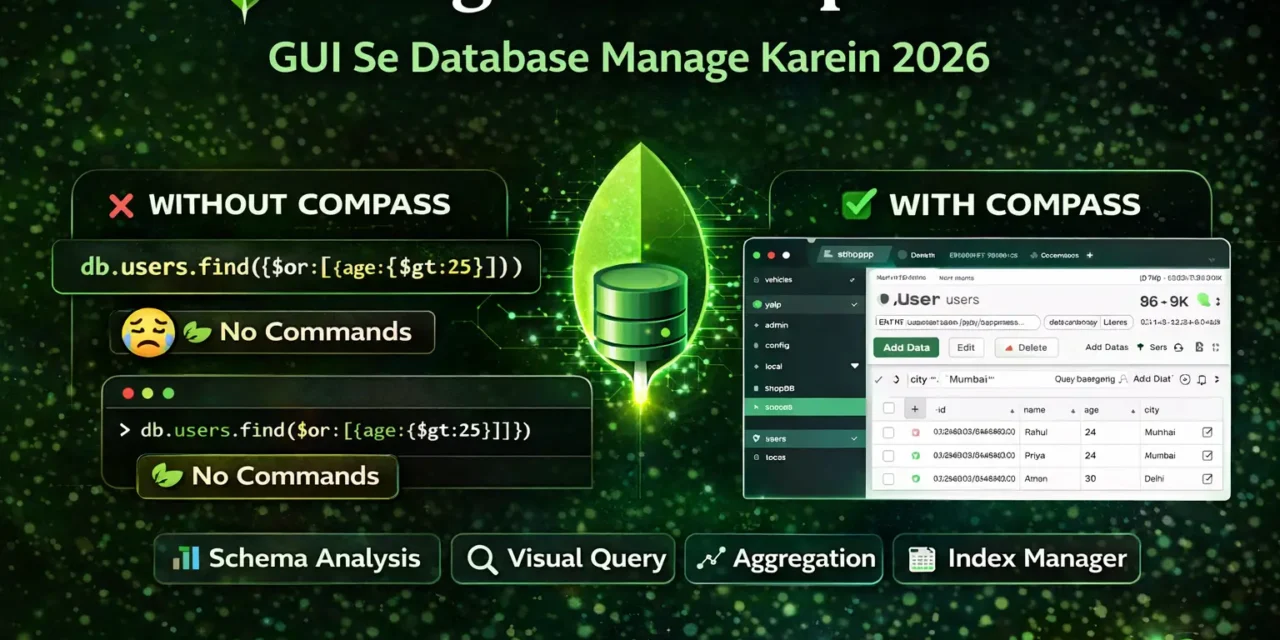
क्या तुमने कभी सोचा है – MongoDB shell commands याद करना मुश्किल लगता है? db.collection.find({$or: [...]}) – ये सब याद रखना आसान नहीं है।
MongoDB Compass GUI tool है – बिना command याद किए database manage करने के लिए। यह official MongoDB GUI है जो data को visually explore, query, और manage करने देता है.
MongoDB Compass GUI Hindi में समझना बहुत जरूरी है क्योंकि:
- No command memorization – सब visual है
- Beginner-friendly – shell commands नहीं आते तो भी काम कर सकते हो
- Quick debugging – data को आसानी से देख और edit कर सकते हो
- Schema analysis – data structure automatically samajh mein aa jata है
- Performance monitoring – queries slow क्यों हैं, पता लगा सकते हो
Aaj kya seekhoge?
| Topic | Kya Seekhega? |
|---|---|
| Compass Kya Hai? | Introduction aur features |
| Installation | Download aur setup |
| Connection | Local aur Atlas se connect |
| Database Management | Create, drop databases |
| Collection Management | Create, rename, drop collections |
| Document Operations | Insert, update, delete documents |
| Query Filtering | Visual query builder |
| Schema Analysis | Data structure samjho |
| Aggregation | Visual pipeline builder |
| Index Management | Performance optimize |
Kya tumhe pata hai?
MongoDB Compass natural language queries भी support करता है – English में लिखो, query ban जाएगी!
तो चलिए शुरू करते हैं – MongoDB Compass GUI Hindi सीखने का सफर! 🚀
Table of Contents
1. MongoDB Compass क्या Hai? – Introduction
MongoDB Compass ek graphical user interface (GUI) है जो MongoDB database को visually manage करने देता है.
Key Features:
Who Should Use Compass?
| User Type | Kyun Use Karein? |
|---|---|
| Beginners | Command याद नहीं रखने पड़ते |
| Developers | Fast debugging और data exploration |
| Data Analysts | Schema analysis और aggregation |
| DBAs | Performance monitoring और indexing |
MongoDB Compass GUI Hindi में हम step-by-step सब कुछ सीखेंगे।
2. Installation – Download aur Setup
Step 1: Download Compass
- Official website पर जाओ: mongodb.com/products/compass
- अपने OS के according version select करो (Windows, macOS, Linux)
- Installer download करो
Step 2: Install
Windows:
.msifile run करो- Installation wizard follow करो
macOS:
.dmgfile open करो- Compass को Applications folder में drag करो
Linux:
# Ubuntu/Debian
sudo dpkg -i mongodb-compass_*.deb
Step 3: Launch Compass
Installation पूरा होने के बाद, Compass application open करो.
3. Connection – Local aur Atlas Se Connect Karna
Option 1: Local MongoDB Connection
Connection String: mongodb://localhost:27017Steps:
- Compass open करो
- “New Connection” click करो
- Connection field में
mongodb://localhost:27017enter करो - “Connect” click करो
Option 2: MongoDB Atlas Connection (Cloud)
Step 1: Free Cluster Create करो
- mongodb.com/atlas पर sign up करो
- Free cluster create करो
- Database user create करो (username/password save रखो)
Step 2: Connection String Copy करो
- Cluster में “Connect” click करो
- “Connect using MongoDB Compass” select करो
- Connection string copy करो
Step 3: Compass से Connect करो
Connection Success:
Connected होने पर left sidebar में databases की list दिखेगी.
4. Compass Interface – Navigation Samjhein
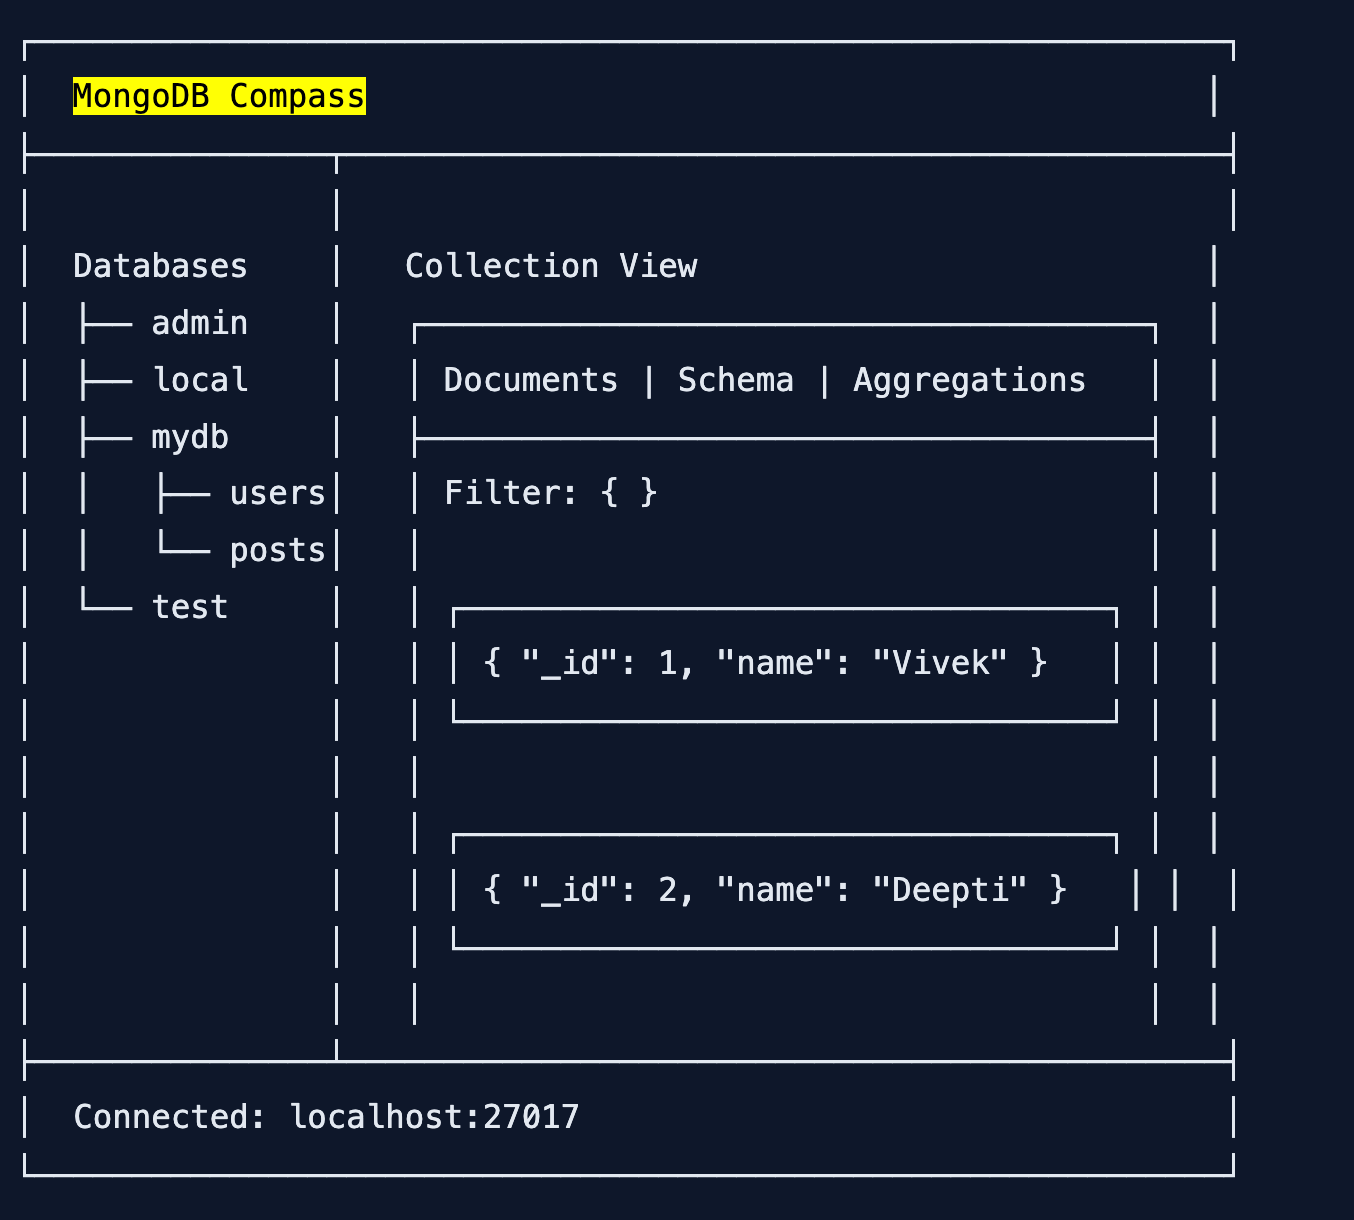
Main Interface Layout:
Key Sections:
| Section | Purpose |
|---|---|
| Left Sidebar | Databases और collections की list |
| Main View | Selected collection के documents |
| Tabs | Documents, Schema, Aggregations, Indexes |
| Filter Bar | Query लिखने के लिए |
| Toolbar | Add, Edit, Delete, Export buttons |
5. Database Management – Create, Drop
Create Database:
Method 1: Using “+” Button
- Left sidebar में “+” icon click करो
- Database Name enter करो (e.g.,
shopDB) - Collection Name enter करो (e.g.,
products) - “Create Database” click करो
Method 2: Using “Create Database” Button
- “Databases” tab में “Create Database” click करो
- Name enter करो → Create करो
Drop Database:
Warning: यह operation permanent है – सारा data delete हो जाएगा!
- Database name पर right-click करो
- “Drop Database” select करो
- Confirmation में “Drop” click करो
6. Collection Management – Create, Rename, Drop
Create Collection:
- Database select करो
- “Create Collection” button click करो
- Collection name enter करो (e.g.,
users) - (Optional) Capped collection options set करो
- “Create” click करो
Rename Collection:
- Collection name पर right-click करो
- “Rename Collection” select करो
- New name enter करो
- “Rename” click करो
Drop Collection:
- Collection name पर right-click करो
- “Drop Collection” select करो
- Confirm करो
7. Document Operations – Insert, Update, Delete
Insert Document:
Method 1: Manual Entry
- Collection open करो
- “Add Data” button click करो → “Insert Document”
- JSON editor में document enter करो:
{
  "name": "Vivek Sharma",
  "email": "vivek@example.com",
  "age": 25,
  "city": "Mumbai",
  "hobbies": ["coding", "reading"]
}- “Insert” click करो
Method 2: Import File
- “Add Data” → “Import File”
- JSON या CSV file select करो
- Import options configure करो
- “Import” click करो
Update Document:
- Edit करने वाले document पर hover करो
- Pencil icon (Edit) click करो
- JSON editor में changes करो
- “Update” click करो
Delete Document:
8. Query Filtering – Visual Query Builder
Basic Filter:
Filter bar में JSON query लिखो:
// Find user by name
{ "name": "Vivek Sharma" }

// Find users in Mumbai
{ "city": "Mumbai" }

// Find users age > 25
{ "age": { "$gt": 25 } }

// Find users from Mumbai or Delhi
{ "$or": [ { "city": "Mumbai" }, { "city": "Delhi" } ] }
Apply करने के लिए “Find” button click करो.
Visual Query Builder (Easy Mode!):
- Filter bar के बगल में “Visual Query Builder” toggle करो
- Form में fields select करो:
- Field:
age - Operator:
$gt(greater than) - Value:
25
- Field:
- Compass automatically JSON query generate करेगा
Projection (Select Specific Fields):
Filter bar के नीचे “Project” option में fields specify करो:
// Sirf name and email दिखाओ
{ "name": 1, "email": 1, "_id": 0 }
Sorting:
“Sort” field में लिखो:
// Age ascending (chhote se bade)
{ "age": 1 }

// Age descending (bade se chhote)
{ "age": -1 }

// CreatedAt descending (latest first)
{ "createdAt": -1 }
9. Schema Analysis – Data Structure समझो
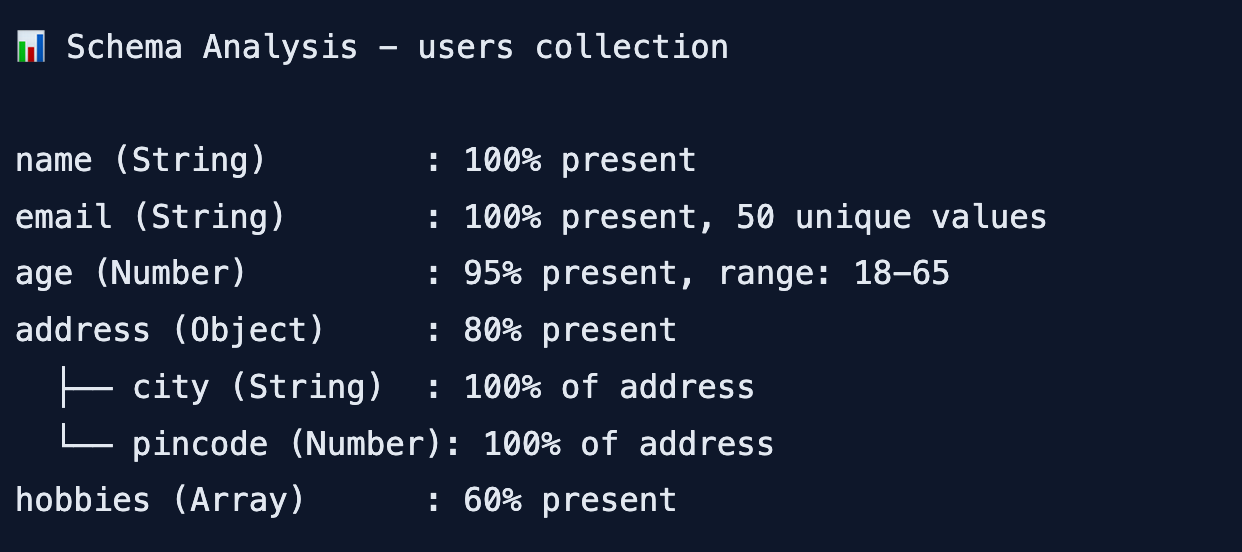
Schema tab collection के data structure को automatically analyze करता है.
Steps to Analyze Schema:
What Schema Analysis Shows:
| Information | Example |
|---|---|
| Field Names | name, email, age, address |
| Data Types | String, Number, Object, Array |
| Frequency | Kitने documents में field है |
| Unique Values | Unique values की count |
| Null Count | Kitने documents में null है |
Schema Visualization Example:
Why Schema Analysis is Useful:
- Data quality check कर सकते हो
- Missing fields identify कर सकते हो
- Data types inconsistent हैं तो पता चलता है
- Application development के लिए data structure समझ सकते हो
10. Aggregation Pipeline – Visual Data Processing
Aggregation complex data processing के लिए है – filtering, grouping, sorting, calculations.
Aggregation Pipeline Stages:
How to Use Aggregation in Compass:
- Collection open करो
- “Aggregations” tab click करो
- “Add Stage” button click करो
- Stage type select करो (
$match,$group, etc.) - Stage configuration enter करो
- Preview देखो – live results dikhenge
Example: Group Users by City
Stage 1 – $group:
{
  "_id": "$city",
  "totalUsers": { "$sum": 1 },
  "averageAge": { "$avg": "$age" }
}
Stage 2 – $sort:
{
  "totalUsers": -1
}
Output:
Mumbai: 25 users, avg age 28
Delhi: 20 users, avg age 26
Bangalore: 15 users, avg age 30
11. Index Management – Performance Optimize
Indexes query performance improve करते हैं.
View Existing Indexes:
- Collection open करो
- “Indexes” tab click करो
- सभी indexes की list दिखेगी
Create Index:
- “Create Index” button click करो
- Fields specify करो:
- Field:
email - Type:
1(ascending) या-1(descending)
- Field:
- Index options:
- Unique Index – duplicate values prevent करता है
- Partial Filter Expression – specific documents पर index
- “Create” click करो
Common Index Examples:
// Single field index
{ "email": 1 }

// Compound index (multiple fields)
{ "city": 1, "age": -1 }

// Unique index
{ "email": 1 } with unique: true

// Text index (search)
{ "name": "text", "description": "text" }
Check If Query Uses Index:
- Query run करो
- “Explain” button click करो
- Output में
"stage": "IXSCAN"देखो (index use हो रहा है) "stage": "COLLSCAN"देखो तो index nahi use हो रहा
12. Export aur Import – Data Transfer
Export Data:
- Collection open करो
- “Export Collection” button click करो
- Format select करो:
- JSON – MongoDB format
- CSV – Excel, Sheets के लिए
- Export options:
- सभी documents या filtered
- Specific fields only
- “Export” click करो → file save करो
Import Data:
- Collection open करो
- “Add Data” → “Import File” click करो
- JSON या CSV file select करो
- Import options configure करो
- “Import” click करो
13. Compass vs Shell – Comparison
| Feature | MongoDB Compass | MongoDB Shell |
|---|---|---|
| Interface | GUI (point-click) | Command line |
| Learning Curve | Easy | Steep |
| Query Building | Visual builder + text | Only text |
| Schema Analysis | ✅ Automatic | ❌ Manual |
| Aggregation Builder | ✅ Visual stages | ❌ Write manually |
| Data Visualization | ✅ Tables, charts | ❌ Text only |
| Performance Analysis | ✅ Explain plan GUI | ⚠️ Text explain |
| Automation | ❌ Limited | ✅ Scripting |
| Batch Operations | ❌ No | ✅ Yes |
| Best For | Exploration, debugging, learning | Automation, scripts, production |
When to Use What:
| Use Compass When… | Use Shell When… |
|---|---|
| नया database explore कर रहे हो | Script लिख रहे हो |
| Data visually देखना चाहते हो | Batch operations कर रहे हो |
| Schema समझना चाहते हो | Production deployment कर रहे हो |
| Queries debug कर रहे हो | CI/CD pipelines में use कर रहे हो |
| MongoDB सीख रहे हो | Complex administrative tasks |
14. Quick Cheat Sheet
Installation:
# Download from
https://www.mongodb.com/products/compass

# Connection strings
Local: mongodb://localhost:27017
Atlas: mongodb+srv://username:password@cluster.mongodb.net/
Key Shortcuts:
| Action | Shortcut |
|---|---|
| New Connection | Ctrl + N |
| Refresh | Ctrl + R |
| Find | Ctrl + F |
| Insert Document | Ctrl + I |
Common Queries in Filter Bar:
| Query | Purpose |
|---|---|
{ "name": "Vivek" } | Exact match |
{ "age": { "$gt": 18 } } | Greater than |
{ "city": { "$in": ["Mumbai", "Delhi"] } } | In array |
{ "$or": [ { "age": 25 }, { "city": "Mumbai" } ] } | OR condition |
15. FAQ
Q1: MongoDB Compass GUI Hindi में सबसे useful feature kya hai?
Schema Analysis – automatically data structure दिखा देता है। नए dataset को समझने में बहुत helpful है.
Q2: Compass free है या paid?
Free है! MongoDB official GUI tool है.
Q3: Compass के लिए system requirements kya hain?
Windows 10+, macOS 10.14+, या Linux। Minimum 4GB RAM recommended है।
Q4: Local MongoDB se connect kaise karein?mongodb://localhost:27017 connection string use करो.
Q5: Compass mein query kaise likhein?
Filter bar में JSON query likho या Visual Query Builder use करो.
Q6: Schema analysis kya dikhata hai?
Field names, data types, frequency, unique values, null counts – सब automatically दिखा देता है.
Q7: Aggregation pipeline kya hai?
Data processing के multiple stages – filter, group, sort, calculate – visually build कर सकते हो.
Q8: Index kyun banayein?
Query performance improve करने के लिए। Compass में Indexes tab से create कर सकते हो.
Q9: Data export kaise karein?
Collection में “Export Collection” button click करो → JSON या CSV select करो → Export.
Q10: Compass vs Robo 3T – kya better hai?
Compass official है, schema analysis और aggregation features better हैं। Robo 3T lightweight है लेकिन features limited हैं.
16. Conclusion
बहुत बढ़िया दोस्तों! आज हमने MongoDB Compass GUI Hindi को पूरी detail में समझा।
Quick Recap:
| Feature | क्या कर सकते हो? |
|---|---|
| Database Management | Create, drop databases |
| Collection Management | Create, rename, drop collections |
| Document CRUD | Insert, update, delete visually |
| Query Filtering | Visual builder या JSON queries |
| Schema Analysis | Auto data structure analysis |
| Aggregation | Visual pipeline builder |
| Index Management | Create/delete indexes |
| Export/Import | JSON, CSV files |
Mera personal experience:
पहले main MongoDB shell use करता था – queries याद रखना मुश्किल था। Compass use करने के बाद development bohot fast हो गया। Schema analysis से नए dataset समझने में seconds lagte हैं। Aggregation pipeline visual builder bohot powerful है।
Tum bhi ye steps follow karo:
- ✅ Compass download और install करो
- ✅ Local या Atlas database से connect करो
- ✅ नया database और collection बनाओ
- ✅ कुछ documents insert करो
- ✅ Filter queries try करो
- ✅ Schema tab explore करो
अब तुम्हारी बारी है!
नीचे comment में बताओ:
- तुम Compass use karoge या shell?
- कौन सा feature सबसे useful लगा?
- अगला topic क्या चाहिए? (Mongoose ODM? Aggregation Pipeline Deep Dive? MongoDB Atlas?)
The Easy Master पर बने रहो। Happy Coding with Compass! 🚀🍃
Resources
Additional Resources
- React.js Kya Hai? JSX aur Components Samjhe – Beginner Guide 2026
- React Props and State Data Flow Hindi – समझे आसान भाषा में 2026
- React Router v6 – Multi-Page App Banaye (Routing Guide) 2026
- Advanced React Hooks – useContext and useReducer Samjhe 2026
- Redux Toolkit Simplified – State Management Aasaan Tarika 2026
- React API Integration Made Easy with Fetch and Axios
- React Performance Optimization – App Ko Fast कैसे बनाएं 2026
- React 19 New Features – AI Integration with React (2026)
- Node.js क्या है? 2026 में अपना पहला Backend Server बनाएँ
- NPM Packages कैसे इंस्टॉल करें? Modules (ESM vs CommonJS) 2026
- Express.js Tutorial – REST API Routing और Middleware समझे 2026
- Prisma ORM MongoDB से Database Connect कैसे करें – Easy Tutorial Hindi
- JWT Authentication Node.js – Secure Login System बनाए 2026
- WebSockets Node.js – Live Chat App कैसे बनाएं (Socket.io)
- Async Await vs Promises – Node.js में Async Code कैसे सीखें?
- Microservices Architecture node.js आसान हिंदी Explanation 2026
- Docker से Node.js App Production Ready Deploy करें 2026
- Express.js Setup – पहला Server कैसे बनाएं (Step-by-Step) 2026
- Express.js Routing – GET POST PUT DELETE Complete Guide
- Express Middleware समझे – Application, Router, Error Middleware
- Express req and res Objects – Query, Params, Body, Headers Explained
- Express Static Files और Templating – EJS से Dynamic HTML Banaye
- Express Router – API Routes को Organize करें (Modular Code)
- Express.js में Environment Variables – .env File कैसे Use करें
- Express File Upload Multer Tutorial | Image PDF Hindi 2026
- Express Security – Helmet, CORS, Rate Limiting, Validation (2026)
- Express + TypeScript – Type-Safe API कैसे बनाएं 2026
- Express MongoDB CRUD – Complete REST API Example 2026
- Express Logging – Morgan और Winston से Debug करें
- Express API Testing – Supertest से Routes Test करें
- MongoDB Setup – CRUD Operations समझे (Beginner Guide) 2026