नमस्ते दोस्तों!
स्वागत है The Easy Master पर!
क्या आपने FastAPI पर अच्छी APIs बना ली हैं? और अब सोच रहे हैं – “मेरा API तो localhost पर बढ़िया चलता है, लेकिन दुनिया को दिखाना है तो online deploy कैसे करूँ?”
यही सबसे common problem hai har beginner ke saath. Main bhi yahan tak pohocha.
Maine pehli baar jab API deploy karna seekha, toh 4-5 platforms try kiye – Heroku, PythonAnywhere, DigitalOcean – sab complex ya paise wale the. Phir maine Railway discover kiya – aur 5 minute mein mera API online tha. Free mein. Bina server configure kiye.
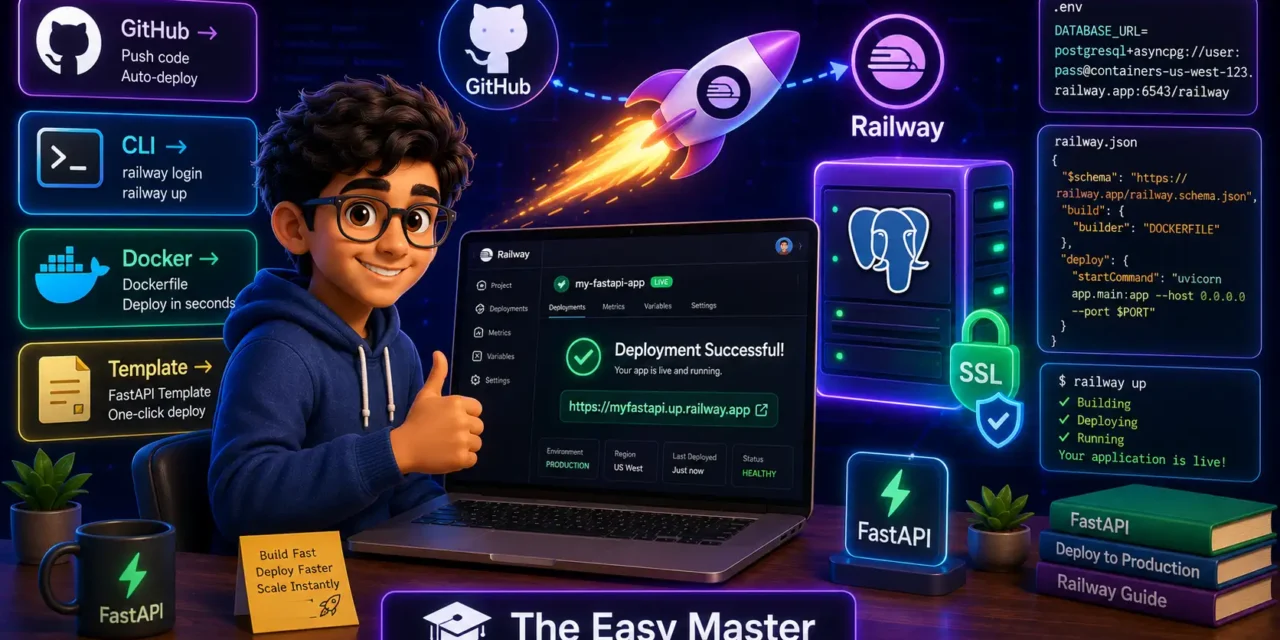
Is FastAPI deployment Hindi article mein main aapko Railway platform par deploy karna sikhata hoon – beginners ke liye sabse easy platform:
✅ Railway kya hai – aur kyun best beginners ke liye
✅ 3 deployment methods – GitHub + CLI + Docker (aapki choice)
✅ Railway CLI install aur setup – 2 minute mein ready
✅ Environment variables – API keys, secrets safe rakho
✅ PostgreSQL database attachment – async ke saath
✅ Custom domain + SSL – apna domain lagao automatic certificate
✅ Pricing 2026 – free tier kya offer karta hai, production mein kitna lagta hai
✅ Production checklist – health check, logging, monitoring
✅ CI/CD (GitHub Actions) – push karo aur auto-deploy
✅ Common mistakes + solutions – 5-10 min bachao
End mein cheat sheet, practice prompts, aur feature image prompt bhi milega.
Chaliye deploy karna shuru karte hain! 🚀
Table of Contents
1. Railway Kya Hai? – Beginners Ke Liye Perfect
Railway ek modern deployment platform hai. Aap apna code push karo, Railway automatically build + deploy kar deta hai. Server configure karna, Nginx set karna, SSL certificates manage karna – kuch nahi. Sab automatic.
Railway kyun special hai?
- ✅ No server configuration – bas code push karo
- ✅ Automatic SSL – HTTPS certificate khud generate hota hai
- ✅ PostgreSQL built-in – 2 click mein database attach ho jata hai
- ✅ Free trial – $5 free credits experiment karne ko
- ✅ Multiple deployment methods – GitHub, CLI, Docker, template – jo suit kare wahi use karo
Railway ek official FastAPI deployment guide provide karta hai, aur platform ka FastAPI templates bohot popular hain .
Railway by default Nixpacks build system use karta hai, jo Python app को automatically detect karta hai. Aap manually configure bhi kar sakte ho (railway.toml ya Dockerfile se) .
2. Railway vs Alternatives – क्यों चुनें?
Simple recommendation:
- Learning / Side project → Railway (easy + free credits)
- Production app → Railway Hobby plan (best value)
- Large scale → Railway Pro or AWS
3. Prerequisites – Deploy Karne Se Pehle Ready Ho
Deploy karne se pehle yeh ready rakho:
✅ FastAPI project ready locally (uvicorn se chal raha ho)
✅ requirements.txt file – Railway automatically dependencies install karega
✅ GitHub account – Railway ko GitHub se connect karna hai
✅ Railway account – signup at railway.com (GitHub login works)
✅ Working API endpoint – test karo ke /health endpoint hai ya nahi
Project structure for Railway:
my-fastapi-app/
├── app/
│   ├── __init__.py
│   └── main.py
├── requirements.txt
├── railway.json          # optional
├── .env                  # local use – Git mein mat push karna
└── .gitignore
4. Deployment Method #1 – GitHub Repo Se (Easiest)
Beginners ke liye sabse easy method – GitHub repo connect karo, Railway auto-deploy karega.
Step-by-step:
Step 1: Railway में जाओ → New Project बटन click karo → Deploy from GitHub repo
Step 2: Railway GitHub के साथ authenticate karo aur apna FastAPI repo select karo.
Step 3: Click Deploy Now – Railway automatically:
- Python version detect karega
- Dependencies install karega
- Your app start karega
Step 4: Deploy successful hone ke baad, service publicly accessible nahi hoti by default. Isliye, service के Settings → Networking → Generate Domain click karo.
Step 5: Railway automatically ek domain generate karega like: my-project.up.railway.app
✅ Done! Aapka FastAPI app live hai!
💡 Pro Tip: Community bhi bohot FastAPI templates banate hain. Railway website par “Templates” section mein search kar sakte ho
q=fastapi– mil jayenge ready-to-deploy templates.
5. Deployment Method #2 – Railway CLI Se (Professional)
CLI se deploy karo – fast hai aur power bhi.
5.1 Install Railway CLI
# Windows (PowerShell as Administrator)
powershell -exec bypass -c "irm https://railway.com/install.ps1 | iex"

# macOS (Homebrew)
brew install railway

# Linux (curl)
curl -fsSL https://railway.com/install.sh | sh
5.2 Login and Deploy
# 1. Login
railway login

# 2. Apne FastAPI project folder mein jao
cd my-fastapi-app

# 3. Railway project initialize karo
railway init

# 4. Deploy now!
railway up
railway up command scans, compresses, uploads your app files, aur real-time logs terminal mein dikhati hai.
Real-time logs dekhte raho:
Creating deployment...
Using Nixpacks (Python)
Installing dependencies...
Running uvicorn...
✓ Deployment successful!
✅ Done! Service domain generate karne ke liye dashboard mein jaao ya CLI se dekh lo.
💡 Professional tip: Background mein deploy karne ke liye
railway up -d(detached mode) use karo. CI/CD ke liyerailway up --cicommand hai – build logs stream karta hai aur build complete hone par exit ho jata hai.
6. Deployment Method #3 – Dockerfile Se (Advanced Control)
Dockerfile use karne se zyada control milta hai – image size optimize kar sakte ho, custom dependencies add kar sakte ho.
6.1 Dockerfile Example
# Use official Python runtime
FROM python:3.12-slim

# Set working directory
WORKDIR /app

# Install dependencies first (better caching)
COPY requirements.txt .
RUN pip install --no-cache-dir -r requirements.txt

# Copy application code
COPY . .

# Expose port (Railway automatically maps this)
ENV PORT=8000
EXPOSE 8000

# Run the application
CMD ["uvicorn", "app.main:app", "--host", "0.0.0.0", "--port", "8000"]
6.2 Docker Par Deploy Karna
# Option 1: Railway CLI se
railway up  # Railway automatically detects Dockerfile

# Option 2: Railway JSON se configure
# railway.json mein builder: "DOCKERFILE" specify karo
Docker se deploy karne ke fayde: build times faster ho sakte hain (caching ki wajah se), aur dependencies par full control hai.
💡 Pro Tip: Production mein Dockerfile use karo – consistency ensure hoti hai aur environment-specific packages add kar sakte ho. Python 3.12 ka use karo; yeh 2026 mein standard hai aur Railway completely supports karta hai.
7. Configuration – Railway.json / Railway.toml
Railway “Config as Code” support karta hai. Aap apne repo mein railway.json ya railway.toml file rakh sakte ho – Railway automatically configuration read karega.
7.1 Railway.json Example (Uvicorn + Health Check)
{
  "$schema": "https://railway.app/railway.schema.json",
  "build": {
    "builder": "NIXPACKS"
  },
  "deploy": {
    "startCommand": "uvicorn app.main:app --host 0.0.0.0 --port $PORT",
    "healthcheckPath": "/health",
    "restartPolicyType": "ON_FAILURE"
  }
}
Key configurations:
builder: "NIXPACKS"– Railway’s automatic build systemstartCommand– app start kaise karna hai. Uvicorn use karo for productionhealthcheckPath– endpoint pe request bhejta hai Railway to check if app healthy hairestartPolicyType: "ON_FAILURE"– automatically restart on crash
$PORT variable Railway automatically inject karta hai – kabhi hardcode 8000 mat karna.
7.2 Railway.toml Example
[build]
builder = "NIXPACKS"

[deploy]
startCommand = "uvicorn app.main:app --host 0.0.0.0 --port ${PORT:8000}"
healthcheckPath = "/health"
restartPolicyType = "ON_FAILURE"
${PORT:8000} syntax – agar $PORT variable available hai to use karo, nahi to 8000 default。
8. Environment Variables – Secrets Safe Rakho
API keys, database URLs, JWT secrets – yeh sensitive information environment variables mein rakhna. Kabhi code mein hardcode mat karna.
8.1 Railway Dashboard Se Set Karna
- Project dashboard mein service select karo
- Variables tab mein click karo
- Add variable button – key-value pair add karo
Example:
DATABASE_URL=postgresql://...
SECRET_KEY=your-jwt-secret-key
OPENAI_API_KEY=sk-...
Railway PostgreSQL create karta hai toh automatically DATABASE_URL variable add kar deta hai.
8.2 Code Mein Access Karna
import os
from fastapi import FastAPI

app = FastAPI()

@app.get("/settings")
def get_settings():
    db_url = os.getenv("DATABASE_URL")
    secret = os.getenv("SECRET_KEY", "fallback-for-development")
    return {"database_configured": bool(db_url)}
8.3 Local Development with Railway Variables
Railway CLI se production variables local mein use kar sakte ho without manually copying:
railway run python app/main.pyrailway run fetches environment variables from Railway service and injects them into your local command.
Personal Experience: Maine ek baar hardcoded API key commit kar di – 2 ghante mein someone used it. Tab se environment variables hamesha use karta hoon.
.envfile and.gitignoremust hai!
9. PostgreSQL Database – Project Mein Attach Karein
FastAPI + PostgreSQL async ke saath deploy karna Railway par bahut easy hai. Railway PostgreSQL automatically provisions aur DATABASE_URL environment variable inject karta hai.
9.1 Database Add Karna
Method A: Dashboard se (easiest)
- Railway project mein New button click karo
- Select Database → PostgreSQL
- Service automatically create ho jayegi
- Railway auto-generates
DATABASE_URLenvironment variable
Method B: Railway CLI se
railway add -d postgresql9.2 FastAPI Mein Use Karna (Async SQLAlchemy)
import os
from sqlalchemy.ext.asyncio import create_async_engine

DATABASE_URL = os.getenv("DATABASE_URL")
# Railway automatically sets DATABASE_URL in format:
# postgresql://postgres:password@postgres.railway.internal:5432/railway

# Convert to async format if needed (replace postgresql:// with postgresql+asyncpg://)
async_url = DATABASE_URL.replace("postgresql://", "postgresql+asyncpg://")
engine = create_async_engine(async_url)
Railway Postgres service internally .railway.internal domain use karta hai – isliye internal communication fast hai aur secure bhi.
9.3 Database Backups
Production databases ke liye Railway has automatic backups feature. Dashboard mein jaake enable karo – regular backups automatically honge.
10. Custom Domain + Automatic SSL – Apna Domain Lagao
Railway .up.railway.app domain give karta hai. But agar apna domain (e.g., api.theeasymaster.com) lagana hai toh custom domain feature use karo.
10.1 Custom Domain Setup
- Service ke Settings → Public Networking mein jao
- Custom Domain option select karo
- Apna domain type karo (e.g.,
api.theeasymaster.com) - Railway CNAME record + TXT record dikhayega
- Apne DNS provider (Cloudflare, Namecheap, etc.) mein yeh records add karo
- Railway automatically domain verify karega aur Let’s Encrypt SSL certificate generate karega
⚠️ Important: TXT record bhi add karna jaroori hai – sirf CNAME DNS update karna kaafi nahi hai.
10.2 Custom Domain Limits (2026)
Note: Freenom domains allowed nahi hain. Use a proper domain registrar (Namecheap, Cloudflare, GoDaddy) for best results.
Personal Experience: DNS propagation mein 24-48 hours lag sakte hain – ghabrana mat. Railway automatically status update karta hai jab domain verified ho jata hai. Green check mark dikhega jab sab sahi ho.
11. Pricing 2026 – Free Trial + Hobby Plan Breakdown
Railway pricing predictable hai aur beginners ke liye affordable.
11.1 Plan Structure
11.2 Resource Limits per Service
| Resource | Free Trial | Free | Hobby | Pro |
|---|---|---|---|---|
| RAM | 1 GB | 0.5 GB | 48 GB | 1 TB |
| CPU | 2 vCPU | 1 vCPU | 48 vCPU | 1,000 vCPU |
| Ephemeral Storage | 1 GB | 1 GB | 100 GB | 100 GB |
| Volume Storage | 0.5 GB | 0.5 GB | 5 GB | 1 TB |
11.3 Usage Pricing (On top of monthly fee)
Resource usage ke alag charges hote hain:
| Resource | Price |
|---|---|
| RAM | 10/GB/month(0.000231/GB/minute) |
| CPU | 20/vCPU/month(0.000463/vCPU/minute) |
| Network Egress | $0.05/GB |
| Volume Storage | $0.15/GB/month |
11.4 Real Example – Small FastAPI App Costs
Ek simple FastAPI app with 1 replica, 0.5 GB RAM, minimal traffic:
- Hobby plan base fee: $5/month
- RAM (0.5 GB x 10)=5/month
- CPU (0.5 vCPU x 20)=10/month
- Total ≈ 20/month(butHobbyincludes5 credit)
Better option: Free Trial 1 GB RAM with $5 credit – better for beginners.
11.5 How to Prevent Bill Shock
Railway mein spending limits set kar sakte ho:
- Dashboard mein Settings → Billing → Usage Limits
- Set a maximum monthly spend
- Railway automatically stops services when limit reached
Pro Tip: Free Trial pe sign up karo – 5creditsmilenge,testingkeliyeperfect.HarRailwayaccountkoektrialgrantmiltihai.Freeplanmein1 monthly credit milta hai – small API ke liye kaafi hai.
12. Production Checklist – Deploy Ke Baad Kya Check Karein
Deploy kar diya – ab production-ready banane ke liye yeh checklist follow karo:
✅ Security Checklist
- Use Hobby plan minimum for production – Free tier mein 1 replica limit hai
- All secrets in environment variables – No hardcoded keys in code
- DATABASE_URL secure – Railway automatically injects
- CORS configured properly – Don’t allow
*in production - API documentation disabled in production (or protected)
✅ Performance Checklist
- Uvicorn with multiple workers in railway.json
- Add
--workers 4to startCommand for better concurrency - Database connection pooling configured
- Async endpoints for I/O-bound operations
✅ Reliability Checklist
- Health check endpoint –
/healthreturns 200. Railway will use this for monitoring - Logging configured – Railway logs automatically capture stdout/stderr
- Restart policy set to
ON_FAILURE– Auto-recovery on crash - Backups enabled for production database
✅ Monitoring Checklist
- Railway logs monitored – Real-time logs in dashboard
- Set up usage alerts – Avoid bill surprises
- Deployment notifications enabled (email/webhook)
Example Health Check Endpoint
from fastapi import FastAPI

app = FastAPI()

@app.get("/health")
def health_check():
    return {"status": "healthy", "timestamp": datetime.utcnow().isoformat()}
Railway automatically calls /health on your startCommand. Agar 200 response nahi aata, Railway sometimes triggers automatic redeploy.
13. CI/CD Pipeline – GitHub Actions Se Auto-Deploy
Railway built-in GitHub integration hai – default mein production branch push karo, auto-deploy ho jayega. Lekin fully automated CI/CD ke liye GitHub Actions setup karo.
13.1 Railway Project Token for GitHub Actions
- Railway dashboard mein Settings → Tokens
- Create Project Token – select environment (production/staging)
- Token copy karo – store in GitHub Secrets as
RAILWAY_TOKEN
13.2 GitHub Actions Workflow File
Create .github/workflows/deploy.yml in your repository:
name: Deploy to Railway

on:
  push:
    branches: [main]  # main branch pe push hota hi deploy

jobs:
  deploy:
    runs-on: ubuntu-latest
    steps:
      - name: Checkout code
        uses: actions/checkout@v4

      - name: Install Railway CLI
        run: curl -fsSL https://railway.com/install.sh | sh

      - name: Deploy to Railway
        env:
          RAILWAY_TOKEN: ${{ secrets.RAILWAY_TOKEN }}
        run: railway up --ci
13.3 Pull Request Preview Deployments (Staging)
Railway supports branch-based environments:
- Railway dashboard mein Environments tab mein jao
- Create
stagingenvironment linked todevelopbranch developbranch push karo → staging env deploy ho jayega- Manual promotion: staging environment deployment to production
Railway environment variable injection per environment configure kar sakte ho – different database for staging, etc. Railway environments auto-deploy from their respective branches.
Pro Tip: GitHub Actions deploy ke liye
railway up --ciuse karo. CI mode mein sirf build logs stream hote hain aur build complete hone par exit ho jata hai.
14. Health Checks & Monitoring – API Down Nahi Hone Denge
Railway automatically services check karta hai – lekin aapko also implement karna chahiye:
14.1 Implement Health Check Endpoint
import time
from fastapi import FastAPI

app = FastAPI()

@app.get("/health")
def health():
    return {
        "status": "healthy",
        "timestamp": time.time(),
        "database": check_db_connection()  # optional
    }

def check_db_connection():
    try:
        # test database query
        return "connected"
    except:
        return "disconnected"
14.2 Railway Health Check Configuration
railway.json mein:
{
  "deploy": {
    "healthcheckPath": "/health",
    "restartPolicyType": "ON_FAILURE"
  }
}
Agar health check fail ho, Railway automatically service restart kar dega.
14.3 Logs Dekhna
# Real-time logs
railway logs

# Last 100 lines
railway logs --limit 100

# Specific deployment logs
railway logs --deployment <deployment-id>
14.4 Monitoring Dashboard
Railway dashboard mein jaake:
- Resource usage graphs (CPU, RAM, Network)
- Deployment history
- Error rates (from logs)
- Database metrics (for PostgreSQL service)
Personal Mistake: Pehle main health check implement nahi karta tha – service crash hoti toh pata bhi nahi chalta. Ab every production service mein
/healthendpoint must hai.
15. Common Mistakes (aur Unka Solution!)
| Mistake | Why? | Solution |
|---|---|---|
Hardcoded PORT=8000 in code | Railway $PORT variable provide karta hai – hardcode kiya toh random port assign hoga | Use port = int(os.getenv("PORT", 8000)) |
| requirements.txt missing | Railway can’t install dependencies | Always include requirements.txt |
| No health check endpoint | Railway ko pata nahi chalta service crash hui toh | Add /health endpoint returning 200 |
| Database URL hardcoded | Different in dev vs production | Use os.getenv("DATABASE_URL") |
| CORS not configured | Frontend can’t call API | Add CORSMiddleware with proper origins |
| Secret key in code | Security risk – commits mein leak ho jayega | Use environment variables for all secrets |
| Async loop not handled in database connection | Railway Postgres async requires proper engine setup | Use create_async_engine with asyncpg driver |
| Procfile missing | Railway uses startCommand config now | Use railway.json or Dockerfile, not Procfile |
| .gitignore missing .env file | Environment variables accidentally committed | Add .env to .gitignore before first commit |
Personal Mistake: Maine ek baar Railway deploy karne ke baad port 8000 hardcode kiya – service “Bind failed” error aayi. 2 ghante baad pata chala ki Railway
$PORTvariable provide karta hai aur main usko ignore kar raha tha.os.getenv("PORT", 8000)se kaam theek ho gaya.
16. Best Practices – Professional Production Code
✅ Security Best Practices
- Always use environment variables for secrets – Never hardcode
- Use
.envfile locally with.gitignore– Avoid commit - Production mein CORS properly configure:
from fastapi.middleware.cors import CORSMiddleware
app.add_middleware(
    CORSMiddleware,
    allow_origins=["https://yourdomain.com"],  # not "*"
    allow_credentials=True,
)- Hide sensitive docs in production:
app = FastAPI(docs_url="/docs" if not production else None)✅ Performance Best Practices
- Use Uvicorn with multiple workers:
"startCommand": "uvicorn app.main:app --host 0.0.0.0 --port $PORT --workers 4"- Enable Gzip compression for responses
- Use async database drivers (asyncpg, aiomysql, etc.)
✅ Reliability Best Practices
- Implement proper logging – capture errors
import logging
logging.basicConfig(level=logging.INFO)
logger = logging.getLogger(__name__)- Set restart policy in railway.json –
"ON_FAILURE" - Monitor resource usage – Railway dashboard mein graphs available hain
✅ DevOps Best Practices
- Use railway.json for config as code – version control mein rakh sakte ho
- Set up different environments (staging, production)
- Use GitHub Actions for CI/CD with project tokens
- Database backups enabled before production launch
- Set spending limits – Railway mein budget limits set kar sakte ho
17. Resources – Cheat Sheet + Practice Prompts
Cheat Sheet (Copy-Paste Ready)
# ---------- RAILWAY CLI COMMANDS ----------
railway login           # Login to Railway
railway init            # Initialize project in current directory
railway up              # Deploy (attached mode - see logs)
railway up -d           # Deploy in background (detached mode)
railway logs            # View deployment logs
railway open            # Open project dashboard in browser
railway variables       # List environment variables
railway add -d postgresql  # Add PostgreSQL database
railway run python script.py  # Run script with Railway env vars

# ---------- railway.json (Config as Code) ----------
{
  "$schema": "https://railway.app/railway.schema.json",
  "build": { "builder": "NIXPACKS" },
  "deploy": {
    "startCommand": "uvicorn app.main:app --host 0.0.0.0 --port $PORT",
    "healthcheckPath": "/health"
  }
}

# ---------- Environment Variables in Code ----------
import os
DATABASE_URL = os.getenv("DATABASE_URL")
SECRET_KEY = os.getenv("SECRET_KEY", "dev-secret")

# ---------- FastAPI Startup Config ----------
port = int(os.getenv("PORT", 8000))
# Use port variable for uvicorn run

# ---------- Health Check Endpoint ----------
@app.get("/health")
def health():
    return {"status": "ok"}
Practice Prompts
- Beginner: Railway account banao, GitHub pe simple FastAPI repo push karo (agar nahi hai to hello world wala). Railway dashboard se GitHub repo link karo – project deploy karo aur domain generate karo. Public URL hit karke test karo.
- Intermediate: Railway CLI install karo, local project deploy karo
railway upse. Environment variables add karo for API keys. Staging and production environments create karo – developer branch staging, main branch production auto-deploy. - Advanced: PostgreSQL database attach karo, Railway mein async SQLAlchemy connection configure karo. GitHub Actions workflow banake auto-deploy implement karo on push to main. Custom domain + SSL set karo. Production-grade health check and monitoring setup karo.
18. FAQ
Q1: Kya main completely free mein FastAPI deploy kar sakta hoon?
Haan – Trial signup karte h month credits milte hain – for extremely light usage.
Q2: Railway aur Vercel mein kya antar hai?
Vercel primarily frontend (Next.js, React) ke liye hai. Railway full backend + database + workers ke liye designed hai. FastAPI ke liye Railway better hai.
Q3: Railway par Python 3.12 support karta hai?
Haan – Railway Nixpacks builder automatically Python 3.12 detect karta hai. Railway Dockerfile ke through kisi bhi Python version use kar sakte ho.
Q4: PostgreSQL database automatically backed up hota hai?
Railway has a built-in Backups feature. Production databases ke liye enable karna recommended hai.
Q5: Apna domain kaise lagayein (api.mywebsite.com)?
Service settings mein Custom Domain add karo – Railway automatically CNAME + TXT records batata hai. DNS provider mein add karo, automatic SSL certificate issue ho jayega.
Q6: Agar API down ho jaye toh Railway notify karega?
Haan – Railway health checks fail hone par email notifications bhejta hai. You can also configure webhooks for external monitoring.
Q7: Do I need Docker to deploy on Railway?
Nahi – Railway Nixpacks build system use karta hai. Sirf requirements.txt provide karo, Railway automatically app build aur deploy karega. Docker optional hai advanced control ke liye.
19. Conclusion
Bahut badhiya! Aapne aaj seekh liya:
✅ FastAPI deployment Hindi mein – Railway platform par full guide
✅ 3 deployment methods – GitHub (easiest), CLI (professional), Docker (advanced)
✅ Configuration as Code – railway.json se full control
✅ Environment variables – secrets safe aur organized
✅ PostgreSQL database – 2 click mein attach, async ke saath
✅ Custom domain + automatic SSL – apni identity lagao
✅ Pricing 2026 – $5 credits free + predictable billing
✅ CI/CD pipeline – GitHub Actions auto-deploy
✅ Health checks aur monitoring – production-ready checklist
Railway = FastAPI ke liye best deployment platform beginners ke liye. Easy hai, powerful hai, aur affordable hai.
Aapki challenge: Upar diye practice prompts mein se “basic deployment” wala implement karo. Apna deployed URL comment mein share karo – main check karunga aur feedback dunga.
Next topic kya chahiye?
- FastAPI WebSockets (Real-time chat)?
- FastAPI + Redis (Caching + Rate Limiting)?
- FastAPI Monitoring (Prometheus + Grafana)?
Comment mein batao!
The Easy Master ke saath deployment seekhte raho. Happy deploying! 🚀
Resources
- Railway Official FastAPI Deploy Guide
- Railway Pricing Plans 2026
- Railway PostgreSQL Documentation
- Railway Custom Domains Guide
- Railway CLI Documentation
- Railway GitHub Actions Integration
Additional Resources
- MongoDB Setup – CRUD Operations समझे (Beginner Guide) 2026
- MongoDB Compass से GUI Database Manage करने का आसान तरीका | Beginner Tutorial 2026
- Node.js MongoDB Connection – Mongoose Setup समझे 2026
- MongoDB Data Modeling – Embedded Documents vs References 2026
- MongoDB Indexing – Query Speed बढ़ने करने का आसान तरीका
- MongoDB Aggregation Pipeline – Stages समझे | Practical Examples
- Express MongoDB CRUD – Complete REST API Example
- Mongoose ODM – Schema, Model, and Validation समझे 2026
- MongoDB Atlas – Cloud Database Free में Deploy करें 2026
- JWT Authentication MongoDB – User Login System कैसे बनाएं 2026
- Next.js App Router – Pages Router से क्या बदला? Complete Guide 2026
- Next.js Server Components – ‘use client’ कब और कहां Use करें
- Next.js Routing – Layouts, Dynamic Routes and Nested Routes 2026
- Next.js 16 New Features – Turbopack, Cache Components and proxy.ts
- Next.js Partial Prerendering – Static and Dynamic Content साथ में
- Next.js Authentication – JWT Session Management (App Router) 2026
- Next.js SEO – Metadata API and Image Optimization समझे 2026
- Next.js TypeScript – Full-Stack Type-Safe App कैसे बनाएं
- FastAPI Kya Hai? FastAPI Python Setup Aur Pehla API Hindi 2026
- FastAPI Path Parameters Hindi – शून्य से हीरो तक गाइड 2026
- Pydantic v2 Tutorial Hindi – Data Validation Master 2026
- FastAPI dependency injection Hindi – Code Reuse Ka Magic
- FastAPI Async Await Hindi – Non-Blocking Code 2026
- FastAPI PostgreSQL SQLModel Hindi – Async Guide 2026
- FastAPI JWT Authentication Hindi – Secure API Login
- FastAPI OpenAI Integration Hindi – AI Chatbot API 2026
- FastAPI Multi-Agent AI Hindi – LangGraph Zero to Hero
Views: 1,870