नमस्ते दोस्तों! 🙏
स्वागत है The Easy Master पर!
क्या तुमने कभी सोचा है – React app में data ek jagah se dusri jagah kaise jaata hai?
जब तुम एक Instagram post like karte ho – sirf like button change hota hai, count increase hota hai – lekin poora page reload nahi hota. ये सब possible है Props and State की वजह से।
React Props State Data Flow Hindi में समझना बहुत जरूरी है क्योंकि:
- Props and State – React ke do most important concepts हैं
- Bina props and state के interactive app nahi bana sakte
- Interview में 100% props/state related questions पूछे जाते हैं
- Real projects में har component props ya state use karta hai
Aaj kya seekhoge?
| Topic | Kya Sikhega? |
|---|---|
| Props | Parent se child mein data kaise bhejein |
| State | Component ka apna memory kaise manage karein |
| Data Flow | Unidirectional (ek direction) flow kya hai |
| Lifting State Up | Sibling components mein data kaise share karein |
| Controlled Components | Forms ko React way mein handle karna |
Kya tumhe pata hai?
Props read-only होते हैं – change nahi kar sakte। State mutable है – change kar sakte हो। ये React का golden rule है!
तो चलिए शुरू करते हैं – React Props and State Data Flow Hindi सीखने का सफर! 🚀
Table of Contents
1. React Props and State Data Flow Hindi – Introduction
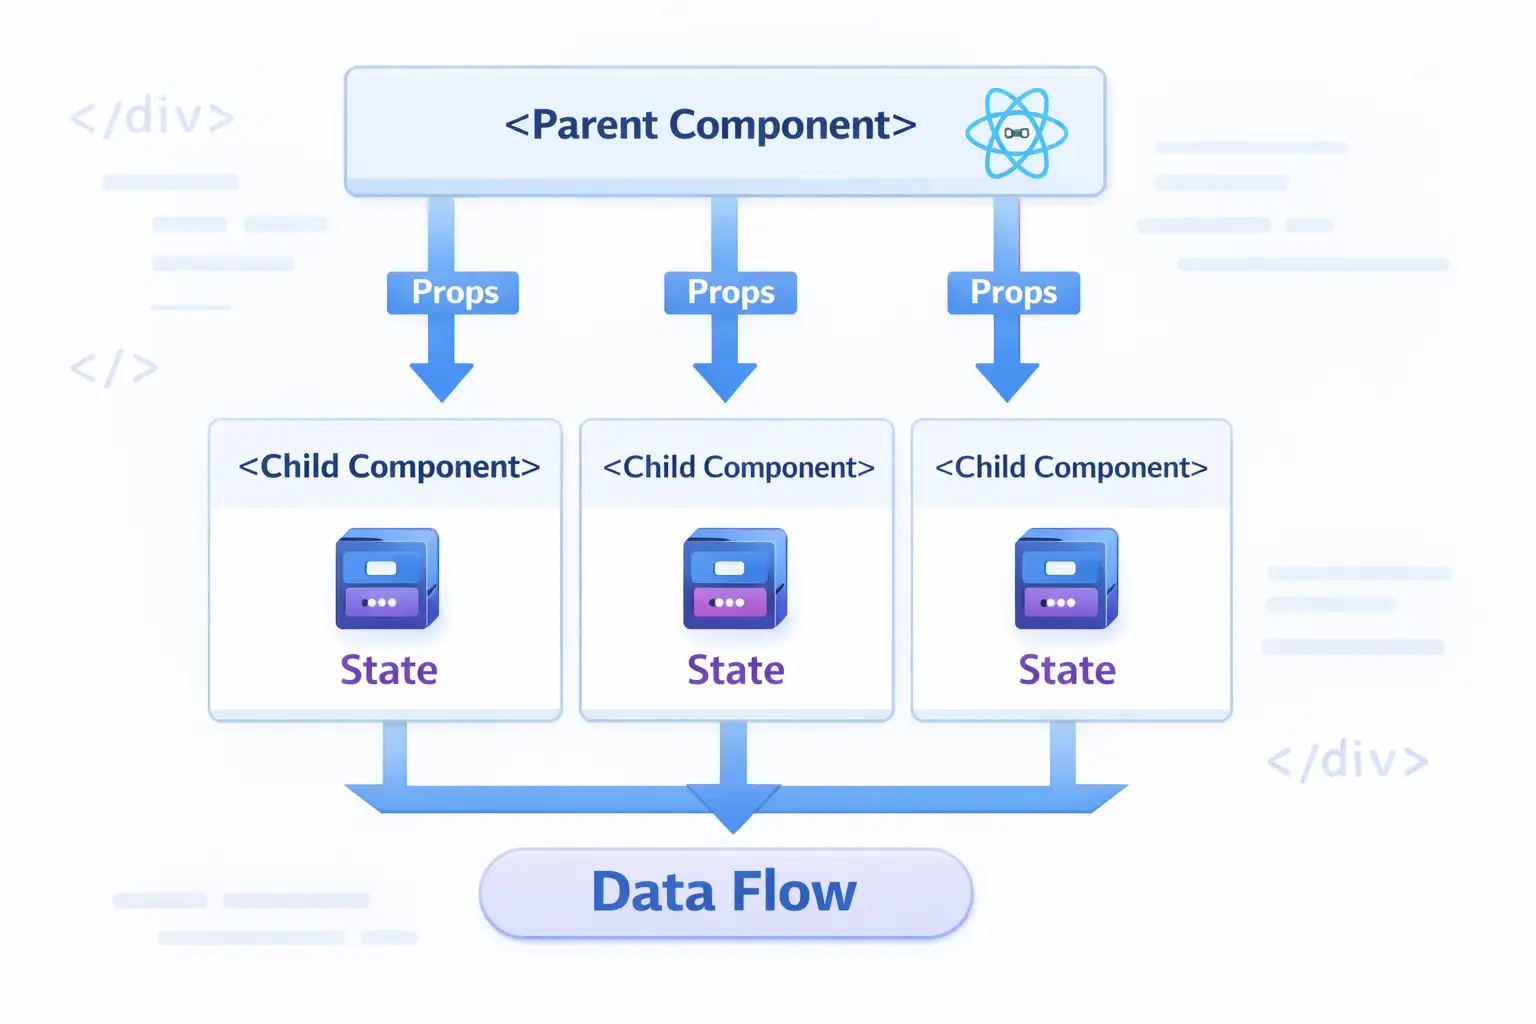
React Props and State Data Flow Hindi में तीन main concepts हैं:
1. Props (Properties)
Parent component → Child component data bhejna
2. State
Component ka apna memory – jo time ke saath badal sakta hai
3. Data Flow
React में data ek direction mein flow karta है – top to bottom
Simple Analogy:
Socho ek company hai:
| Concept | Analogy |
|---|---|
| Props | Boss (parent) → Employee (child) को instructions (read-only) |
| State | Employee का apna notebook – woh khud likh/badal sakta hai |
| Data Flow | Instructions sirf upar se neeche jaate hain – employee boss ko instruction nahi de sakta |
React Props and State Data Flow Hindi में इन तीनों को detail में समझेंगे।
2. Props क्या हैं? (Properties)
Props = Properties – data jo parent component child component को pass karta hai।
Props Ki 3 Golden Rules:
// RULE 1: Props are READ-ONLY – modify nahi kar sakte
function ChildComponent(props) {
  // props.name = "New Name"; // ❌ ERROR – cannot modify props
  return <h1>{props.name}</h1>;
}

// RULE 2: Props can be any data type
function App() {
  return (
    <UserCard
      name="Rahul"           // string
      age={25}               // number
      isActive={true}        // boolean
      hobbies={["coding", "gaming"]}  // array
      address={{ city: "Mumbai", pincode: 400001 }}  // object
      onLike={() => console.log("Liked!")}  // function
    />
  );
}

// RULE 3: Props ka data parent se child tak jaata hai (one-way)
// App → UserCard → UserInfo → UserAvatar (ek hi direction)
Props Destructuring – Cleaner Way:
// ❌ Without destructuring – repetitive
function Welcome(props) {
  return (
    <div>
      <h1>Hello, {props.name}</h1>
      <p>Age: {props.age}</p>
      <p>City: {props.city}</p>
    </div>
  );
}

// ✅ With destructuring – clean
function Welcome({ name, age, city }) {
  return (
    <div>
      <h1>Hello, {name}</h1>
      <p>Age: {age}</p>
      <p>City: {city}</p>
    </div>
  );
}

// ✅ Default props – agar value pass nahi ki toh default use hoga
function Greeting({ name = "Guest", greeting = "Namaste" }) {
  return <h1>{greeting}, {name}!</h1>;
}

// Usage:
<Greeting />                    // Output: Namaste, Guest!
<Greeting name="Rahul" />       // Output: Namaste, Rahul!
<Greeting name="Priya" greeting="Hello" /> // Output: Hello, Priya!
Children Props – Special Prop:
// Parent component
function App() {
  return (
    <Card>
      <h2>Card Title</h2>
      <p>This is card content</p>
      <button>Click Me</button>
    </Card>
  );
}

// Child component – props.children se access
function Card({ children }) {
  return (
    <div className="card">
      <div className="card-header">Header</div>
      <div className="card-body">{children}</div>
      <div className="card-footer">Footer</div>
    </div>
  );
}
React Props State Data Flow Hindi mein props ko samjho – yeh data pass karne ka standard way hai।
3. State क्या है?
State = Component ka internal memory jo time ke saath badal sakti hai।
useState Hook – State Banane Ka Tarika:
import { useState } from 'react';

function Counter() {
  // Syntax: const [value, setValue] = useState(initialValue);
  const [count, setCount] = useState(0);     // number state
  const [name, setName] = useState("");       // string state
  const [user, setUser] = useState(null);     // null/object state
  const [items, setItems] = useState([]);     // array state

  return (
    <div>
      <p>Count: {count}</p>
      <button onClick={() => setCount(count + 1)}>
        Increment
      </button>
    </div>
  );
}
State Kis Tarah Ka Data Store Kar Sakti Hai:
function UserProfile() {
  // 1. Number state
  const [age, setAge] = useState(25);

  // 2. String state
  const [name, setName] = useState("Rahul");

  // 3. Boolean state
  const [isLoggedIn, setIsLoggedIn] = useState(false);

  // 4. Array state
  const [hobbies, setHobbies] = useState(["coding", "reading"]);

  // 5. Object state
  const [user, setUser] = useState({
    id: 1,
    name: "Rahul",
    email: "rahul@example.com"
  });

  // 6. Null state (loading/fetching ke liye)
  const [data, setData] = useState(null);

  // Add to array
  const addHobby = (newHobby) => {
    setHobbies([...hobbies, newHobby]);
  };

  // Update object
  const updateUserName = (newName) => {
    setUser({ ...user, name: newName });
  };

  return (
    <div>
      <p>Name: {name}</p>
      <p>Age: {age}</p>
      <button onClick={() => setAge(age + 1)}>Birthday!</button>
    </div>
  );
}
State Update – Important Rules:
function Counter() {
  const [count, setCount] = useState(0);

  // ✅ CORRECT – using setter function
  const increment = () => {
    setCount(count + 1);
  };

  // ✅ CORRECT – functional update (when new value depends on previous)
  const incrementSafe = () => {
    setCount(prevCount => prevCount + 1);
  };

  // ❌ WRONG – directly modifying
  const wrongIncrement = () => {
    count = count + 1; // React won't re-render
  };

  // ❌ WRONG – mutating objects/arrays directly
  const wrongUpdate = () => {
    user.name = "New Name"; // No re-render
    setUser(user); // Same object reference – React ignores
  };

  // ✅ CORRECT – creating new object/array
  const correctUpdate = () => {
    setUser({ ...user, name: "New Name" });
  };

  return <button onClick={increment}>Count: {count}</button>;
}
4. Props vs State – Complete Comparison
React Props State Data Flow Hindi mein sabse important comparison:
| Feature | Props | State |
|---|---|---|
| Mutable? | ❌ No (read-only) | ✅ Yes |
| Who controls? | Parent component | Component itself |
| Can change? | No – parent se naye props aate hain | Yes – using setter function |
| Purpose | Pass data parent → child | Manage dynamic data inside component |
| Trigger re-render? | Yes (when parent sends new props) | Yes (when setState called) |
| Can pass to child? | ✅ Yes | ✅ Yes (as props) |
| Default values | ✅ Yes (defaultProps) | ✅ Yes (useState initial value) |
| Access in child | Directly as parameter | N/A (state is local) |
Visual Example:
// App.js (Parent)
function App() {
  const [userName, setUserName] = useState("Rahul"); // State in parent

  return (
    <div>
      {/* Props pass kar rahe hain */}
      <Greeting name={userName} />
      <NameChanger onNameChange={setUserName} />
    </div>
  );
}

// Greeting.js (Child) – receives PROPS
function Greeting({ name }) {  // ← PROPS (read-only)
  // ❌ Cannot do: name = "Priya"
  return <h1>Hello, {name}</h1>;
}

// NameChanger.js (Child) – has its own STATE
function NameChanger({ onNameChange }) {
  const [inputValue, setInputValue] = useState(""); // ← STATE (mutable)

  return (
    <input
      value={inputValue}  // controlled by state
      onChange={(e) => setInputValue(e.target.value)} // updating state
      onBlur={() => onNameChange(inputValue)}
    />
  );
}
5. Unidirectional Data Flow – Ek Direction Mein Data
React में data top to bottom (parent से child) flow karta hai – ek hi direction में।
Visual Representation:
        App (State: user = "Rahul")
              │
              │ props (name="Rahul")
              ▼
         Header Component
              │
              │ props (userName="Rahul")
              ▼
        UserAvatar Component
Example:
// Only App has state
function App() {
  const [user, setUser] = useState({ name: "Rahul", role: "Admin" });

  return (
    <div>
      <Header user={user} />        {/* props pass */}
      <Sidebar user={user} />       {/* props pass */}
      <Content user={user} />       {/* props pass */}
    </div>
  );
}

// Header receives props – no state here
function Header({ user }) {
  return (
    <header>
      <h1>Welcome, {user.name}</h1>
      <UserMenu user={user} />      {/* further passing */}
    </header>
  );
}

// UserMenu receives props – no state here either
function UserMenu({ user }) {
  return (
    <div className="menu">
      <span>Role: {user.role}</span>
    </div>
  );
}
Why Unidirectional?
| Benefit | Explanation |
|---|---|
| Predictable | Data ka source of truth clear hai |
| Debug easy | Pata hai data kahan se aa raha hai |
| No conflicts | Two-way binding se confusion nahi |
| Performance | React easily track kar sakta hai changes |
6. Lifting State Up – Sibling Components Mein Data Share Karna
Problem: Do sibling components ko same data share karna hai – lekin props sirf parent→child jaate hain, siblings mein direct nahi।
Solution: State ko common parent mein rakh do – phir props ke through dono siblings mein bhejo। इसे कहते हैं Lifting State Up।
Problem Example (Without Lifting):
// ❌ WRONG – siblings can't share state directly
function SearchBar() {
  const [searchTerm, setSearchTerm] = useState("");
  return <input onChange={(e) => setSearchTerm(e.target.value)} />;
}

function ResultsList() {
  // How to get searchTerm here? Can't!
  return <div>Results...</div>;
}
Solution (With Lifting State Up):
// ✅ CORRECT – State in parent component
function SearchPage() {
  // State lifted UP to common parent
  const [searchTerm, setSearchTerm] = useState("");

  return (
    <div>
      <SearchBar
        searchTerm={searchTerm}
        onSearchChange={setSearchTerm}
      />
      <ResultsList searchTerm={searchTerm} />
    </div>
  );
}

// Child 1 – receives state and setter as props
function SearchBar({ searchTerm, onSearchChange }) {
  return (
    <input
      value={searchTerm}
      onChange={(e) => onSearchChange(e.target.value)}
      placeholder="Search..."
    />
  );
}

// Child 2 – receives state as props
function ResultsList({ searchTerm }) {
  const results = filterData(searchTerm);
  return (
    <ul>
      {results.map(item => <li key={item.id}>{item.name}</li>)}
    </ul>
  );
}
Real-world Example – Temperature Converter:
function TemperatureConverter() {
  const [celsius, setCelsius] = useState("");
  const [fahrenheit, setFahrenheit] = useState("");

  // Convert celsius to fahrenheit
  const handleCelsiusChange = (value) => {
    setCelsius(value);
    if (value === "") {
      setFahrenheit("");
    } else {
      setFahrenheit((parseFloat(value) * 9/5 + 32).toString());
    }
  };

  // Convert fahrenheit to celsius
  const handleFahrenheitChange = (value) => {
    setFahrenheit(value);
    if (value === "") {
      setCelsius("");
    } else {
      setCelsius(((parseFloat(value) - 32) * 5/9).toString());
    }
  };

  return (
    <div>
      <TemperatureInput
        scale="Celsius"
        value={celsius}
        onChange={handleCelsiusChange}
      />
      <TemperatureInput
        scale="Fahrenheit"
        value={fahrenheit}
        onChange={handleFahrenheitChange}
      />
    </div>
  );
}

function TemperatureInput({ scale, value, onChange }) {
  return (
    <fieldset>
      <legend>Enter temperature in {scale}:</legend>
      <input
        type="number"
        value={value}
        onChange={(e) => onChange(e.target.value)}
      />
    </fieldset>
  );
}
7. Controlled Components – Forms Handle Karna
Controlled Component = Form input jiska value React state द्वारा control किया जाता है।
Uncontrolled vs Controlled:
// ❌ Uncontrolled – DOM apna value rakhta hai
function UncontrolledForm() {
  return <input type="text" />;
  // React ko value ka pata nahi – access karne ke liye ref chahiye
}

// ✅ Controlled – React control karta hai value
function ControlledForm() {
  const [value, setValue] = useState("");

  return (
    <input
      type="text"
      value={value}  // React state se control
      onChange={(e) => setValue(e.target.value)}  // Update on change
    />
  );
}
Complete Form Example:
import { useState } from 'react';

function RegistrationForm() {
  const [formData, setFormData] = useState({
    username: "",
    email: "",
    password: "",
    confirmPassword: "",
    age: "",
    gender: "",
    interests: [],
    termsAccepted: false
  });

  const [errors, setErrors] = useState({});

  // Generic change handler for all inputs
  const handleChange = (e) => {
    const { name, value, type, checked } = e.target;

    setFormData(prev => ({
      ...prev,
      [name]: type === "checkbox" ? checked :
               type === "select-multiple" ? Array.from(e.target.selectedOptions, opt => opt.value) :
               value
    }));

    // Clear error for this field when user types
    if (errors[name]) {
      setErrors(prev => ({ ...prev, [name]: "" }));
    }
  };

  const handleSubmit = (e) => {
    e.preventDefault();

    // Validation
    const newErrors = {};
    if (!formData.username) newErrors.username = "Username is required";
    if (!formData.email.includes("@")) newErrors.email = "Invalid email";
    if (formData.password !== formData.confirmPassword) {
      newErrors.confirmPassword = "Passwords don't match";
    }

    if (Object.keys(newErrors).length > 0) {
      setErrors(newErrors);
      return;
    }

    console.log("Form submitted:", formData);
    alert("Registration successful!");
  };

  return (
    <form onSubmit={handleSubmit}>
      <div>
        <label>Username:</label>
        <input
          type="text"
          name="username"
          value={formData.username}
          onChange={handleChange}
        />
        {errors.username && <span style={{color: "red"}}>{errors.username}</span>}
      </div>

      <div>
        <label>Email:</label>
        <input
          type="email"
          name="email"
          value={formData.email}
          onChange={handleChange}
        />
        {errors.email && <span style={{color: "red"}}>{errors.email}</span>}
      </div>

      <div>
        <label>Password:</label>
        <input
          type="password"
          name="password"
          value={formData.password}
          onChange={handleChange}
        />
      </div>

      <div>
        <label>Gender:</label>
        <select name="gender" value={formData.gender} onChange={handleChange}>
          <option value="">Select</option>
          <option value="male">Male</option>
          <option value="female">Female</option>
          <option value="other">Other</option>
        </select>
      </div>

      <div>
        <label>
          <input
            type="checkbox"
            name="termsAccepted"
            checked={formData.termsAccepted}
            onChange={handleChange}
          />
          Accept Terms & Conditions
        </label>
      </div>

      <button type="submit">Register</button>
    </form>
  );
}
8. Prop Drilling – Problem aur Solution
Prop Drilling = Jab props ko multiple intermediate components se pass karna padta hai – even when those components don’t need the prop.
Problem Example:
// ❌ Prop Drilling – User data App → Profile → Details → Avatar
// Avatar needs user, but Profile and Details don't!
function App() {
  const [user, setUser] = useState({ name: "Rahul", avatar: "image.jpg" });
  return <Profile user={user} />;
}

function Profile({ user }) {  // Doesn't need user itself
  return <Details user={user} />;  // Just passing through
}

function Details({ user }) {  // Doesn't need user itself
  return <Avatar user={user} />;  // Just passing through
}

function Avatar({ user }) {  // Actually needs user!
  return <img src={user.avatar} alt={user.name} />;
}
Solutions for Prop Drilling:
Solution 1: Component Composition
// ✅ Better – pass children instead
function App() {
  const [user, setUser] = useState({ name: "Rahul", avatar: "image.jpg" });

  return (
    <Profile>
      <Details>
        <Avatar user={user} />
      </Details>
    </Profile>
  );
}

function Profile({ children }) {
  return <div className="profile">{children}</div>;
}

function Details({ children }) {
  return <div className="details">{children}</div>;
}

function Avatar({ user }) {
  return <img src={user.avatar} alt={user.name} />;
}
Solution 2: Context API (Advanced – next topic)
// Context API – direct access, no prop drilling
const UserContext = React.createContext();

function App() {
  const [user, setUser] = useState({ name: "Rahul" });

  return (
    <UserContext.Provider value={user}>
      <Profile />
    </UserContext.Provider>
  );
}

function Profile() {
  return <Details />;  // No props needed!
}

function Details() {
  return <Avatar />;   // No props needed!
}

function Avatar() {
  const user = useContext(UserContext);  // Direct access!
  return <img src={user.avatar} />;
}
9. Real-world Project Examples
Example 1: Todo App (Props + State)
import { useState } from 'react';

function TodoApp() {
  const [todos, setTodos] = useState([]);
  const [inputValue, setInputValue] = useState("");

  const addTodo = () => {
    if (inputValue.trim()) {
      setTodos([...todos, { id: Date.now(), text: inputValue, completed: false }]);
      setInputValue("");
    }
  };

  const toggleTodo = (id) => {
    setTodos(todos.map(todo =>
      todo.id === id ? { ...todo, completed: !todo.completed } : todo
    ));
  };

  const deleteTodo = (id) => {
    setTodos(todos.filter(todo => todo.id !== id));
  };

  return (
    <div>
      <h1>Todo App</h1>
      <div>
        <input
          value={inputValue}
          onChange={(e) => setInputValue(e.target.value)}
          onKeyPress={(e) => e.key === 'Enter' && addTodo()}
          placeholder="Add a task..."
        />
        <button onClick={addTodo}>Add</button>
      </div>

      <TodoList
        todos={todos}
        onToggle={toggleTodo}
        onDelete={deleteTodo}
      />

      <Stats todos={todos} />
    </div>
  );
}

function TodoList({ todos, onToggle, onDelete }) {
  if (todos.length === 0) {
    return <p>No tasks yet. Add one!</p>;
  }

  return (
    <ul>
      {todos.map(todo => (
        <TodoItem
          key={todo.id}
          todo={todo}
          onToggle={onToggle}
          onDelete={onDelete}
        />
      ))}
    </ul>
  );
}

function TodoItem({ todo, onToggle, onDelete }) {
  return (
    <li style={{ textDecoration: todo.completed ? 'line-through' : 'none' }}>
      <input
        type="checkbox"
        checked={todo.completed}
        onChange={() => onToggle(todo.id)}
      />
      <span>{todo.text}</span>
      <button onClick={() => onDelete(todo.id)}>❌</button>
    </li>
  );
}

function Stats({ todos }) {
  const total = todos.length;
  const completed = todos.filter(t => t.completed).length;
  const pending = total - completed;

  return (
    <div>
      <p>Total: {total} | Completed: {completed} | Pending: {pending}</p>
    </div>
  );
}
Example 2: Shopping Cart
function ShoppingCart() {
  const [cart, setCart] = useState([]);

  const products = [
    { id: 1, name: "Laptop", price: 50000 },
    { id: 2, name: "Mouse", price: 500 },
    { id: 3, name: "Keyboard", price: 1500 }
  ];

  const addToCart = (product) => {
    setCart(prevCart => {
      const existing = prevCart.find(item => item.id === product.id);
      if (existing) {
        return prevCart.map(item =>
          item.id === product.id
            ? { ...item, quantity: item.quantity + 1 }
            : item
        );
      }
      return [...prevCart, { ...product, quantity: 1 }];
    });
  };

  const removeFromCart = (id) => {
    setCart(prevCart => prevCart.filter(item => item.id !== id));
  };

  const updateQuantity = (id, quantity) => {
    if (quantity === 0) {
      removeFromCart(id);
    } else {
      setCart(prevCart =>
        prevCart.map(item =>
          item.id === id ? { ...item, quantity } : item
        )
      );
    }
  };

  const getTotalPrice = () => {
    return cart.reduce((total, item) => total + (item.price * item.quantity), 0);
  };

  return (
    <div>
      <h1>Shopping Cart</h1>

      <ProductList products={products} onAddToCart={addToCart} />

      <Cart
        cart={cart}
        onUpdateQuantity={updateQuantity}
        onRemove={removeFromCart}
      />

      <h3>Total: ₹{getTotalPrice()}</h3>
    </div>
  );
}

function ProductList({ products, onAddToCart }) {
  return (
    <div>
      <h2>Products</h2>
      {products.map(product => (
        <div key={product.id}>
          <span>{product.name} - ₹{product.price}</span>
          <button onClick={() => onAddToCart(product)}>Add to Cart</button>
        </div>
      ))}
    </div>
  );
}

function Cart({ cart, onUpdateQuantity, onRemove }) {
  if (cart.length === 0) {
    return <p>Cart is empty</p>;
  }

  return (
    <div>
      <h2>Cart</h2>
      {cart.map(item => (
        <div key={item.id}>
          <span>{item.name} - ₹{item.price} x {item.quantity}</span>
          <button onClick={() => onUpdateQuantity(item.id, item.quantity - 1)}>-</button>
          <button onClick={() => onUpdateQuantity(item.id, item.quantity + 1)}>+</button>
          <button onClick={() => onRemove(item.id)}>Remove</button>
        </div>
      ))}
    </div>
  );
}
10. Common Mistakes + Solutions
Mistake 1: Directly mutating state
// ❌ Wrong
const [user, setUser] = useState({ name: "Vivek" });
user.name = "Deepti";  // No re-render
setUser(user);        // Same reference – React ignores

// ✅ Correct
setUser({ ...user, name: "Deepti" });
Mistake 2: Using state value immediately after setState
// ❌ Wrong
setCount(count + 1);
console.log(count);  // Still old value!

// ✅ Correct
setCount(count + 1);
useEffect(() => {
  console.log(count);  // New value after re-render
}, [count]);

// OR use functional update
setCount(prev => {
  const newValue = prev + 1;
  console.log(newValue);  // New value immediately
  return newValue;
});
Mistake 3: Modifying props
// ❌ Wrong
function Child({ user }) {
  user.name = "New Name";  // ERROR – props are read-only
  return <h1>{user.name}</h1>;
}

// ✅ Correct – copy and then modify
function Child({ user, onUpdate }) {
  const handleUpdate = () => {
    onUpdate({ ...user, name: "New Name" });
  };
  return <button onClick={handleUpdate}>Update</button>;
}// ❌ Warning: Each child needs unique key
{todos.map(todo => <li>{todo.text}</li>)}
// ✅ Correct
{todos.map(todo => <li key={todo.id}>{todo.text}</li>)}11. Quick Cheat Sheet
| Concept | Syntax | Example |
|---|---|---|
| Props | <Child prop={value} /> | <User name="Rahul" /> |
| Props Destructuring | function Child({ prop }) | function User({ name }) |
| Default Props | function Child({ name = "Guest" }) | function Greeting({ name = "Guest" }) |
| Children Prop | {children} | <Card><h1>Title</h1></Card> |
| useState | const [val, setVal] = useState(init) | const [count, setCount] = useState(0) |
| Update Array | setArr([...arr, newItem]) | setTodos([...todos, newTodo]) |
| Update Object | setObj({ ...obj, key: newValue }) | setUser({ ...user, name: "New" }) |
| Functional Update | setVal(prev => prev + 1) | setCount(c => c + 1) |
| Lifting State | State in parent, props to children | TemperatureConverter example |
| Controlled Input | value={state} + onChange={setState} | <input value={name} onChange={e => setName(e.target.value)} /> |
12. FAQ
Q1: React Props State Data Flow Hindi में सबसे important rule क्या है?
Props read-only हैं, State mutable है। Data always top to bottom flow karta है (parent → child).
Q2: State change hone par kya hota hai?
Component re-render hota hai – React automatically UI update kar deta hai।
Q3: Kya main props ko change kar sakta hoon?
Nahi! Props are immutable (read-only). Agar change karna hai toh parent component mein change करो.
Q4: State ko child component mein kaise bhejein?
Props ke through: <Child value={state} onUpdate={setState} />
Q5: Sibling components ke beech data kaise share karein?
Lifting state up – common parent mein state rakho, phir props se dono siblings mein bhejo।
Q6: setState async kyun hai?
Performance ke liye। React multiple setState calls को batch करके ek saath process karta hai।
Q7: Object/array state update kaise karein?
New object/array create करो (spread operator ... use करो) – direct mutate mat करो।
Q8: Prop drilling se kaise bachein?
Context API, Redux, ya component composition (children prop) use करो।
Q9: Controlled vs Uncontrolled components – kya use karein?
Controlled components preferred हैं – React state single source of truth रहता है।
Q10: Kya ek component mein multiple states ho sakti hain?
Haan! useState multiple baar call कर सकते हो। Ya ek object state bana सकते हो।
13. Conclusion
बहुत बढ़िया दोस्तों! आज हमने React Props and State Data Flow Hindi को पूरी detail में समझा।
Quick Recap:
| Concept | Key Takeaway |
|---|---|
| Props | Parent → Child data (read-only) |
| State | Component ka apna memory (mutable) |
| Data Flow | Unidirectional – top to bottom |
| Lifting State Up | Siblings ke liye common parent mein state |
| Controlled Components | Form inputs controlled by React state |
Mera personal experience:
जब मैंने पहली बार props and state समझा, तो मुझे लगा – “इतना simple है React?”। लेकिन जब lifting state up और prop drilling जैसे real scenarios आए, तो थोड़ा मुश्किल लगा। Practice के 2-3 projects के बाद sab clear हो गया।
Tum bhi ye projects zaroor karo:
- ✅ Counter App
- ✅ Todo App
- ✅ Temperature Converter
- ✅ Shopping Cart
अब तुम्हारी बारी है!
नीचे comment में बताओ:
- तुम्हें props ज्यादा easy लगे या state?
- क्या तुमने कभी lifting state up use kiya है?
The Easy Master पर बने रहो। Happy Coding! ⚛️🚀
Resources
- React.dev – State and Props
- React.dev – Lifting State Up
- React.dev – Controlled Components
- W3Schools – React Props
Additional Resources
- Master ES6: A Complete Feature Guide with Examples
- Top 10 React Libraries and Tools Every Developer Must Know in 2025
- Top 10 Free APIs for Practice in 2026
- JavaScript Deep Dive 2026: Closures, Promises & Event Loop
- TypeScript Modules Export Import Best Practices – समझे आसान भाषा में 2026
- React.js Kya Hai? JSX aur Components Samjhe – Beginner Guide 2026