नमस्ते दोस्तों!
स्वागत है The Easy Master पर!
तो आपने Kubernetes में Deployment और Service तो सीख ली। अब आपके पास एक सवाल है – “अगर मेरे पास एक ही domain (example.com) है और मैं उसके अंदर चाहता हूँ कि example.com/store पर store backend जाए और example.com/blog पर blog backend जाए, तो कैसे करूँ?”
बिल्कुल सही सवाल है।
LoadBalancer या NodePort Service एक ही backend को expose कर सकती है। हर backend के लिए अलग IP या port याद रखना annoying है। Ingress यही समस्या solve करता है – यह एक “smart gateway” है जो request को URL path, hostname, header etc. के आधार पर सही backend service में route कर देता है。
Maine jab pehली बार Ingress सीखा था, तो मुझे लगा था: “बस एक और चीज़ seekhni padegi, और कितना complex होगा?” Lekin एक बार समझ आ गया, तो सबसे powerful चीज़ लगी।
इस Kubernetes Ingress tutorial Hindi में मैं आपको सिखाऊंगा:
✅ Ingress kya hai और NodePort/LoadBalancer se कैसे better hai
✅ Ingress Controller – क्यों सिर्फ Ingress resource create karna kaafi nahi hai
✅ Minikube पर NGINX Ingress Controller setup – minikube addons enable ingress
✅ Path-based routing – एक domain पर /api और /web
✅ Host-based routing – api.example.com और www.example.com अलग-अलग backend
✅ TLS/SSL certificates – HTTPS traffic kaise secure karein
✅ Real project example – FastAPI + React app ek Ingress ke neeche
✅ Multiple Ingress controllers और Gateway API का introduction
Chaliye smart HTTP routing seekhte hain! ☸️🌐
Table of Contents
1. Ingress Kya Hai? – Smart HTTP Router
Ingress एक API object hai जो cluster के बाहर से HTTP/HTTPS traffic को cluster ke अंदर services तक route करने के rules define करता है। An Ingress may be configured to give Services externally-reachable URLs, load balance traffic, terminate SSL / TLS, and offer name-based virtual hosting.
Simple definition: Ingress एक Layer 7 (application layer) load balancer है जो URL path, hostname, HTTP headers, etc. के आधार पर traffic route करता है。
Analogy: Ingress एक smart receptionist है। जब कोई आगंतुक आता है (HTTP request), तो यह देखता है कि वह कहाँ जाना चाहता है:
- अगर URL
/storehai → store department (service) में भेजो - अगर URL
/bloghai → blog department में भेजो - अगर hostname
api.example.comhai → API department में भेजो
Ingress के Features:
| Feature | Description |
|---|---|
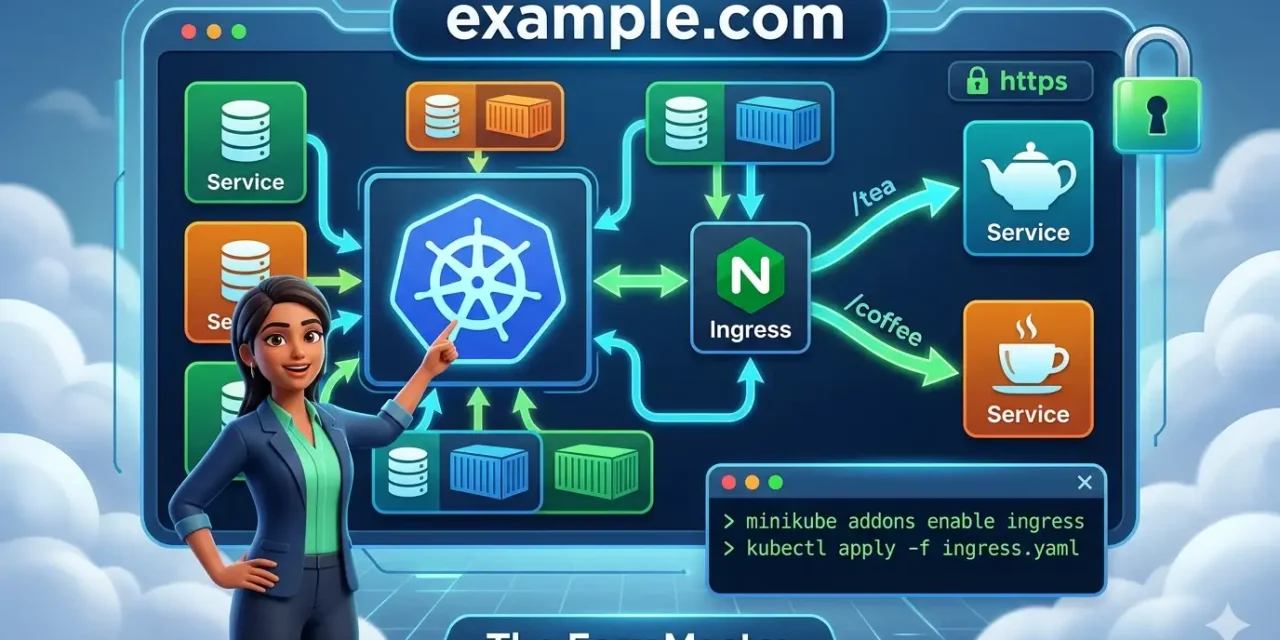
| Path-based routing | example.com/tea → tea service, example.com/coffee → coffee service |
| Host-based routing | api.example.com → API service, www.example.com → frontend service |
| SSL/TLS termination | HTTPS traffic secure किए, certificate management |
| Load balancing | Multiple backend pods ke beech traffic distribute |
| Single IP/Load Balancer | Multiple services ek hi cloud load balancer ke peeche expose |
Ingress API has been frozen and is no longer being developed, with Gateway API being the recommended path forward. But don’t worry – Ingress is still widely used and Kubernetes has no plans to remove it. We’ll cover it thoroughly, and also touch on Gateway API basics.
2. Ingress vs LoadBalancer vs NodePort – Difference Kya Hai?
Kubernetes mein external traffic expose karne ke 3 main तरीके हैं – NodePort, LoadBalancer, and Ingress。 Let’s compare:
| Feature | NodePort | LoadBalancer | Ingress |
|---|---|---|---|
| Protocol | TCP/UDP (Layer 4) | TCP/UDP (Layer 4) | HTTP/HTTPS (Layer 7) |
| Exposes | एक service per high port (30000-32767) | एक service per cloud LB | Multiple services ek hi IP/LB के पीछे |
| Routing logic | None | None | Path, hostname, header, etc. |
| SSL termination | ❌ No | ❌ No (external LB possibly) | ✅ Yes (native) |
| Cost | Free (no external LB) | High (per service LB charges) | Low (single LB for many services) |
| Use case | Local dev, debugging | Production single service, each service needs direct external IP | Production microservices, API gateway, multiple services behind same domain |
Port binding logic: Ingress binding happens at Layer 7 (HTTP/HTTPS), while NodePort works at Layer 4. This allows Ingress to inspect and route based on application data (path, hostname).
Pros and Cons summary:
- NodePort: Simple but high port numbers, not ideal for user-facing apps, every node has same port exposed → more surface area。
- LoadBalancer: Each service gets its own cloud LB and external IP → cost add hota jata hai as number of services grows。
- Ingress: One load balancer can route to dozens of services, provides URL routing and SSL termination, cheaper and more powerful for Layer 7。 As one source notes, “Ingress is the most powerful service type used to expose services, and it only requires you to maintain one load balancer, which can be cheaper.”
Quick Analogy:
- NodePort: Har department का अपना अलग entrance (different port per service)
- LoadBalancer: Har department का अपना अलग building (separate IP per service) – expensive!
- Ingress: एक ही building, एक receptionist जो visitor को department तक guide करता है based on request
3. Ingress Controller – क्यों ज़रूरी है?
IMPORTANT – Most beginners confuse this: सिर्फ Ingress YAML बनाने से kubernetes apne aap traffic route nahi karega。 An Ingress Controller is required to satisfy an Ingress; only creating an Ingress resource has no effect.
Ingress Controller kya hai?
- Ingress Controller ek pod hai jo cluster mein run hota है और ingress rules ko पढ़ता है
- Ye typically Nginx, HAProxy, Traefik, or cloud-specific load balancers use करता है
- Ye external traffic (actual HTTP requests) को accept करता है और rules के अनुसार backend services में forward करता है
- Ismein do parts होते हैं: Ingress resource (rules define karta hai) aur Ingress controller (actual traffic handle karta hai)
Ingress Resource vs Ingress Controller:
- Ingress Resource: एक configuration object (rulebook) –
kubectl apply -f ingress.yaml - Ingress Controller: एक running pod jo rules को implement karta है –
kubectl get pods -n ingress-nginx
Popular Ingress Controllers:
| Controller | Best for |
|---|---|
| NGINX Ingress Controller | Most popular, community maintained, feature-rich |
| Traefik | Dynamic configuration, integrates with cert-manager |
| AWS Load Balancer Controller | AWS EKS users |
| Istio / Gateway API | Advanced service mesh, modern architecture |
The Kubernetes project recommends using Gateway instead of Ingress for new applications, but Ingress is still widely deployed and not going away。 Nevertheless, Ingress remains an important skill for any Kubernetes practitioner.
Kubernetes community recommends using Gateway API instead of Ingress for new applications, as Ingress API has been frozen. We’ll cover Ingress thoroughly (as it’s still widely used), and later give an introduction to Gateway API.
In simple terms: Ingress resource = map (rules). Ingress controller = GPS + driver जो map पढ़ता है और actual directions follow करता है। Without the GPS, the map is useless!
4. Ingress Controller kaise install karein – NGINX setup
Minikube on-board mein ingress addon already hai। minikube addons enable ingress se yeh automatically NGINX Ingress Controller install कर देता है। Real cloud clusters (EKS, GKE, AKS) mein you need to install it manually.
For Minikube (Easiest for learning)
# Enable ingress addon
minikube addons enable ingress

# Verify NGINX Ingress Controller is running (wait up to a minute)
kubectl get pods -n ingress-nginx
Expected output:
NAME                                        READY   STATUS      RESTARTS   AGE
ingress-nginx-admission-create-xxxxx        0/1     Completed   0          1m
ingress-nginx-admission-patch-xxxxx         0/1     Completed   0          1m
ingress-nginx-controller-xxxxxxxxxx-xxxxx   1/1     Running     0          1m
Make sure the main controller pod (ingress-nginx-controller-*) is Running. The admission controller pods may be Completed – that’s normal。
For Real Cluster (EKS/GKE/AKS, or bare-metal)
You can install via Helm (recommended) or raw manifests. Here’s a quick sample using Helm (most common):
# Add NGINX Ingress repo
helm repo add ingress-nginx https://kubernetes.github.io/ingress-nginx
helm repo update

# Install the controller
helm install ingress-nginx ingress-nginx/ingress-nginx
Once installed, you’ll see a LoadBalancer service created, which provides an external IP address for cloud clusters.
kubectl get services should show something like:
NAME                                 TYPE           CLUSTER-IP      EXTERNAL-IP
ingress-nginx-controller             LoadBalancer   10.100.150.5    a1b2c3d4...elb.amazonaws.com
5. Ingress YAML – Rules kaise likhein
Ingress YAML mein do types ke rules main hote hain: path-based और host-based। We’ll see both with examples.
5.1 Path-based Routing Example
apiVersion: networking.k8s.io/v1
kind: Ingress
metadata:
  name: minimal-ingress
spec:
  ingressClassName: nginx
  rules:
  - host: example.com
    http:
      paths:
      - path: /tea
        pathType: Prefix
        backend:
          service:
            name: tea-service
            port:
              number: 80
      - path: /coffee
        pathType: Prefix
        backend:
          service:
            name: coffee-service
            port:
              number: 80
Key Fields Explained:
| Field | Meaning |
|---|---|
apiVersion | Use networking.k8s.io/v1 (stable, no changes expected) |
kind: Ingress | Type of resource |
metadata.name | Ingress object का नाम |
spec.ingressClassName | Kaunsa Ingress controller use karna hai (nginx, traefik, etc.) |
spec.rules | List of routing rules |
rules.host | Domain name – यहाँ example.com। अगर host omitted, all traffic matches |
paths.path | URL path pattern (e.g., /tea, /coffee) |
paths.pathType | Prefix (starts with), Exact (exact match), ImplementationSpecific |
backend.service | Target service ka naam aur port |
5.2 Host-based Routing Example (Virtual Hosting)
apiVersion: networking.k8s.io/v1
kind: Ingress
metadata:
  name: virtual-host-ingress
spec:
  ingressClassName: nginx
  rules:
  - host: api.example.com
    http:
      paths:
      - path: /
        pathType: Prefix
        backend:
          service:
            name: api-service
            port:
              number: 80
  - host: www.example.com
    http:
      paths:
      - path: /
        pathType: Prefix
        backend:
          service:
            name: web-service
            port:
              number: 80
Path Type Details:
| PathType | Behaviour | Example |
|---|---|---|
Exact | URL path exactly match karna chahiye | /tea matches only /tea, not /tea/xyz |
Prefix | URL path prefix match (case-sensitive) | /tea matches /tea, /tea/abc, /tea/abc/xyz |
ImplementationSpecific | Ingress controller decides | Often works like Prefix but depends on controller |
Wildcard Hosts: You can also specify *.example.com to match any subdomain:
- host: "*.example.com"In that case, api.example.com, store.example.com, etc., all route to the same backend。
5.3 Ingress with TLS (HTTPS)
apiVersion: networking.k8s.io/v1
kind: Ingress
metadata:
  name: tls-ingress
spec:
  ingressClassName: nginx
  tls:
  - hosts:
    - secure.example.com
    secretName: tls-secret
  rules:
  - host: secure.example.com
    http:
      paths:
      - path: /
        pathType: Prefix
        backend:
          service:
            name: secure-service
            port:
              number: 80
tls-secret must be created first:
kubectl create secret tls tls-secret --cert=path/to/cert.crt --key=path/to/key.pem6. Hands-On #1 – Minikube par Ingress enable karein aur test karein
Let’s get our hands dirty! We’ll set up two simple apps and route traffic with Ingress.
Step 1: Start Minikube
minikube startStep 2: Enable Ingress Addon
minikube addons enable ingressWait for the NGINX Ingress controller pods to be Running:
kubectl wait --namespace ingress-nginx --for=condition=ready pod --selector=app.kubernetes.io/component=controller --timeout=120sStep 3: Deploy First App (Tea Service)
Create a deployment and service for “tea” backend:
kubectl create deployment tea --image=nginxdemos/hello
kubectl expose deployment tea --port=80 --target-port=80 --type=NodePort
Step 4: Deploy Second App (Coffee Service)
kubectl create deployment coffee --image=nginxdemos/hello
kubectl expose deployment coffee --port=80 --target-port=80 --type=NodePort
Step 5: Create Ingress YAML (ingress.yaml)
apiVersion: networking.k8s.io/v1
kind: Ingress
metadata:
  name: coffee-tea-ingress
spec:
  ingressClassName: nginx
  rules:
  - http:
      paths:
      - path: /tea
        pathType: Prefix
        backend:
          service:
            name: tea
            port:
              number: 80
      - path: /coffee
        pathType: Prefix
        backend:
          service:
            name: coffee
            port:
              number: 80
Step 6: Apply Ingress
kubectl apply -f ingress.yamlStep 7: Test the Ingress
Get the Minikube IP address:
minikube ip
# Usually 192.168.49.2 or similar
Access via curl:
curl http://<minikube-ip>/tea
curl http://<minikube-ip>/coffee
Each request should go to the respective service!
Step 8: Test via Browser or Port Forwarding
# In another terminal, run port-forward
kubectl port-forward --namespace=ingress-nginx service/ingress-nginx-controller 8080:80
Then visit http://localhost:8080/tea and http://localhost:8080/coffee in your browser.
🎉 Congratulations! Your Ingress is routing traffic based on URL path!
7. Hands-On #2 – Path-based routing: /tea aur /coffee
Let’s extend the previous example with a more realistic scenario. We’ll use different Docker images that show which pod handled the request.
Step 1: Use Custom Images with Hostname Display
Instead of the generic nginxdemos/hello, let’s use hashicorp/http-echo for clarity:
kubectl create deployment tea-app --image=hashicorp/http-echo -- -text="Tea service served by pod: $HOSTNAME"
kubectl expose deployment tea-app --port=5678 --target-port=5678kubectl create deployment coffee-app --image=hashicorp/http-echo -- -text="Coffee service served by pod: $HOSTNAME"
kubectl expose deployment coffee-app --port=5678 --target-port=5678Step 2: Update Ingress YAML
apiVersion: networking.k8s.io/v1
kind: Ingress
metadata:
  name: beverage-ingress
spec:
  ingressClassName: nginx
  rules:
  - host: beverages.local
    http:
      paths:
      - path: /tea
        pathType: Prefix
        backend:
          service:
            name: tea-app
            port:
              number: 5678
      - path: /coffee
        pathType: Prefix
        backend:
          service:
            name: coffee-app
            port:
              number: 5678
Step 3: Apply and Test
We need to map beverages.local to Minikube’s IP in /etc/hosts (or on Windows, C:\Windows\System32\drivers\etc\hosts):
192.168.49.2 beverages.localThen:
curl http://beverages.local/tea
curl http://beverages.local/coffee
You should see different text outputs depending on the path!
Step 4: Scale and See Load Balancing
Scale one of the deployments:
kubectl scale deployment tea-app --replicas=3Now multiple pods answer to /tea. Ingress will load-balance among them.
Path Type Nuances: NGINX Ingress controller matches paths by prefix, and the matching is case-sensitive。
8. Hands-On #3 – Host-based routing: cafe.example.com aur tea.example.com
Now let’s route based on hostname rather than path。 This is great for microservices where different subdomains serve different services (e.g., api.example.com, dashboard.example.com, docs.example.com).
Step 1: Deploy Two Different Applications
# Cafe app (main website)
kubectl create deployment cafe --image=nginxdemos/hello
kubectl expose deployment cafe --port=80 --target-port=80

# Tea app (subdomain tea shop)
kubectl create deployment tea-shop --image=nginxdemos/hello
kubectl expose deployment tea-shop --port=80 --target-port=80
Step 2: Create Host-based Ingress YAML (host-ingress.yaml)
apiVersion: networking.k8s.io/v1
kind: Ingress
metadata:
  name: host-based-ingress
spec:
  ingressClassName: nginx
  rules:
  - host: cafe.example.com
    http:
      paths:
      - path: /
        pathType: Prefix
        backend:
          service:
            name: cafe
            port:
              number: 80
  - host: tea.example.com
    http:
      paths:
      - path: /
        pathType: Prefix
        backend:
          service:
            name: tea-shop
            port:
              number: 80
Step 3: Apply Ingress and Update /etc/hosts
kubectl apply -f host-ingress.yamlAdd these entries to your /etc/hosts (or Windows equivalent), using Minikube’s IP:
192.168.49.2 cafe.example.com
192.168.49.2 tea.example.com
Step 4: Test
curl http://cafe.example.com
curl http://tea.example.com
You’ll see different hello pages from each service!
Multiple host entries possible: An Ingress can list multiple host rules, and each host can have its own path configuration.
9. Hands-On #4 – TLS/SSL: HTTPS Ingress secure karein
Security is paramount. Let’s secure our Ingress with HTTPS/TLS。
Step 1: Generate a self-signed certificate (for development / testing)
Do not use self-signed certs in production! For production, use Let’s Encrypt (via cert-manager) or your cloud provider’s certificate service.
# Generate a private key
openssl genrsa -out tls.key 2048

# Generate a Certificate Signing Request (CSR) and a self-signed certificate valid for 365 days
openssl req -new -x509 -key tls.key -out tls.crt -days 365 -subj "/CN=secure.example.com"
Step 2: Create a Kubernetes TLS Secret
kubectl create secret tls secure-tls --key=tls.key --cert=tls.crtVerify the secret:
kubectl get secret secure-tlsStep 3: Create an Ingress with TLS
apiVersion: networking.k8s.io/v1
kind: Ingress
metadata:
  name: tls-demo-ingress
spec:
  ingressClassName: nginx
  tls:
  - hosts:
    - secure.example.com
    secretName: secure-tls
  rules:
  - host: secure.example.com
    http:
      paths:
      - path: /
        pathType: Prefix
        backend:
          service:
            name: coffee
            port:
              number: 80
Step 4: Apply and Update /etc/hosts
kubectl apply -f tls-ingress.yamlAdd to /etc/hosts:
192.168.49.2 secure.example.comStep 5: Test HTTPS connection
curl -k https://secure.example.comThe -k flag skips SSL verification (since we use a self-signed certificate). For real certificates, you would not need -k.
For Production (Let’s Encrypt with cert-manager):
Step 1: Install cert-manager
kubectl apply -f https://github.com/cert-manager/cert-manager/releases/latest/download/cert-manager.yamlStep 2: Create a ClusterIssuer (e.g., Let’s Encrypt staging)
apiVersion: cert-manager.io/v1
kind: ClusterIssuer
metadata:
  name: letsencrypt-prod
spec:
  acme:
    server: https://acme-v02.api.letsencrypt.org/directory
    email: your-email@example.com
    privateKeySecretRef:
      name: letsencrypt-prod
    solvers:
    - http01:
        ingress:
          class: nginx
Step 3: Annotate your Ingress to request a certificate
metadata:
  annotations:
    cert-manager.io/cluster-issuer: "letsencrypt-prod"
Then cert-manager automatically provisions the certificate, renews it before expiry, and rotates the secret. This is the production standard!
10. Real Project – FastAPI backend + React frontend ek Ingress ke neeche
Now for a real-life scenario: You have a FastAPI backend on /api and a React frontend on /, both served via the same Ingress.
Step 1: Build and Push Docker Images (or use local for Minikube)
# Dockerfile for FastAPI backend
FROM python:3.11-slim
WORKDIR /app
COPY requirements.txt .
RUN pip install fastapi uvicorn
COPY . .
CMD ["uvicorn", "main:app", "--host", "0.0.0.0", "--port", "8000"]# Dockerfile for React frontend (nginx serving static build)
FROM node:18 AS build
WORKDIR /app
COPY package*.json .
RUN npm install
COPY . .
RUN npm run build
FROM nginx:alpine
COPY --from=build /app/build /usr/share/nginx/html
EXPOSE 80Step 2: Deploy Backend and Frontend in Kubernetes
# Backend deployment + service (ClusterIP)
kubectl create deployment fastapi-backend --image=yourrepo/fastapi-app
kubectl expose deployment fastapi-backend --port=8000 --target-port=8000

# Frontend deployment + service (ClusterIP)
kubectl create deployment react-frontend --image=yourrepo/react-app
kubectl expose deployment react-frontend --port=80 --target-port=80
Step 3: Single Ingress that routes both
apiVersion: networking.k8s.io/v1
kind: Ingress
metadata:
  name: fullstack-ingress
spec:
  ingressClassName: nginx
  rules:
  - host: app.example.com
    http:
      paths:
      - path: /api
        pathType: Prefix
        backend:
          service:
            name: fastapi-backend
            port:
              number: 8000
      - path: /
        pathType: Prefix
        backend:
          service:
            name: react-frontend
            port:
              number: 80
Order matters: The /api path must be listed before / because the / rule is a catch-all。 NGINX Ingress evaluates paths in order.
Step 4: Access the complete app
app.example.com/→ React frontend (your UI)app.example.com/api→ FastAPI backend endpoints- Your frontend can make API calls to
/api/notes, etc., without CORS issues
This is exactly how many production microservices architectures work – all services exposed under a single domain, with a smart Ingress router directing traffic to the right backend service!
11. Common Mistakes (aur Unka Solution!)
| Mistake | Why it’s wrong | Solution |
|---|---|---|
| Forgetting to install Ingress Controller | Ingress resource exists but traffic never routes | Install NGINX controller: kubectl apply -f https://... or minikube addons enable ingress |
Missing ingressClassName | Older clusters may default to no controller | Explicitly specify spec.ingressClassName: nginx |
| Service selector mismatch | Service finds no endpoints, Ingress gets 503 errors | Verify service selectors match pod labels |
| Path order matters | Ingress may route /api to default backend if / rule comes first | Put more specific paths above general ones |
| Using NodePort Service type | While possible, not needed for Ingress – Ingress works best with ClusterIP Services | Use ClusterIP for services behind Ingress |
| TLS secret not in same namespace as Ingress | Secret not found; Ingress fails to start TLS | Keep secret in same namespace |
| Wrong pathType | Use Exact when you need Prefix, or vice versa | Know your use case: Exact for exact string matching, Prefix for subtree |
| Misconfigured default backend | No fallback for unmatched routes, users see 404 | Define a defaultBackend in Ingress spec |
| Host header mismatch in testing | Using IP address directly, host-based rules won’t match | Use curl -H "Host: example.com" http://<ip> or modify /etc/hosts |
| Annotations on wrong Ingress | Some controllers require specific annotations to work correctly | Check controller docs; for NGINX, use nginx.ingress.kubernetes.io/rewrite-target etc. |
| Not setting up admission webhook | Errors in Ingress YAML not caught before apply | Wait for the admission controller pod to be ready (it may initially be pending) |
💡 Personal Experience: I once wasted hours debugging an Ingress that kept returning 404. The issue was that I had enabled the ingress addon, but the admission controller pod was stuck in Pending state because my Minikube cluster was out of resources. After increasing CPU and memory for the cluster, everything worked beautifully. Always check pod status:
kubectl get pods -n ingress-nginx!
Another common pitfall: Forgetting to update your local /etc/hosts when using host-based routing. You can also use curl with the -H flag: curl -H "Host: myapp.example.com" http://<minikube-ip>/ to test without modifying /etc/hosts.
12. Multiple Ingress Controllers aur Ingress Class
In real-world clusters, you might have multiple ingress controllers (e.g., one for internal traffic, one for external). Use IngressClass resources to choose which controller handles which Ingress。
Why multiple controllers?
- NGINX for HTTP/HTTPS traffic
- Traefik for advanced routing with middleware
- AWS Load Balancer Controller for integration with AWS ALB
- Internal vs external: One for public traffic, another for internal services
Define an IngressClass
apiVersion: networking.k8s.io/v1
kind: IngressClass
metadata:
  name: nginx-internal
spec:
  controller: nginx.org/ingress-controller
Then reference it in your Ingress: spec.ingressClassName: nginx-internal。
This keeps your cluster organized especially when you have hundreds of ingress resources。
Default IngressClass
You can mark one as default so that any Ingress without ingressClassName uses it:
metadata:
  annotations:
    ingressclass.kubernetes.io/is-default-class: "true"
13. Gateway API – Ingress ka future kya hai?
The Ingress API has been frozen and is no longer being developed. The Kubernetes project now recommends using Gateway API instead, which provides more powerful, modular, and role-oriented ways to manage ingress traffic。
Gateway API key differences:
- Role-based resources: GatewayClass, Gateway, HTTPRoute, etc.
- Cross-namespace routing: Route traffic to services in different namespaces
- Better protocol support: gRPC, WebSockets, etc.
- More extensible: With custom policies
Gateway API example (very brief):
apiVersion: gateway.networking.k8s.io/v1
kind: HTTPRoute
metadata:
  name: http-route
spec:
  parentRefs:
  - name: my-gateway
  rules:
  - matches:
    - path:
        type: PathPrefix
        value: /tea
    backendRefs:
    - name: tea-service
      port: 80
But don’t worry – Ingress is still stable, widely used, and won’t be removed from Kubernetes. You should learn Ingress first, and gradually learn Gateway API when you’re ready.
Ingress API has been frozen, but Kubernetes has no plans to remove it, so learning Ingress is still valuable.
14. Resources – Cheat Sheet & Practice Prompts
Ingress YAML Skeleton
apiVersion: networking.k8s.io/v1
kind: Ingress
metadata:
  name: my-ingress
  annotations:
    nginx.ingress.kubernetes.io/rewrite-target: /
spec:
  ingressClassName: nginx
  tls:
  - hosts:
    - secure.example.com
    secretName: tls-secret
  rules:
  - host: example.com
    http:
      paths:
      - path: /api
        pathType: Prefix
        backend:
          service:
            name: api-service
            port:
              number: 80
      - path: /
        pathType: Prefix
        backend:
          service:
            name: default-service
            port:
              number: 80
  defaultBackend:
    service:
      name: fallback-service
      port:
        number: 80
Essential Commands Cheat Sheet
| Task | Command |
|---|---|
| Enable Ingress in Minikube | minikube addons enable ingress |
| Verify Ingress controller running | kubectl get pods -n ingress-nginx |
| Create Ingress from file | kubectl apply -f ingress.yaml |
| List Ingress resources | kubectl get ingress |
| Describe Ingress | kubectl describe ingress <name> |
| Edit Ingress | kubectl edit ingress <name> |
| Delete Ingress | kubectl delete ingress <name> |
| Delete Ingress from file | kubectl delete -f ingress.yaml |
| View Ingress YAML | kubectl get ingress <name> -o yaml |
| Get Minikube IP | minikube ip |
| Port-forward to test Ingress | kubectl port-forward -n ingress-nginx service/ingress-nginx-controller 8080:80 |
| Create TLS secret | kubectl create secret tls <name> --key=tls.key --cert=tls.crt |
Useful NGINX Ingress Annotations
| Annotation | Purpose |
|---|---|
nginx.ingress.kubernetes.io/rewrite-target: / | Rewrite path for backend services |
nginx.ingress.kubernetes.io/ssl-redirect: "true" | Force HTTPS redirect |
nginx.ingress.kubernetes.io/limit-rps: "10" | Rate limit requests per second |
nginx.ingress.kubernetes.io/cors-allow-origin: "*" | Enable CORS |
nginx.ingress.kubernetes.io/proxy-body-size: "50m" | Increase max upload size |
Practice Prompts
Beginner:
- Minikube start karo, ingress addon enable करके verify karo। Two hello-world deployments create karo (
app1,app2)। Path-based Ingress YAML likho:/app1→app1-service,/app2→app2-service।curlसे test karo।
Intermediate:
- Self-signed certificate generate karo aur TLS secret create karo। Ingress YAML mein TLS section add karo।
curl -k https://...से test karo HTTPS working correctly。cert-manager (Let’s Encrypt staging) se automatic certificate provisioning try karo।
Advanced:
- Multiple Ingress controllers install karo (NGINX + Traefik) aur IngressClass resource define karo। Different Ingresses को different controllers में route करो। Gateway API (experimental) install karo aur simple HTTPRoute create karo for
/coffee。
15. FAQ
Q1: Ingress Controller aur Ingress resource mein kya antar hai?
Ingress resource ek configuration object hai jo rules define karta hai (e.g., YAML file)। Ingress Controller ek running pod hai jo rules ko implement karta है और actual traffic handle karta hai। Without a controller, the Ingress resource has no effect.
Q2: Kya Ingress LoadBalancer Service ki jagah le sakta hai?
Ingress Layer 7 (HTTP/HTTPS) पर काम करता है, jabki LoadBalancer Layer 4 (TCP/UDP) पर। Ingress एक LoadBalancer ke पीछे run होता है – they are complementary, not replacements। For non-HTTP traffic (e.g., database, gRPC, WebSockets), LoadBalancer or NodePort is more appropriate.
Q3: Ek hi cluster mein multiple Ingress Controllers kaise use karein?
Define an IngressClass resource for each controller, and specify spec.ingressClassName: <class-name> in your Ingress resources। This allows different teams or applications to use different ingress controllers.
Q4: Minikube ingress pods “Pending” state mein stuck kyun hain?
Usually resource constraints – insufficient CPU/memory on the Minikube node। Try minikube stop, minikube delete, then minikube start --cpus=4 --memory=8192 to allocate more resources. Also verify Docker is running and you have connectivity.
Q5: Path-based routing ke time backend service mein base path rewrite kaise karein?
Use the nginx.ingress.kubernetes.io/rewrite-target annotation。 Example: /api(/|$)(.*) → $2 etc. This strips the /api prefix before forwarding to the backend service。
Q6: Kya Ingress Gateway API ka future hai?
Ingress API has been frozen and Gateway API is the recommended path for new applications and advanced use cases। However, Ingress will not be removed from Kubernetes and remains stable and widely used. Learn Ingress now, then start exploring Gateway API。
Q7: TLS certificate automatically renew kaise hota hai (production mein)?
Install cert-manager, create a ClusterIssuer (e.g., Let’s Encrypt), and annotate your Ingress with cert-manager.io/cluster-issuer। cert-manager auto-renews certificates before expiry and updates the secret।
Q8: Ingress ke andar default backend kya hota hai?
A default backend handles unmatched requests (when no rule matches). It’s like a 404 handler that you control completely – can return a custom page or an error service।
16. Conclusion – Ab Aapki Baari!
Bahut badhiya! Aapne aaj seekh liya:
✅ Kubernetes Ingress tutorial Hindi – complete guide with hands-on
✅ Ingress vs LoadBalancer vs NodePort – kab kaunsa use karna hai
✅ Ingress Controller – kyun zaroori hai aur kaise install karein
✅ Path-based aur host-based routing – real YAML examples
✅ Minikube par Ingress enable karke first test
✅ TLS/SSL – self-signed aur Let’s Encrypt production certificates
✅ Real project – FastAPI + React ek Ingress ke neeche
✅ Common mistakes aur best practices
✅ Multiple Ingress controllers, IngressClass, Gateway API introduction
Ingress is an essential skill for any cloud-native developer. Ab aap multiple services को एक domain के under expose कर सकते हो, SSL terminate kar सकते हो, aur production-like HTTP routing set up kar सकते हो।
Aapki challenge: Minikube cluster पर Ingress enable karo, do different apps deploy karo, aur path-based ingress create karo (/app1 और /app2)। HTTPS test karo self-signed certificate ke saath। Apna experience comment mein share karo!
Next topic kya chahiye?
- Kubernetes ConfigMaps & Secrets (Configuration Management)?
- Persistent Volumes (Stateful Applications)?
- Helm Charts – Package manager for Kubernetes?
- Service Mesh – Istio or Linkerd introduction?
Comment mein batao!
The Easy Master ke saath Kubernetes seekhte raho। Happy routing! ☸️🚀
Resources
- Ingress – Kubernetes Official Documentation
- Ingress Controllers – Kubernetes
- Set up Ingress on Minikube with NGINX Ingress Controller
- NGINX Ingress Controller Installation Guide
- Gateway API – Official Site
- cert-manager – Let’s Encrypt integration
Additional Resources
- MongoDB Setup – CRUD Operations समझे (Beginner Guide) 2026
- MongoDB Compass से GUI Database Manage करने का आसान तरीका | Beginner Tutorial 2026
- Node.js MongoDB Connection – Mongoose Setup समझे 2026
- MongoDB Data Modeling – Embedded Documents vs References 2026
- MongoDB Indexing – Query Speed बढ़ने करने का आसान तरीका
- MongoDB Aggregation Pipeline – Stages समझे | Practical Examples
- Express MongoDB CRUD – Complete REST API Example
- Mongoose ODM – Schema, Model, and Validation समझे 2026
- MongoDB Atlas – Cloud Database Free में Deploy करें 2026
- JWT Authentication MongoDB – User Login System कैसे बनाएं 2026
- Next.js App Router – Pages Router से क्या बदला? Complete Guide 2026
- Next.js Server Components – ‘use client’ कब और कहां Use करें
- Next.js Routing – Layouts, Dynamic Routes and Nested Routes 2026
- Next.js 16 New Features – Turbopack, Cache Components and proxy.ts
- Next.js Partial Prerendering – Static and Dynamic Content साथ में
- Next.js Authentication – JWT Session Management (App Router) 2026
- Next.js SEO – Metadata API and Image Optimization समझे 2026
- Next.js TypeScript – Full-Stack Type-Safe App कैसे बनाएं
- FastAPI Kya Hai? FastAPI Python Setup Aur Pehla API Hindi 2026
- FastAPI Path Parameters Hindi – शून्य से हीरो तक गाइड 2026
- Pydantic v2 Tutorial Hindi – Data Validation Master 2026
- FastAPI dependency injection Hindi – Code Reuse Ka Magic
- FastAPI Async Await Hindi – Non-Blocking Code 2026
- FastAPI PostgreSQL SQLModel Hindi – Async Guide 2026
- FastAPI JWT Authentication Hindi – Secure API Login
- FastAPI OpenAI Integration Hindi – AI Chatbot API 2026
- FastAPI Multi-Agent AI Hindi – LangGraph Zero to Hero
- FastAPI Deployment Hindi – Railway Zero to Hero 2026
- Docker Introduction in Hindi? Containers vs Virtual Machines
- Docker Images and Containers Hindi – Pehla Container
- Docker Compose Tutorial Hindi – Node.js + MongoDB
- Docker Volumes Networking Hindi – Data Persist कैसे करें
- Kubernetes Architecture Hindi – Pods, Nodes, Cluster
- Minikube Tutorial Hindi – Local Cluster कैसे बनाए
- Kubernetes Deployments Services Hindi – App Expose Karein
Views: 237