नमस्ते दोस्तों!
स्वागत है The Easy Master पर!
तो आपने Minikube से local Kubernetes cluster बना लिया, kubectl चलाना सीख लिया। अब next step – अपने app को Kubernetes में deploy कैसे करें और दुनिया के सामने expose कैसे करें?
आपने simple kubectl create deployment और kubectl expose चलाया होगा। Lekin production mein aise commands nahi chalte. You need declarative YAML files – जहाँ आप बताते हो “मुझे 3 replicas चाहिए, हर pod ko 1 CPU limit चाहिए, service port 80 se external traffic mile”.
Maine jab pehli baar production-grade Deployment लिखी, to mujhe laga – “इतने सारे fields: replicas, selector, template, ports, targetPort… क्या-क्या है?” Par ek ek karke jab practice ki, tab sab clear ho gaya.
इस Kubernetes deployments services Hindi article mein main aapko practical examples ke saath sikhata hoon:
✅ Deployment kya hai? – Pods ka manager, desired state maintain karta hai
✅ Deployment YAML – apiVersion, kind, metadata, spec, template, selector, replicas
✅ Scale & Rolling Updates – kubectl scale aur kubectl rollout
✅ Service kya hai? – Pods ko stable endpoint provide karna
✅ Service types – ClusterIP (internal), NodePort (external dev), LoadBalancer (cloud), ExternalName
✅ Service YAML – selector, ports, targetPort, protocol
✅ Hands-On examples – Nginx Deployment + NodePort Service + LoadBalancer
✅ Real project – FastAPI app deploy and expose
Chaliye shuru karte hain production-grade Kubernetes manifest likhna! ☸️
Table of Contents
1. Deployment – Pods Ka Manager
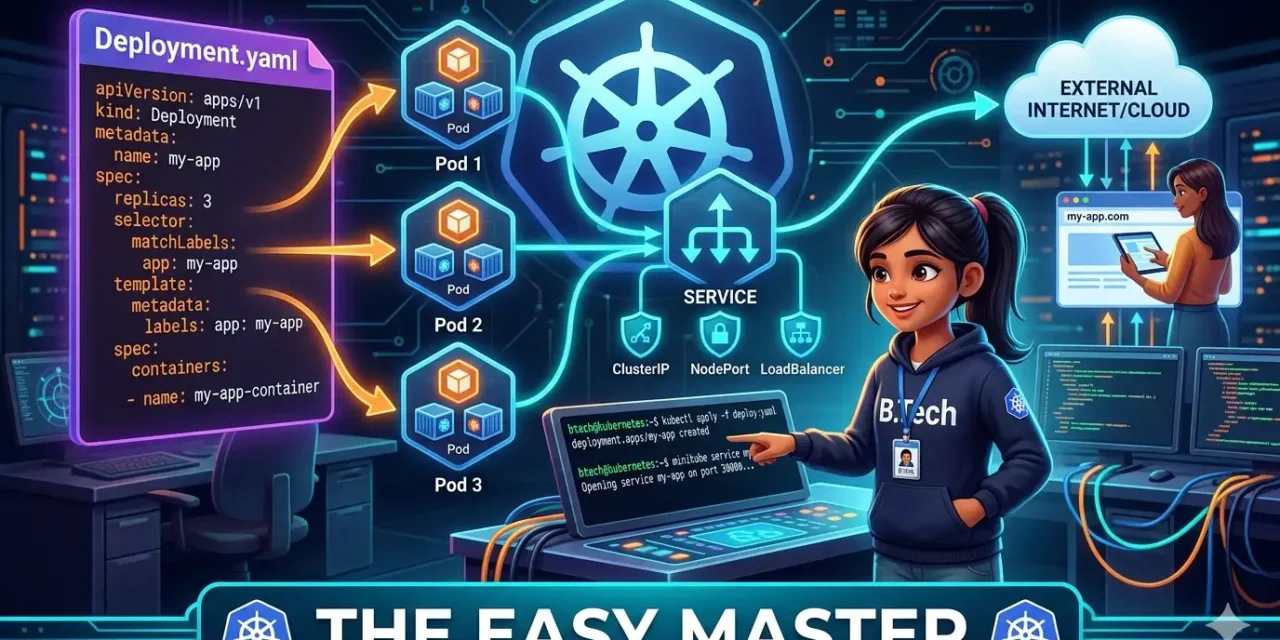
Deployment Kubernetes ka ek workload resource hai jo Pods aur ReplicaSets ko manage karta hai.
Simple words mein:
Aap Deployment YAML mein likhte ho – “Mujhe nginx image ke 3 pods chahiye, har pod mein 1 CPU limit rahe, rolling update ke time max 1 pod down rahe”. Deployment fir ensure karta hai ki hamesha exactly 3 pods running रहें – chahe pod fail ho ya node down ho।
Deployment एक desired state (वांछित स्थिति) declare karta hai, aur controller उस desired state को achieve और maintain करता है। Pods को directly नहीं बनाते, हमेशा Deployment या StatefulSet use करते हैं।
Why Deployment, not bare Pods?
| Bare Pod | Deployment |
|---|---|
| Pod delete हुआ तो recreate नहीं होगा | Automatically recreates failed pods |
| Scaling manual | replicas field se auto scaling |
| Rolling updates possible nahi | Rolling updates, rollbacks built-in |
| No self-healing | Self-healing by ReplicaSet |
Deployments represent a set of multiple, identical Pods with no unique identities. A Deployment runs multiple replicas of your application and automatically replaces any instances that fail or become unresponsive.
Analogy: Deployment = restaurant manager. आप manager को बताते हो “5 waiters chahiye”. Agar ek waiter बीमार हो जाए, manager automatically नया waiter लगा देता है।
Deployments create ReplicaSets, which are the lower-level controllers actually maintaining the pod count. The Deployment then manages the ReplicaSet, enabling rolling updates and rollbacks.
2. Deployment YAML – Har Field Samjhein
Chaliye ek basic Nginx Deployment ka YAML dekhte hain aur har field ko samajhte hain:
apiVersion: apps/v1
kind: Deployment
metadata:
  name: nginx-deployment
  labels:
    app: nginx
spec:
  replicas: 3
  selector:
    matchLabels:
      app: nginx
  template:
    metadata:
      labels:
        app: nginx
    spec:
      containers:
      - name: nginx
        image: nginx:1.25
        ports:
        - containerPort: 80
Line by line explanation:
| Field | Meaning |
|---|---|
apiVersion: apps/v1 | Kubernetes API version for Deployments (stable) |
kind: Deployment | Type of Kubernetes resource |
metadata.name | Deployment का नाम |
metadata.labels | Deployment को identify करने के लिए labels |
spec.replicas | Kitne identical pods chahiye |
spec.selector.matchLabels | Deployment किन pods को manage karega – ये labels template के labels से match होने चाहिए |
spec.template | Pod template – har pod ki specification |
spec.template.metadata.labels | Pods ke labels (selector से match hone chahiye) |
spec.template.spec.containers | Pod ke andar kon kon se containers चलेंगे |
containers.name | Container ka naam |
containers.image | Container image (Docker Hub से pull) |
containers.ports.containerPort | Container किस port पर listen कर रहा है (just documentation) |
Important:
spec.selectorMUST match the labels inspec.template.metadata.labels. Agar mismatch hua to Deployment error dega.
Optional but useful fields:
| Field | Purpose |
|---|---|
strategy.type | RollingUpdate (default) ya Recreate |
rollingUpdate.maxSurge | Rolling update के दौरान desired से कितने extra pods allowed |
rollingUpdate.maxUnavailable | Rolling update के दौरान कितने pods unavailable ho sakte hain |
containers.resources.requests | Minimum CPU/memory guarantee |
containers.resources.limits | Maximum CPU/memory |
containers.env | Environment variables |
containers.livenessProbe | Check if container is alive |
containers.readinessProbe | Check if container is ready to serve traffic |
3. Hands-On #1 – Pehla Deployment Create Karein (YAML se)
Minikube cluster chalu hai maan ke ( minikube start ), ab hum apna pehla Deployment YAML se banayenge.
Step 1: Create YAML File
nginx-deployment.yaml naam se file banayein:
apiVersion: apps/v1
kind: Deployment
metadata:
  name: nginx-deploy
  labels:
    app: nginx
spec:
  replicas: 2
  selector:
    matchLabels:
      app: nginx
  template:
    metadata:
      labels:
        app: nginx
    spec:
      containers:
      - name: nginx
        image: nginx:1.25
        ports:
        - containerPort: 80
Step 2: Apply the Deployment
kubectl apply -f nginx-deployment.yamlStep 3: Verify Deployment Status
kubectl get deployments
kubectl get pods
Output:
NAME            READY   UP-TO-DATE   AVAILABLE   AGE
nginx-deploy    2/2     2            2           30s

NAME                             READY   STATUS    RESTARTS   AGE
nginx-deploy-7c9796fd6d-6q2z8    1/1     Running   0          30s
nginx-deploy-7c9796fd6d-8j3s9    1/1     Running   0          30s
Step 4: See Deployment Details
kubectl describe deployment nginx-deployIsse saari information milegi – events, replicas, pods, etc.
Step 5: Delete the Deployment (Clean up)
kubectl delete -f nginx-deployment.yamlYa:
kubectl delete deployment nginx-deploy💡 Pro Tip: YAML files को Git में रखो – Infrastructure as Code (IaC)।
kubectl apply -fसे declarative management होता है। Imperative commands (kubectl create deployment) sirf learning ke liye use karo।
4. Scale Karna aur Rolling Updates
4.1 Scaling Replicas
Method 1: kubectl scale command (imperative)
kubectl scale deployment nginx-deploy --replicas=5Verify:
kubectl get pods
# 5 pods running now
Method 2: Edit YAML and re-apply (declarative)
YAML mein replicas: 5 karo aur kubectl apply -f nginx-deployment.yaml चलाओ।
4.2 Rolling Update
Change image version to nginx:1.26
kubectl set image deployment/nginx-deploy nginx=nginx:1.26Ya YAML edit karo: image: nginx:1.26 and kubectl apply -f nginx-deployment.yaml.
During rolling update:
- Old pods gradually terminate, new pods start
- Default strategy:
maxSurge=25%,maxUnavailable=25%(for 2 replicas, 1 pod replaced at a time) - Zero downtime update!
Check rollout status:
kubectl rollout status deployment nginx-deploy4.3 Rollback to Previous Version
kubectl rollout history deployment nginx-deploy
kubectl rollout undo deployment nginx-deploy
4.4 Pause and Resume Rollout
kubectl rollout pause deployment nginx-deploy
# make multiple changes (image, env, etc.)
kubectl rollout resume deployment nginx-deploy
💡 Personal Experience: Once I used
kubectl set imagewithout checking the image tag. The new image had a bug, and the rollout got stuck. Usingkubectl rollout undosaved me. Always test images first in staging, and usekubectl rollout statusto monitor.
5. Service – Stable Endpoint Pods Ke Liye
Pod ephemeral होते हैं – unka IP address change हो सकता है, pod delete/restart हो सकता है। Service एक stable network endpoint provide karti hai जो pods ke set को represent kare।
Service kya karta hai:
- Pods को एक stable IP address और DNS name देती है
- Traffic को matching pods के बीच load balance करती है
- Service discovery enable karti है (Kubernetes DNS)
A service is a method for exposing a network application that is running as one or more Pods in your cluster. It is an abstraction which defines a logical set of Pods and a policy by which to access them.
Kyun Service zaroori hai?
| Problem | Solution |
|---|---|
| Pod IP changes on restart | Service provides stable ClusterIP |
| Multiple pods (replicas) | Service load balances traffic |
| Access from outside cluster | NodePort or LoadBalancer type |
| Service discovery | Kubernetes DNS resolves service names |
Service types:
| Type | Access scope | Use case |
|---|---|---|
| ClusterIP | Only inside cluster | Internal microservice communication |
| NodePort | Cluster node IP + static port | Development, external access without cloud LB |
| LoadBalancer | Cloud provider LB | Production external access (AWS, GCP, Azure) |
| ExternalName | Maps to external DNS | Accessing external services |
A ClusterIP service is the default Kubernetes service. It gives you a service inside your cluster that other apps inside your cluster can access. A NodePort service is the most primitive way to get external traffic directly to your service. A LoadBalancer service is the standard way to expose a service to the internet in a cloud environment.
For Minikube, we can use NodePort or simulate LoadBalancer with minikube tunnel。
6. Service Types – ClusterIP, NodePort, LoadBalancer, ExternalName
6.1 ClusterIP (Default)
Only reachable from within the cluster. Best for internal services – database, backend API (accessed by other pods).
apiVersion: v1
kind: Service
metadata:
  name: my-backend
spec:
  type: ClusterIP
  selector:
    app: my-app
  ports:
    - protocol: TCP
      port: 8080          # Service port
      targetPort: 80      # Pod container port
6.2 NodePort
Exposes the service on each node’s IP at a static port (30000-32767). Good for local development and testing.
apiVersion: v1
kind: Service
metadata:
  name: my-web
spec:
  type: NodePort
  selector:
    app: web
  ports:
    - port: 80
      targetPort: 80
      nodePort: 30001      # Optional, else random
Access: http://<node-ip>:30001
6.3 LoadBalancer
Provisions a cloud load balancer (AWS ELB, GCP LB, Azure LB). External IP assign होता है। Production standard.
apiVersion: v1
kind: Service
metadata:
  name: my-app
spec:
  type: LoadBalancer
  selector:
    app: my-app
  ports:
    - port: 80
      targetPort: 8080
For Minikube, run minikube tunnel to get an external IP for LoadBalancer services.
6.4 ExternalName
Maps service to external DNS name (no selectors).
apiVersion: v1
kind: Service
metadata:
  name: external-db
spec:
  type: ExternalName
  externalName: database.example.com
Other pods can now reach external-db internally as if it were a cluster service.
Selecting the Right Type
| Scenario | Service Type |
|---|---|
| Database accessed only by backend pods | ClusterIP |
| Expose API for external users in cloud | LoadBalancer |
| Local development on Minikube | NodePort |
| Access third-party API inside cluster | ExternalName |
| Internal monitoring dashboard (restricted) | ClusterIP + Ingress (later) |
7. Service YAML – Selector, Ports, TargetPort
Let’s break down a Service YAML:
apiVersion: v1
kind: Service
metadata:
  name: my-service
  labels:
    app: my-app
spec:
  type: NodePort
  selector:
    app: my-app          # Must match pod labels
    tier: backend        # Additional label matching
  ports:
  - name: http
    protocol: TCP
    port: 80             # Port that service listens on
    targetPort: 8080     # Port on pod containers
    nodePort: 30080      # Only for NodePort (30000-32767)
Important fields explained:
| Field | Meaning |
|---|---|
selector | लेबल्स जो pods को filter करती हैं – service traffic वहीं pods को भेजेगी |
ports.port | Service का port – cluster mein doosre services इस port से access karengi |
ports.targetPort | Pod container ka actual port (usually matches containerPort in Deployment) |
ports.nodePort | NodePort type mein host node ka port (if omitted, auto-assign 30000-32767) |
ports.protocol | TCP or UDP (default TCP) |
ports.name | Optional, but useful for multi-port services |
Key point: Service selector must match the labels you defined in your Pod template (spec.template.metadata.labels). Otherwise, the service will have no endpoints and traffic will go nowhere.
Check endpoints of a service:
kubectl get endpoints <service-name>This shows which pod IPs are currently behind the service.
8. Hands-On #2 – NodePort Service se App Expose Karein
We have the nginx-deploy Deployment running with 2 replicas. Let’s expose it using a NodePort service.
Step 1: Create Service YAML
nginx-service.yaml:
apiVersion: v1
kind: Service
metadata:
  name: nginx-service
spec:
  type: NodePort
  selector:
    app: nginx
  ports:
    - protocol: TCP
      port: 80
      targetPort: 80
      nodePort: 30080    # optional; remove for random
Step 2: Apply Service
kubectl apply -f nginx-service.yamlStep 3: Check Service
kubectl get servicesOutput:
NAME            TYPE        CLUSTER-IP     EXTERNAL-IP   PORT(S)        AGE
nginx-service   NodePort    10.100.150.5   <none>        80:30080/TCP   5s
Step 4: Access the App
Using Minikube:
minikube service nginx-serviceThis automatically opens the Nginx welcome page in your browser.
Or manually:
minikube ip
# output: 192.168.49.2
curl http://192.168.49.2:30080
You should see the Nginx welcome page.
Step 5: Scale to See Load Balancing
kubectl scale deployment nginx-deploy --replicas=3Now hit the service multiple times – traffic will be load-balanced across the 3 pods. Check logs per pod to see distribution.
Step 6: Clean Up
kubectl delete -f nginx-service.yaml
kubectl delete -f nginx-deployment.yaml
9. Hands-On #3 – LoadBalancer Service (Minikube Tunnel)
In Minikube, LoadBalancer type works via minikube tunnel – it assigns an external IP accessible from your host.
Step 1: Create LoadBalancer Service YAML
nginx-lb-service.yaml:
apiVersion: v1
kind: Service
metadata:
  name: nginx-lb
spec:
  type: LoadBalancer
  selector:
    app: nginx
  ports:
    - protocol: TCP
      port: 80
      targetPort: 80
Step 2: Apply Service
kubectl apply -f nginx-lb-service.yamlStep 3: Run Minikube Tunnel (in a separate terminal)
minikube tunnelKeep this terminal running. It will request sudo password on first run.
Step 4: Get External IP
kubectl get servicesAfter tunnel is running, the EXTERNAL-IP column will show an IP (e.g., 127.0.0.1 or a local IP). For Minikube, it might show 127.0.0.1.
Step 5: Access the App
curl http://127.0.0.1Or open browser at http://127.0.0.1. You’ll see the Nginx page.
Step 6: Clean Up
kubectl delete service nginx-lb
# Stop tunnel with Ctrl+C in its terminal
💡 Note: Real cloud clusters (EKS, GKE, AKS) automatically provision cloud load balancers when you create a LoadBalancer service. Minikube tunnel simulates that for local testing.
10. Selector Labels – Service Pods Ko Kaise Find Karti Hai
The magic of service-to-pod connection is through labels and selectors.
How it works:
- You add labels to your Pods (via Deployment template)
- Service defines a
selectorwith the same label key-value pairs - Kubernetes control plane watches pods with matching labels and updates service endpoints automatically
Example:
Deployment pod template labels:
template:
  metadata:
    labels:
      app: my-app
      tier: backend
      version: v2
Service selector:
selector:
  app: my-app
  tier: backend
The service will route traffic to all pods having both labels app: my-app AND tier: backend, regardless of their IP addresses or state.
View endpoints (actual pod IPs) behind a service:
kubectl get endpoints <service-name>This list updates automatically as pods are added/removed.
Label Tips:
- Use meaningful label names:
app,tier,environment,version - Labels are key-value pairs – can be used for grouping, selection, and rollouts
- Service selector is not the same as Deployment selector (Deployment selector matches pods it manages; Service selector matches pods it routes to)
Common mistake: Forgetting to add labels to pod template, or mismatching label keys. Then service has 0 endpoints.
11. Real Project – FastAPI App + Deployment + Service
Let’s deploy a real FastAPI app with a Deployment and expose it via NodePort service.
Step 1: FastAPI App Code
Create main.py:
from fastapi import FastAPI
import os

app = FastAPI()

@app.get("/")
def root():
    return {"message": "Namaste from Kubernetes! 🐳", "pod": os.getenv("HOSTNAME", "unknown")}

@app.get("/health")
def health():
    return {"status": "healthy"}
Step 2: Dockerfile
FROM python:3.11-slim
WORKDIR /app
COPY requirements.txt .
RUN pip install --no-cache-dir -r requirements.txt
COPY . .
CMD ["uvicorn", "main:app", "--host", "0.0.0.0", "--port", "8000"]requirements.txt:
fastapi
uvicorn
Step 3: Build and Push Image (or use local with Minikube’s docker-env)
Option A – Use Minikube’s Docker daemon:
eval $(minikube docker-env)
docker build -t fastapi-app:latest .
Option B – Push to Docker Hub (for real clusters).
Step 4: Create Deployment YAML (fastapi-deploy.yaml)
apiVersion: apps/v1
kind: Deployment
metadata:
  name: fastapi-deploy
spec:
  replicas: 3
  selector:
    matchLabels:
      app: fastapi
  template:
    metadata:
      labels:
        app: fastapi
    spec:
      containers:
      - name: fastapi
        image: fastapi-app:latest
        imagePullPolicy: Never   # Because we built locally in Minikube’s docker-env
        ports:
        - containerPort: 8000
        resources:
          requests:
            memory: "128Mi"
            cpu: "100m"
          limits:
            memory: "256Mi"
            cpu: "200m"
        livenessProbe:
          httpGet:
            path: /health
            port: 8000
          initialDelaySeconds: 15
          periodSeconds: 20
Step 5: Create Service YAML (fastapi-service.yaml)
apiVersion: v1
kind: Service
metadata:
  name: fastapi-svc
spec:
  type: NodePort
  selector:
    app: fastapi
  ports:
    - protocol: TCP
      port: 8000
      targetPort: 8000
      nodePort: 31000
Step 6: Deploy
kubectl apply -f fastapi-deploy.yaml
kubectl apply -f fastapi-service.yaml
Step 7: Access API
minikube service fastapi-svcOr manually:
curl $(minikube ip):31000Response:
{"message":"Namaste from Kubernetes! 🐳","pod":"fastapi-deploy-5d7b6f8b9c-2dq4t"}Step 8: Test Health and Scaling
# Check health
curl $(minikube ip):31000/health

# Scale to 5 replicas
kubectl scale deployment fastapi-deploy --replicas=5
Step 9: Clean Up
kubectl delete -f fastapi-service.yaml
kubectl delete -f fastapi-deploy.yaml
12. Common Mistakes (aur Unka Solution!)
| Mistake | Why it’s wrong | Solution |
|---|---|---|
| Deployment selector mismatch with pod template labels | Deployment will fail to create pods | Ensure spec.selector.matchLabels matches spec.template.metadata.labels |
| Service selector not matching pod labels | Service has 0 endpoints; traffic never reaches pods | Check labels using kubectl get pods --show-labels and update service selector |
| TargetPort wrong | Service sends traffic to wrong container port | Verify containerPort in Deployment and set targetPort accordingly |
Using imagePullPolicy: Always for local images | Kubernetes tries to pull from registry, fails | Use imagePullPolicy: Never or set appropriate registry |
| Forgetting to specify namespace | Resources created in default namespace; may not be isolated | Use -n namespace or set namespace in metadata |
| Using ClusterIP for external access | Service not reachable from outside | Change type to NodePort or LoadBalancer |
| No resource requests/limits | Pods can consume all node resources | Always set resources.requests and limits |
| No readiness/liveness probes | Kubernetes doesn’t know when pod is ready/alive | Add readinessProbe and livenessProbe |
💡 Personal Experience: I once spent hours debugging why my service wouldn’t forward traffic. The pod labels were
app: myapp, but the service selector hadapp: my-app(hyphen). Kubernetes is case-sensitive and exact-match. Usekubectl get pods --show-labelsto verify.
13. Best Practices – Production-Ready Manifests
✅ Always use YAML files, not imperative commands – Store in Git for version control and reproducibility.
✅ Set resource requests and limits – Prevents one pod from starving others.
✅ Use strategic labels – app, tier, environment, version. This helps with organization and selectors.
✅ Define liveness and readiness probes – Essential for self-healing.
✅ Use imagePullPolicy: IfNotPresent or Never for local development, Always for production (but tag properly).
✅ Tag container images with version, not latest – fastapi:v1.0.0, not latest. This enables rollbacks.
✅ Prefer LoadBalancer over NodePort in cloud environments – NodePort exposes high-numbered ports; LoadBalancer gives proper public IP and port 80/443.
✅ Use namespaces to separate environments – dev, staging, prod.
✅ Validate YAML before applying:
kubectl apply --dry-run=client -f deployment.yaml✅ Use kubectl rollout status after updates to ensure successful rollout.
✅ Implement HorizontalPodAutoscaler (HPA) for production workloads – scales replicas based on CPU/memory metrics.
✅ Backup Deployment and Service definitions – They are your infrastructure as code.
14. Resources – Cheat Sheet & Practice Prompts
kubectl Commands for Deployments & Services
| Task | Command |
|---|---|
| Create/update from YAML | kubectl apply -f file.yaml |
| Delete from YAML | kubectl delete -f file.yaml |
| List deployments | kubectl get deployments |
| List services | kubectl get services |
| List pods with labels | kubectl get pods --show-labels |
| Scale deployment | kubectl scale deployment NAME --replicas=N |
| Update image | kubectl set image deployment/NAME CONTAINER=IMAGE |
| Rollout status | kubectl rollout status deployment/NAME |
| Rollout history | kubectl rollout history deployment/NAME |
| Rollback | kubectl rollout undo deployment/NAME |
| Describe deployment | kubectl describe deployment NAME |
| Describe service | kubectl describe service NAME |
| Get endpoints of service | kubectl get endpoints NAME |
| Port forward to pod (debug) | kubectl port-forward pod/NAME LOCAL_PORT:TARGET_PORT |
| Expose deployment as service | kubectl expose deployment NAME --type=NodePort --port=80 --target-port=80 |
Deployment YAML Skeleton
apiVersion: apps/v1
kind: Deployment
metadata:
  name: my-app
  labels:
    app: my-app
spec:
  replicas: 3
  selector:
    matchLabels:
      app: my-app
  template:
    metadata:
      labels:
        app: my-app
    spec:
      containers:
      - name: app
        image: my-app:1.0
        ports:
        - containerPort: 8080
        resources:
          requests:
            memory: "128Mi"
            cpu: "100m"
          limits:
            memory: "256Mi"
            cpu: "200m"
Service YAML Skeleton (NodePort)
apiVersion: v1
kind: Service
metadata:
  name: my-app-svc
spec:
  type: NodePort
  selector:
    app: my-app
  ports:
    - port: 80
      targetPort: 8080
      nodePort: 30080
Practice Prompts
Beginner:
- Nginx Deployment YAML likho with 2 replicas, apply karo, pods running check karo.
- NodePort service expose karo and access using
minikube service. - Scale deployment to 4 replicas using
kubectl scale.
Intermediate:
- FastAPI app (simple hello) ka image banao (local Minikube env use karo). Deployment YAML likho with resource requests and liveness probe.
- Service YAML likho (ClusterIP) and test internal access from a temporary pod (
kubectl run test --rm -it --image=busybox -- wget -O- http://fastapi-svc:8000).
Advanced:
- Rolling update perform karo – change image to v2 and watch rollout strategy.
- Service type LoadBalancer + Minikube tunnel se external IP assign karo.
- Canary deployment pattern: Create second Deployment with new version and route partial traffic using a Service with specific label selector (or use Istio).
15. FAQ
Q1: Deployment aur Service mein kya antar hai?
Deployment pods create aur manage karta hai (application logic). Service pods ke liye stable network endpoint provide karti hai (access). Service directly pods ko target nahi karti – wo labels ke through pods find karti hai.
Q2: Service selector mein multiple labels kaise use karein?
Service selector requires all label keys to match (AND condition). Example: selector: { app: myapp, tier: backend } – sirf wahi pods select honge jinka dono labels ho.
Q3: External access ke liye NodePort, LoadBalancer, Ingress mein kya difference hai?
- NodePort: Har node ke specific port (30000-32767) par service expose karta hai. Simple but not suitable for production.
- LoadBalancer: Cloud provider ka external load balancer provision karta hai. Production standard.
- Ingress: HTTP/HTTPS routing, multiple services under same IP, SSL termination, path-based routing.
Q4: Pod delete karna hai to deployment delete karna padega?
Deployment pod ko manage karta hai. Pod directly delete karoge to deployment ek naya pod create kar dega (desired state maintain). Use kubectl delete deployment to remove the deployment and its pods.
Q5: Rolling update ke time service kaise behave karti hai?
Service update ke dauran seamlessly new pods mein traffic shift karti hai. New pods become ready, old pods terminate gradually. No downtime.
Q6: Service endpoints 0 ho rahe hain – kya check karein?
- Check pod labels match service selector:
kubectl get pods --show-labels - Check pods are running (
kubectl get pods) - Check service YAML selector spelling and case
- Verify
targetPortmatches podcontainerPort - Use
kubectl describe serviceto see events
16. Conclusion – Ab Aapki Baari!
Bahut badhiya! Aapne aaj seekh liya:
✅ Kubernetes deployments services Hindi – complete practical guide
✅ Deployment YAML – replicas, selector, template, rolling updates
✅ Scale karne aur rolling update/rollback commands
✅ Service kya hai aur types – ClusterIP, NodePort, LoadBalancer
✅ Service YAML – selector, ports, targetPort
✅ Hands-on Nginx aur FastAPI app deploy and expose
✅ Selector labels kaise kaam karte hain – service to pod matching
✅ Best practices aur common mistakes
Aap ab production-style Kubernetes manifests likh sakte ho. Deployments ensure your app runs reliably, Services ensure it can be reached.
Aapki challenge: FastAPI app (ya koi bhi simple app) ka Docker image banao, Deployment YAML likho with 3 replicas, LoadBalancer service expose karo (Minikube tunnel ke saath). Access karo aur scale karke load balancing test karo. Apna experience comment mein share karo!
Next topic kya chahiye?
- Kubernetes Ingress – Advanced Routing aur SSL Termination?
- ConfigMaps aur Secrets – Configuration Management in K8s?
- Persistent Volumes – Stateful Applications in Kubernetes?
Comment mein batao!
The Easy Master ke saath Kubernetes deployments aur services seekhte raho। Happy exposing! ☸️🚀
Resources
- Deployments – Kubernetes Official Docs
- Services – Kubernetes Documentation
- kubectl Cheat Sheet
- Declarative Management with YAML
- Minikube Tunnel for LoadBalancer
Additional Resources
- MongoDB Setup – CRUD Operations समझे (Beginner Guide) 2026
- MongoDB Compass से GUI Database Manage करने का आसान तरीका | Beginner Tutorial 2026
- Node.js MongoDB Connection – Mongoose Setup समझे 2026
- MongoDB Data Modeling – Embedded Documents vs References 2026
- MongoDB Indexing – Query Speed बढ़ने करने का आसान तरीका
- MongoDB Aggregation Pipeline – Stages समझे | Practical Examples
- Express MongoDB CRUD – Complete REST API Example
- Mongoose ODM – Schema, Model, and Validation समझे 2026
- MongoDB Atlas – Cloud Database Free में Deploy करें 2026
- JWT Authentication MongoDB – User Login System कैसे बनाएं 2026
- Next.js App Router – Pages Router से क्या बदला? Complete Guide 2026
- Next.js Server Components – ‘use client’ कब और कहां Use करें
- Next.js Routing – Layouts, Dynamic Routes and Nested Routes 2026
- Next.js 16 New Features – Turbopack, Cache Components and proxy.ts
- Next.js Partial Prerendering – Static and Dynamic Content साथ में
- Next.js Authentication – JWT Session Management (App Router) 2026
- Next.js SEO – Metadata API and Image Optimization समझे 2026
- Next.js TypeScript – Full-Stack Type-Safe App कैसे बनाएं
- FastAPI Kya Hai? FastAPI Python Setup Aur Pehla API Hindi 2026
- FastAPI Path Parameters Hindi – शून्य से हीरो तक गाइड 2026
- Pydantic v2 Tutorial Hindi – Data Validation Master 2026
- FastAPI dependency injection Hindi – Code Reuse Ka Magic
- FastAPI Async Await Hindi – Non-Blocking Code 2026
- FastAPI PostgreSQL SQLModel Hindi – Async Guide 2026
- FastAPI JWT Authentication Hindi – Secure API Login
- FastAPI OpenAI Integration Hindi – AI Chatbot API 2026
- FastAPI Multi-Agent AI Hindi – LangGraph Zero to Hero
- FastAPI Deployment Hindi – Railway Zero to Hero 2026
- Docker Introduction in Hindi? Containers vs Virtual Machines
- Docker Images and Containers Hindi – Pehla Container
- Docker Compose Tutorial Hindi – Node.js + MongoDB
- Docker Volumes Networking Hindi – Data Persist कैसे करें
- Kubernetes Architecture Hindi – Pods, Nodes, Cluster
- Minikube Tutorial Hindi – Local Cluster कैसे बनाए
Views: 351