नमस्ते दोस्तों!
स्वागत है The Easy Master पर!
तो आपने Docker के basics सीख लिए। docker run, docker ps, docker stop – sab kuch aata hai. Lekin ab lag raha hai – “अपनी खुद की Docker image kaise banayein?”
Maine bhi yehi socha tha jab maine pehli baar apna Node.js app Docker mein run karne ki koshish ki thi. मैंने एक simple Dockerfile likhi, docker build चलाई – और error! फिर दूसरी कोशिश, तीसरी। लगा जैसे कभी image बनेगी ही नहीं।
Lekin धीरे-धीरे मैंने Dockerfile की instructions समझी – FROM, WORKDIR, COPY, RUN, CMD – और फिर मज़ा आ गया। Ab मैं किसी भी app की production-ready image बना सकता हूँ।
इस Dockerfile tutorial Hindi में मैं आपको Node.js app example ke saath Dockerfile likhna सिखाऊंगा:
✅ Dockerfile kya hoti hai – simple definition
✅ Dockerfile instructions – FROM, WORKDIR, COPY, RUN, CMD, EXPOSE, ENV
✅ Node.js app ke liye pehli Dockerfile – step by step
✅ Image build karna – docker build -t name .
✅ Dockerfile optimize kaise karein – image size कम करना
✅ Multi-stage builds – production-level technique
✅ .dockerignore – image ko clean और small रखना
✅ Security best practices – non-root user, health checks
End mein cheat sheet, practice prompts, aur feature image prompt bhi milega.
Node.js example le rahe hain, lekin ye concepts kisi bी language ke liye same hain – Python (FastAPI), Go, Java, sab ke liye kaam aayenge.
तो चलिए, Dockerfile likhna शुरू करते हैं और अपनी खुद की image बनाते हैं! 🐳
Table of Contents
1. Dockerfile Kya Hai? – Beginner’s Definition
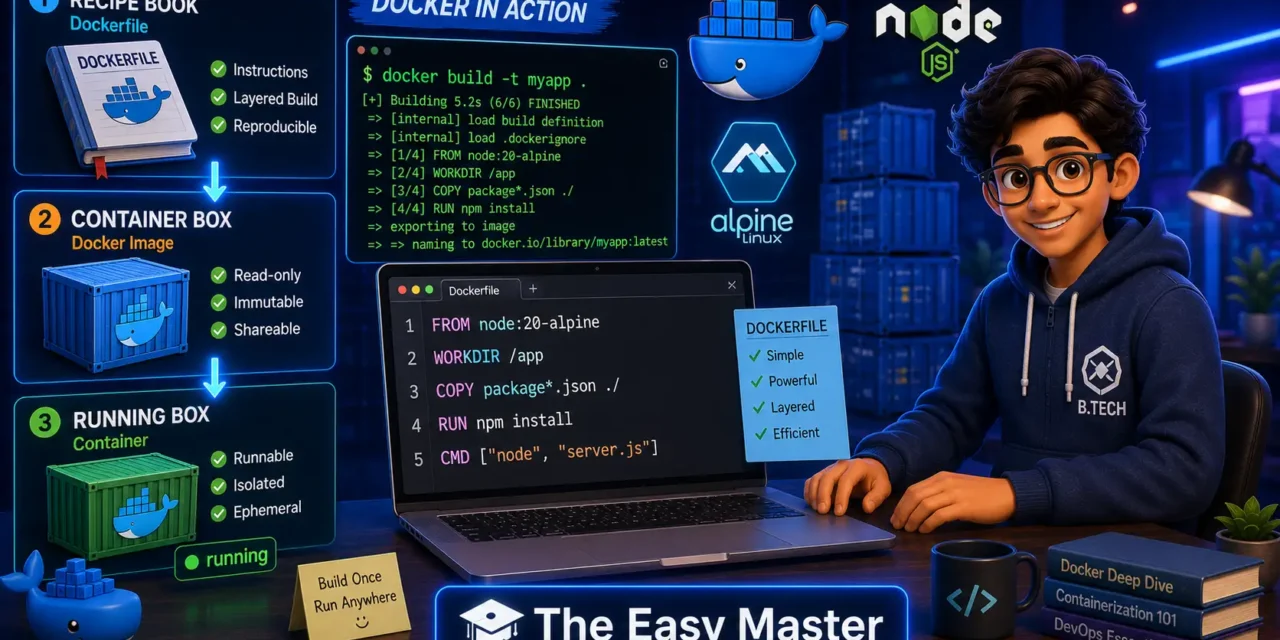
Dockerfile ek text file hai jisme aap instructions likhte ho ki aapki Docker image kaise build hogi.
Simple words mein:
Dockerfile ek recipe book ki tarah hai. Isme aap likhte ho:
- Kaun si base image use karni hai (jaise Node.js, Python)
- Kaun si files copy karni hain
- Kaun se commands install karne hain
- App kaise start hogi
फिर docker build command se Docker उस recipe को पढ़ता है और image बना देता है।
Docker Image vs Dockerfile:
- Dockerfile = Recipe (instructions)
- Docker Image = Pakka hua khana (the actual built image)
Aap ek Dockerfile से multiple images bana sakte ho (अलग-अलग tags ke saath), और एक image से multiple containers।
Docker builds images by reading instructions from a Dockerfile. It’s a text file containing instructions for building your source code.
2. Project Setup – Node.js App Banayein (Simple Express Server)
Dockerfile likhne se pehle, hum ek simple Node.js app banayenge jise hum containerize karenge.
Step 1: Project Folder Banayein
mkdir my-node-app
cd my-node-app
Step 2: package.json File Create Karein
npm init -yStep 3: Express Install Karein
npm install expressStep 4: server.js File Banayein
const express = require('express');
const app = express();
const PORT = process.env.PORT || 3000;

// Health check endpoint (important for production)
app.get('/health', (req, res) => {
    res.json({ status: 'ok', timestamp: Date.now() });
});

// Main endpoint
app.get('/', (req, res) => {
    res.json({ message: 'Namaste Docker! 🐳', app: 'Node.js + Express' });
});

app.listen(PORT, () => {
    console.log(`Server is running on port ${PORT}`);
});
Step 5: Test Locally
node server.jsBrowser mein http://localhost:3000 खोलो – message dikhna chahiye. Ctrl+C se server band karo.
Project structure ab kuch aisa dikhega:
my-node-app/
├── package.json
├── package-lock.json
└── server.js
Ab hum Dockerfile likhne ke liye ready hain!
3. Dockerfile Instructions – हर Command समझें
Dockerfile mein kuch common instructions use hoti hain. Inhe samajh lenge to 90% kaam ho jayega.
| Instruction | Kya Karta Hai? | Example |
|---|---|---|
FROM | Base image specify karta hai. Har Dockerfile FROM se start hoti hai। | FROM node:20-alpine |
WORKDIR | Working directory set karta hai। Baaki commands yahi se execute hongi। | WORKDIR /app |
COPY | Host se files copy karta hai image mein। | COPY package*.json ./ |
RUN | Image build time par command run karta hai। | RUN npm install |
ENV | Environment variable set karta hai। | ENV NODE_ENV=production |
EXPOSE | Container kaunsa port use karega, yeh document karta है (informational)। | EXPOSE 3000 |
CMD | Default command jo container start hone par run hogi। | CMD ["node", "server.js"] |
USER | Non-root user set karta hai security ke liye। | USER node |
The Dockerfile supports instructions like FROM, WORKDIR, COPY, RUN, ENV, EXPOSE, CMD, and USER among others. Docker runs instructions in a Dockerfile in order. A Dockerfile must begin with a FROM instruction.
CMD vs RUN – Important Difference!
| Command | Kab Run Hota Hai? |
|---|---|
RUN | Image build time – ek baar, image build karte waqt। |
CMD | Container run time – har baar container start hota hai tab। |
RUN ka use dependencies install karne ke liye hota hai. CMD ka use app start karne ke liye।
4. Hands-On #1 – Pehli Dockerfile Likhein (Basic Version)
Project folder mein Dockerfile naam ki file banayein (bina kisi extension ke):
# Base image – Node.js 20 Alpine version (small size)
FROM node:20-alpine

# Working directory inside container
WORKDIR /app

# Copy package files first (for caching – important!)
COPY package*.json ./

# Install dependencies
RUN npm install

# Copy application code
COPY . .

# Expose port (documentation)
EXPOSE 3000

# Start the application
CMD ["node", "server.js"]
Yeh Dockerfile kya kar rahi hai? – Line-by-Line Explanation:
| Line | Kya Ho Raha Hai? |
|---|---|
FROM node:20-alpine | Alpine Linux पर based Node.js 20 image use कर रहे हैं। Alpine chhota होता है (~170MB vs ~1GB)। |
WORKDIR /app | Container के अंदर /app folder banao और wahan chalo। |
COPY package*.json ./ | package.json और package-lock.json को container में copy karo। |
RUN npm install | Dependencies install karo। |
COPY . . | Baaki ki saari files (server.js, etc.) copy karo। |
EXPOSE 3000 | Documentation – container 3000 port use karega। |
CMD ["node", "server.js"] | Container start होने पर node server.js चलाओ। |
Why Copy package files first?
Docker har instruction ke liye ek layer बनाता है। अगर package.json change नहीं हुआ, तो Docker cache use karega और npm install दोबारा नहीं करेगा। इससे build fast होता है। Each build step is cached; reusing cached layers improves build time.
5. Image Build Karein – docker build Command
Dockerfile बना ली, अब image बनाने की बारी है।
docker build -t my-node-app:v1 .Command को समझो:
| Part | Meaning |
|---|---|
docker build | Image build करने का command। |
-t my-node-app:v1 | Image को name (my-node-app) और tag (v1) देना। |
. | Build context – current folder (my-node-app/)। Docker yahan Dockerfile ढूंढेगा। |
Build Output:
[+] Building 5.2s (11/11) FINISHED
 => [internal] load build definition from Dockerfile
 => [internal] load .dockerignore
 => [1/5] FROM node:20-alpine
 => [2/5] WORKDIR /app
 => [3/5] COPY package*.json ./
 => [4/5] RUN npm install
 => [5/5] COPY . .
 => exporting to image
 => => naming to docker.io/library/my-node-app:v1
Verify image bani ya nahi:
docker imagesOutput mein my-node-app v1 dikhna चाहिए, size ~200MB के आसपास।
Container Run Karein – Test Your Image
docker run -d -p 3000:3000 --name my-app my-node-app:v1Flags:
-d– background mein चलाओ-p 3000:3000– host port 3000 को container port 3000 से map करो--name my-app– container ko naam do
Browser mein http://localhost:3000 खोलो। “Namaste Docker!” message देखना चाहिए।
http://localhost:3000/health भी try karo – { status: 'ok', ... } आना चाहिए।
Stop and Remove
docker stop my-app
docker rm my-app
6. Dockerfile Optimize Kaise Karein – Image Size कम करना
Pehli Dockerfile kaam तो कर रही है, लेकिन production के लिए उसे optimize karna zaroori है। Focus on smaller image size + faster rebuilds + better security.
6.1 Use Alpine Base Image
| Base Image | Size | Pros & Cons |
|---|---|---|
node:20 | ~1.05 GB | Full Debian – sab kuch hai, lekin bahut bada |
node:20-slim | ~220 MB | Stripped Debian – medium size |
node:20-alpine | ~180 MB | Alpine Linux – smallest and recommended |
Always prefer -alpine tag for production.
6.2 Set NODE_ENV=production
Yeh environment variable Node.js को बताता है ki production mode mein chalo, jo npm install को optimize करता है। इसे Dockerfile mein add करो:
ENV NODE_ENV=production6.3 Use npm ci --omit=dev Instead of npm install
npm ci package-lock.json ke hisaab se exact versions install karta hai (faster और reliable)。 --omit=dev से development dependencies skip हो जाती हैं।
Optimized lines:
# Better: npm ci instead of npm install
RUN npm ci --omit=dev && npm cache clean --force
6.4 Chain RUN Commands to Reduce Layers
Docker every RUN, COPY, ADD instruction के लिए ek layer बनाता है – जितनी कम layers, उतना अच्छा।
# ❌ Bad – separate RUN commands create multiple layers
RUN apt-get update
RUN apt-get install -y curl
RUN apt-get clean

# ✅ Good – chaining commands in single RUN
RUN apt-get update && apt-get install -y curl && apt-get clean
Optimized Single-Stage Dockerfile (Production-Ready Basics)
FROM node:20-alpine

# Set environment variables
ENV NODE_ENV=production
ENV PORT=3000

WORKDIR /app

# Copy package files
COPY package*.json ./

# Install production dependencies only
RUN npm ci --omit=dev && npm cache clean --force

# Copy application code
COPY . .

# Non-root user (more in security section)
RUN addgroup -g 1001 -S nodejs && \
    adduser -S myuser -u 1001 && \
    chown -R myuser:nodejs /app
USER myuser

EXPOSE 3000

HEALTHCHECK --interval=30s --timeout=3s --start-period=5s --retries=3 \
  CMD node -e "require('http').get('http://localhost:3000/health', (r) => {r.statusCode === 200 ? process.exit(0) : process.exit(1)})"

CMD ["node", "server.js"]
7. .dockerignore – Image को Clean रखें
Dockerfile की तरह ही .dockerignore file project folder mein बनाए। ये वो files और folders specify करती है जो image build में include नहीं होनी चाहिए।
.dockerignore Content:
# Dependencies (installed via RUN npm install)
node_modules/

# Git files
.git/
.gitignore

# Environment files
.env
.env.local

# Logs
*.log
npm-debug.log*

# OS files
.DS_Store
Thumbs.db

# IDE files
.vscode/
.idea/

# Build outputs (agar aage se build step add kiya)
dist/
build/
Kyun important hai?
- Image size chhoti रहती है
- Security – sensitive files (
.env) image mein नहीं जातीं - Build context light रहता है, build faster होता है
8. Multi-Stage Builds – Production-Level Technique
Pehle wali Dockerfile single-stage thi – sab kuch final image mein आ जाता है। Build tools, source code, dependencies – सब कुछ।
Problem: Image bohot bulky हो जाती है। Aap development tools (compilers, build dependencies) production image mein nahi चाहते।
Solution: Multi-stage build – multiple FROM statements के साथ। Build tools वाली dependencies first stage में install होती हैं, फिर सिर्फ production artifacts final stage में copy होते हैं।
Multi-stage builds allow you to build your code in one stage and copy only the production-ready files to a smaller runtime image, significantly reducing image size and attack surface.
Production-Ready Multi-Stage Dockerfile for Node.js:
# Stage 1: Builder – dependencies install and build (agar koi build step hai)
FROM node:20-alpine AS builder

WORKDIR /app

# Copy package files
COPY package*.json ./

# Install dependencies (including devDependencies for build)
RUN npm ci

# Copy source code
COPY . .

# Agar build step hai (e.g., React ya TypeScript)
# RUN npm run build

# Stage 2: Runner – final production image
FROM node:20-alpine AS runner

# Set environment
ENV NODE_ENV=production
ENV PORT=3000

# Install dumb-init for proper signal handling
RUN apk add --no-cache dumb-init

# Create non-root user
RUN addgroup -g 1001 -S nodejs && \
    adduser -S myuser -u 1001

WORKDIR /app

# Copy production artifacts from builder stage
COPY --from=builder --chown=myuser:nodejs /app/package*.json ./
COPY --from=builder --chown=myuser:nodejs /app/node_modules ./node_modules
COPY --from=builder --chown=myuser:nodejs /app/server.js .

# Switch to non-root user
USER myuser

EXPOSE 3000

# Health check (will be explained in security section)
HEALTHCHECK --interval=30s --timeout=3s --start-period=5s --retries=3 \
  CMD node -e "require('http').get('http://localhost:3000/health', (r) => {r.statusCode === 200 ? process.exit(0) : process.exit(1)})"

# Use dumb-init to handle signals properly
ENTRYPOINT ["dumb-init", "--"]
CMD ["node", "server.js"]
Multi-Stage Ke Fayde:
| Without Multi-Stage | With Multi-Stage |
|---|---|
| ~220 MB image | ~80-100 MB image |
| Build tools and dev dependencies included | Only production dependencies |
| सब कुछ एक layer में – hard to optimize | Builder stage can be cached, runner stage minimal |
| Not ideal for production | Recommended for production |
Multi-stage builds are recommended for all types of applications。
9. Security Best Practices – Non-Root User & Health Checks
9.1 Non-Root User
By default, container root user के तौर पर चलता है – agar container compromised हुआ, तो attacker को container के अंदर root access मिल जाता है।
Fix: एक dedicated non-root user बनाओ।
RUN addgroup -g 1001 -S nodejs && \
    adduser -S myuser -u 1001
USER myuser
9.2 Health Checks
Health check Docker को बताता है ki container healthy है या नहीं।
HEALTHCHECK --interval=30s --timeout=3s --start-period=5s --retries=3 \
  CMD node -e "require('http').get('http://localhost:3000/health', (r) => {r.statusCode === 200 ? process.exit(0) : process.exit(1)})"
Without a health check, Docker doesn’t know if your app crashed, Kubernetes won’t restart unhealthy pods, and load balancers will send traffic to dead containers.
Flags explained:
--interval=30s– har 30 second mein check--timeout=3s– response के लिए 3 second wait--start-period=5s– container start hone के बाद 5 second wait करो health check से पहले--retries=3– 3 बार fail होने पर container unhealthy mark होता है
App mein mandatory health check endpoint होना चाहिए (/health) – जैसे हमने server.js में बनाया है।
9.3 Never Store Secrets in Dockerfile
Passwords, API keys, private keys – kabhi bhi ENV mein hardcode मत करो, और Dockerfile commit मत करो। Always use Docker secrets or environment variables at runtime (passed via -e flag or .env file).
Security Checklist:
| Item | Status |
|---|---|
| Non-root user configured | ✅ |
Health check endpoint (/health) implemented | ✅ |
| Health check instruction in Dockerfile | ✅ |
| No secrets in Dockerfile | ✅ |
NODE_ENV=production set | ✅ |
| Minimal base image (alpine/slim) | ✅ |
.dockerignore configured | ✅ |
10. Common Beginner Mistakes (aur Unka Solution!)
| Mistake | Kyun Galat Hai? | Solution |
|---|---|---|
COPY . . before RUN npm install | Code change होने पर हर बार npm install दोबारा होगी – slow | Copy package files first, then install, then copy rest code |
npm install without --omit=dev | Dev dependencies unnecessary bloat | Use npm ci --omit=dev |
Using node:latest tag | Unpredictable – kabhi kabhi major version upgrade हो सकता है | Pin specific version: node:20-alpine |
Forgetting .dockerignore | node_modules and secrets image mein copy हो जाते हैं | Always include .dockerignore |
| Running as root in production | Security risk – container compromised तो attacker ko root access | Add USER instruction |
| No health check | Docker/Orchestrator को नहीं पता app crash hui | Add HEALTHCHECK |
CMD npm start instead of CMD ["node", "server.js"] | Shell form extra process बना सकता है, signal handling issue | Use exec form (JSON array) |
| Multi-stage nahi kiya | Image size बहुत बड़ी | Use multi-stage builds for production |
docker build context wrong set karna | COPY command fail या unrelated files copy | Use . for current directory, include .dockerignore |
Not using .dockerignore for node_modules | Node modules already installed via RUN, फिर भी COPY हो रही है – size double | Add node_modules/ to .dockerignore |
11. Real Project Example – FastAPI App Ka Dockerfile (Bonus)
Aap FastAPI use कर रहे हो, तो यह Dockerfile template use कर सकते हो:
# Builder stage
FROM python:3.12-slim AS builder

WORKDIR /app

# Install build dependencies
RUN apt-get update && apt-get install -y --no-install-recommends gcc && \
    apt-get clean && rm -rf /var/lib/apt/lists/*

# Copy requirements and install
COPY requirements.txt .
RUN pip install --no-cache-dir -r requirements.txt

# Final stage
FROM python:3.12-slim

WORKDIR /app

# Create non-root user
RUN addgroup --system --gid 1001 appgroup && \
    adduser --system --uid 1001 --gid 1001 appuser

# Copy installed packages from builder
COPY --from=builder /usr/local/lib/python3.12/site-packages /usr/local/lib/python3.12/site-packages
COPY --from=builder /usr/local/bin /usr/local/bin

# Copy application
COPY ./app ./app

USER appuser

EXPOSE 8000

HEALTHCHECK --interval=30s --timeout=3s --start-period=5s --retries=3 \
  CMD curl -f http://localhost:8000/health || exit 1

CMD ["uvicorn", "app.main:app", "--host", "0.0.0.0", "--port", "8000"]
Yahi pattern aap kisi भी Python/FastAPI project ke liye use kar sakte ho।
12. Dockerfile vs docker-compose.yml – Difference
| Feature | Dockerfile | docker-compose.yml |
|---|---|---|
| Purpose | Ek single image kaise build karni hai – yeh define करता है | Multiple containers ko ek saath run कैसे करना है – define करता है |
| Extens .yaml | ||
| Main Command | docker build -t name . | docker-compose up -d |
| When to use | Ek specific app/image को define करने के लिए | Multiple services (app + database + cache) orchestrate करने के लिए |
E.g.:
Dockerfile–FROM node:20-alpine,RUN npm install,CMD ["node", "server.js"]docker-compose.yml–services: { api: { build: ., ports: [...], depends_on: [db] }, db: { image: postgres, ... } }
Dockerfile se aap image बनाते हो, docker-compose से aap multiple containers ko एक साथ run करते हो – इनका उपयोग साथ में भी होता है।
13. Resources – Cheat Sheet & Practice Prompts
Cheat Sheet (Copy-Paste Ready)
# ---------- MINIMAL DOCKERFILE ----------
FROM node:20-alpine
WORKDIR /app
COPY package*.json ./
RUN npm ci --omit=dev
COPY . .
EXPOSE 3000
CMD ["node", "server.js"]

# ---------- MULTI-STAGE DOCKERFILE ----------
FROM node:20-alpine AS builder
WORKDIR /app
COPY package*.json ./
RUN npm ci

FROM node:20-alpine AS runner
RUN addgroup -g 1001 -S nodejs && adduser -S myuser -u 1001
WORKDIR /app
COPY --from=builder --chown=myuser:nodejs /app/node_modules ./node_modules
COPY --chown=myuser:nodejs . .
USER myuser
EXPOSE 3000
HEALTHCHECK --interval=30s CMD node -e "require('http').get('http://localhost:3000/health')"
CMD ["node", "server.js"]
Common Commands Quick Reference:
| Command | Purpose |
|---|---|
docker build -t myapp:v1 . | Build image with name and tag |
docker images | List images |
docker run -d -p 8080:3000 myapp:v1 | Run container from image |
docker run -it myapp:v1 /bin/sh | Get shell inside container |
docker image inspect myapp:v1 | See image details |
Practice Prompts
Level 1: Beginner
- Simple Node.js app banao (Express server). Dockerfile likho, image build karo, container run karo। Browser mein message check karo।
Dockerfileमें base imagenode:18-alpineuse karo।WORKDIRset karo,package.jsoncopy karo,npm installchalao,server.jscopy karo,CMDset karo।
Level 2: Intermediate
- Upar wale Dockerfile ko optimize karo –
npm ci --omit=dev,NODE_ENV=production,.dockerignoreadd karo। Image size compare karo। - Multi-stage build implement karo। Builder stage mein dependencies install karo, runner stage mein sirf production artifacts copy karo।
Level 3: Advanced
- Non-root user add karo और health check implement karo।
HEALTHCHECKinstruction Dockerfile mein add karo। - FastAPI app (Python) ka Dockerfile likho jo Gunicorn + Uvicorn use kare production mein। Multi-stage build use karo।
14. FAQ
Q1: Dockerfile mein CMD aur ENTRYPOINT mein kya antar hai?
CMD default arguments provide karta hai जिन्हें container run karte waqt override किया जा सकता है। ENTRYPOINT fixed command होता है जो हमेशा चलता है। Aap ENTRYPOINT और CMD combine kar सकते हो – e.g., ENTRYPOINT ["node"] CMD ["server.js"]।
Q2: Image ka size kaise check karein?
docker images – list images ke saath size bhi दिखाता है। docker system df – disk usage breakdown।
Q3: COPY vs ADD – difference kya hai?
COPY simple – files copy karta hai। ADD extra features: URL fetch, tar auto-extract। Official docs: COPY recommended, unless ADD ki extra features chahiye。COPY is preferred for local file copying because it’s more predictable.
Q4: Local file change hone पर automatically rebuild kaise karein?
Single service ke liye docker-compose.yml use karo aur docker-compose up --build। या tools like nodemon + bind mounts use karo development ke दौरान।
Q5: Multiple Dockerfile ek hi project mein kaise manage karein?
Multiple Dockerfile alag names de सकते हो (e.g., Dockerfile.dev, Dockerfile.prod)। docker build -f Dockerfile.prod -t myapp:prod . specific file build kar सकते हो।
Q6: ENV Dockerfile mein aur runtime -e flag mein kya antar hai?
ENV in Dockerfile sets default environment variables – build time पर ही set हो जाती हैं। -e flag runtime पर override karta hai। Secrets (passwords, API keys) kabhi ENV में hardcode मत करो – runtime पर -e या .env file use karo।
Q7: Kya Docker image delete karne ke baad rebuild karna mushkil hota hai?
Nahi – jab tak Dockerfile और source code hai tab tak docker build चलाकर फिर से बना सकते हो। Base images Docker Hub पर available हैं, local delete होने पर docker build automatically pull कर लेगी।
15. Conclusion – Ab Aapki Baari!
Bahut badhiya! Aapne aaj seekh liya:
✅ Dockerfile tutorial Hindi – complete guide for beginners
✅ All important instructions – FROM, WORKDIR, COPY, RUN, CMD, EXPOSE, ENV, USER
✅ Node.js app ki pehli Dockerfile – likhi, build ki, run ki
✅ .dockerignore – image को clean और small रखना
✅ Multi-stage builds – production-level technique
✅ Security best practices – non-root user aur health checks
✅ Common mistakes aur unka solution
Dockerfile likhna ab easy लगता है, है ना? Bas practice chahiye।
Aapki challenge: Upar diye practice prompts mein se “intermediate” level wala implement karo। Apna Dockerfile code comment mein share karo – main review karunga और feedback dunga।
Next topic kya chahiye?
- Docker Compose in Hindi (multi-container applications)?
- Deploy Docker Images to Cloud (Docker Hub + GitHub Container Registry)?
- CI/CD Pipeline for Docker Images (GitHub Actions)?
Comment mein batao!
The Easy Master ke saath Dockerfile likhna seekhte raho। Happy Dockering! 🐳🚀
Resources
- Dockerfile Reference – Official Documentation – All instructions explained
- Multi-stage Builds – Official Guide – Full explanation with examples
- Best Practices for Writing Dockerfiles – Official best practices
- Containerize a Node.js Application – Docker Guide – Step-by-step Node.js walkthrough
- Dockerizing Node.js in 2026 – Production Guide – Multi-stage, health checks, security
Additional Resources
- MongoDB Setup – CRUD Operations समझे (Beginner Guide) 2026
- MongoDB Compass से GUI Database Manage करने का आसान तरीका | Beginner Tutorial 2026
- Node.js MongoDB Connection – Mongoose Setup समझे 2026
- MongoDB Data Modeling – Embedded Documents vs References 2026
- MongoDB Indexing – Query Speed बढ़ने करने का आसान तरीका
- MongoDB Aggregation Pipeline – Stages समझे | Practical Examples
- Express MongoDB CRUD – Complete REST API Example
- Mongoose ODM – Schema, Model, and Validation समझे 2026
- MongoDB Atlas – Cloud Database Free में Deploy करें 2026
- JWT Authentication MongoDB – User Login System कैसे बनाएं 2026
- Next.js App Router – Pages Router से क्या बदला? Complete Guide 2026
- Next.js Server Components – ‘use client’ कब और कहां Use करें
- Next.js Routing – Layouts, Dynamic Routes and Nested Routes 2026
- Next.js 16 New Features – Turbopack, Cache Components and proxy.ts
- Next.js Partial Prerendering – Static and Dynamic Content साथ में
- Next.js Authentication – JWT Session Management (App Router) 2026
- Next.js SEO – Metadata API and Image Optimization समझे 2026
- Next.js TypeScript – Full-Stack Type-Safe App कैसे बनाएं
- FastAPI Kya Hai? FastAPI Python Setup Aur Pehla API Hindi 2026
- FastAPI Path Parameters Hindi – शून्य से हीरो तक गाइड 2026
- Pydantic v2 Tutorial Hindi – Data Validation Master 2026
- FastAPI dependency injection Hindi – Code Reuse Ka Magic
- FastAPI Async Await Hindi – Non-Blocking Code 2026
- FastAPI PostgreSQL SQLModel Hindi – Async Guide 2026
- FastAPI JWT Authentication Hindi – Secure API Login
- FastAPI OpenAI Integration Hindi – AI Chatbot API 2026
- FastAPI Multi-Agent AI Hindi – LangGraph Zero to Hero
- FastAPI Deployment Hindi – Railway Zero to Hero 2026
- Docker Introduction in Hindi? Containers vs Virtual Machines
- Docker Images and Containers Hindi – Pehla Container
Views: 295