नमस्ते दोस्तों!
स्वागत है The Easy Master पर!
आपने Kubernetes सीख लिया – Deployments, Services, Ingress, सब कुछ। अब आपने सोचा होगा: “हर बार अलग-अलग environment के लिए alag YAML files लिखनी पड़ती हैं। एक ही app के लिए Dev, Staging, Production – तीन अलग-अलग files. फिर उन्हें kubectl apply -f से deploy karna. Thoda time-consuming नहीं है?”
बिल्कुल सही सवाल है। Manual YAML management बहुत repetitive और error-prone होता है।
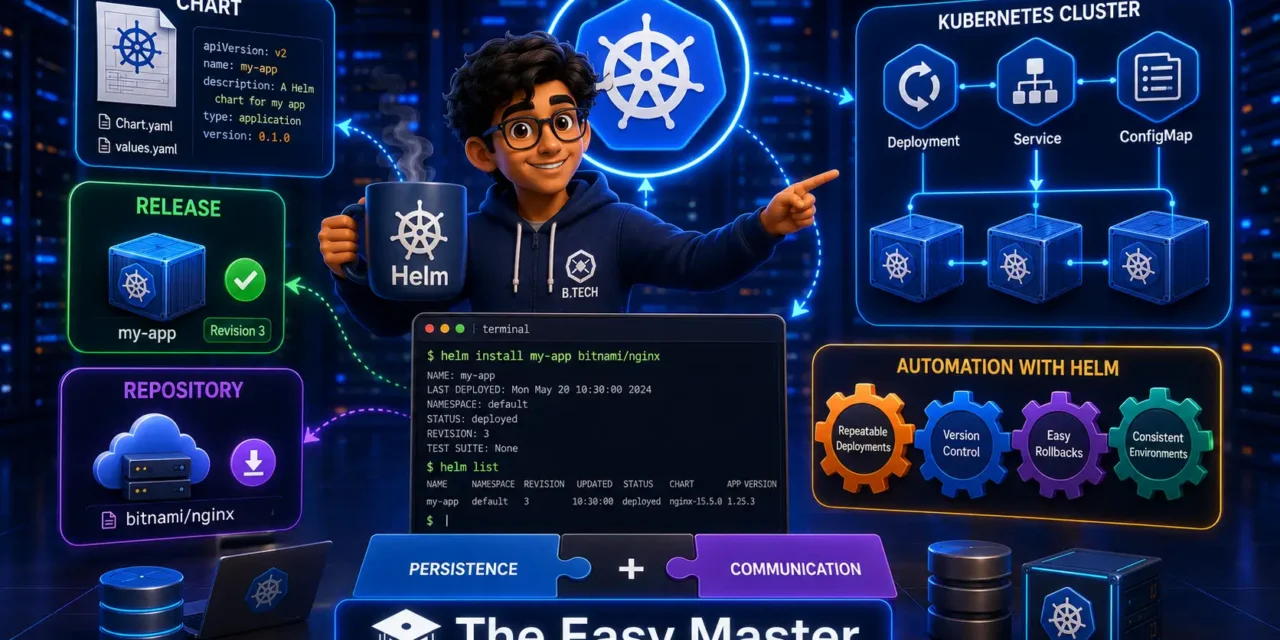
यहाँ पर Helm ka जादू शुरू होता है। Helm Kubernetes का package manager है – जैसे Ubuntu के लिए apt, macOS के लिए brew, Python के लिए pip. Helm आपके Kubernetes YAML manifests को “Chart” नामक package में pack करता है और उसे एक command से deploy, upgrade, rollback कर सकता है।
मुझे याद है जब maine pehली बार Helm का उपयोग किया था। Ek complex application ke liye मुझे ~10-12 YAML files maintain करनी पड़ रही थीं. Phir Helm sikhne ke baad mujhe एक chart बनाना पड़ा और helm install command से सब deploy हो गया। Us din lagbhag 70% YAML code repeat होने से बचा और productivity improve हुई।
इस Helm Kubernetes tutorial Hindi में मैं आपको सब कुछ सिखाऊंगा:
✅ Helm kya hai? – Package manager for K8s, Benefits
✅ Chart, Release, Repository – Important concepts
✅ Helm v3 vs v2 – Tiller kaunsa hai?
✅ Installation – Windows, Mac, Linux
✅ Helm Repositories – Bitnami charts, Artifact Hub
✅ Helm Commands – install, upgrade, rollback, uninstall, history
✅ Helm Charts structure – Chart.yaml, values.yaml, templates
✅ Helm Template engine – Go templates, Flow control, Functions
✅ Hands-On – Nginx chart deploy & customise
✅ Real project – Node.js + MongoDB Helm chart
✅ Best practices & common mistakes
Chaliye Helm ki duniya mein step rakhate hain! 🚢
Table of Contents
1. Helm Kya Hai? – Package Manager for Kubernetes
Helm Kubernetes के लिए package manager है। यह आपको Charts नामक packages में Kubernetes applications को define, install और upgrade करने में मदद करता है।
Helm charts YAML definitions of Kubernetes resources (Deployments, Services, ConfigMaps, etc.) को reusable और versionable packages में बदल देते हैं। ये charts चाहे तो public repositories (जैसे Bitnami) से install किए जा सकते हैं, या आप अपने खुद के custom charts बना सकते हैं।
Helm originally DeisLabs द्वारा बनाया गया था और फिर CNCF (Cloud Native Computing Foundation) को donate कर दिया गया था। आज CNCF इस प्रोजेक्ट को maintain कर रहा है।
Helm Kyun Use Karein? – 5 Main Benefits
| Benefit | Explanation |
|---|---|
| Reusability | एक बार Chart बनाएं, बार-बार use करें। Multiple environments (dev/staging/prod) के लिए different values.yaml use करें। |
| Version Control | Helm charts versioned होते हैं। Aap helm history और helm rollback से किसी भी revision पर वापस जा सकते हैं। |
| Dependency Management | एक chart दूसरे chart पर depend कर सकता है। Helm automatically subcharts install करता है। |
| Simplified Deployment | एक कमांड helm install से सारे YAML manifests apply हो जाते हैं। helm upgrade से app update कर सकते हैं। |
| Parameterization | Templates में variables डालकर reusable बनाइए। values.yaml file में values डालिए। |
Helm means several benefits: Repositories provide everything necessary for deployment and configurations. You can jump between versions easily and everything works with a single CLI command. Helm also integrates seamlessly into CI/CD pipelines and enjoys strong community support.
2. Kubernetes YAML vs Helm Charts – Difference kya hai?
| Aspect | Kubernetes YAML | Helm Charts |
|---|---|---|
| Abstraction Level | Low – direct YAML manifests | High – templated YAML + variables |
| Reusability | Poor – Copy-paste across environments | Excellent – One chart + different values files |
| Parameterization | ❌ No built-in – edit YAML manually | ✅ Yes – values.yaml and --set override |
| Dependency Management | ❌ Manual | ✅ Automatic (subcharts) |
| Versioning & Rollback | ❌ Manual kubectl apply -f file.yaml | ✅ Built-in (helm history / helm rollback) |
| Complexity | Simple for tiny apps | Moderate learning curve |
Summary: Kubernetes YAML fine-grained control and low-level access देता है। Helm charts higher abstraction और automation देते हैं। Helm charts “package manager” की तरह काम करते हैं, जैसे apt, brew, या pip।
3. Helm v3 vs v2 – क्यों v3 use करें?
Helm v2 में एक server-side component था जिसका नाम था Tiller। Tiller cluster में install होता था और tiller के पास cluster-wide admin permissions होती थीं – यह एक बड़ी security risk थी।
Helm v3 (November 2019 release) में Tiller हटा दिया गया। अब Helm client सीधे Kubernetes API server से communicate करता है (same as kubectl)। इसलिए Helm v3 ज्यादा secure और simple है।
helm version command चलाकर आप check कर सकते हैं कि कौन सा version use कर रहे हो। version.BuildInfo{Version:"v3.14.0"} ऐसा कुछ दिखना चाहिए। Today the latest Helm v3 stable release is v3.20.2, and Helm v4 is also available (v4.6.38 etc.)। हमारी guide v3/v4 donों पर focus करेगी क्योंकि command structure mostly same है।
Why Helm v3 over v2?
- No Tiller → No cluster-admin security risk
- Improved security (RBAC respected)
- Better upgrade/rollback mechanism
- Support for OCI registries (store charts in Docker registries)
- Simpler architecture
4. Core Concepts – Chart, Release, Repository, Values
| Concept | Definition | Analogy (apt/brew) |
|---|---|---|
| Chart | A Helm package containing templates, default values, and metadata. | .deb package, .apk file, brew formula. |
| Release | A specific instance of a chart running on a Kubernetes cluster. Each install/upgrade creates a new release revision. | An installed program (e.g., nginx running on port 80). |
| Repository | A location where charts are stored and shared (HTTP server). Default repo: https://charts.bitnami.com/bitnami. | Ubuntu APT repo, Homebrew tap. |
| Values | Configuration variables that parameterize a chart, defined in values.yaml and overridable at install time. | Configuration file for a program (.conf file). |
Simple words:
Chart = Recipe (list of ingredients + instructions)
Release = Baked cake (running instance)
Repository = Cookbook library (where recipes are stored)
Values = Customizations (less sugar, more salt, etc.)
5. Helm Installation – 2 Minute mein ready
Windows (Chocolatey)
choco install kubernetes-helmmacOS (Homebrew)
brew install helmLinux (via script)
curl https://raw.githubusercontent.com/helm/helm/main/scripts/get-helm-3 | bashVerify installation
helm versionExpected output: version.BuildInfo{Version:"v3.20.2", ...}
Note: Helm automatically uses your existing
kubeconfigfile (same askubectl)। It communicates directly with the Kubernetes API server.
6. Helm Repositories – Charts kahan se laayein
Repository एक HTTP server है जो packaged Helm charts host करता है।
Add a Repository (Bitnami – popular & trusted)
helm repo add bitnami https://charts.bitnami.com/bitnamiUpdate repositories (fetch latest charts)
helm repo updateSearch for a chart in repositories
helm search repo nginxSearch Artifact Hub (global chart search)
Artifact Hub is a central search engine for all Helm charts (like Docker Hub for images).
helm search hub wordpressYou can also browse Artifact Hub in your browser.
List added repositories
helm repo listRemove a repository
helm repo remove bitnami7. Helm Charts – Structure aur Files Explained
Helm chart की directory structure standard होती है। helm create <chart-name> command से आप एक scaffold generate कर सकते हैं।
Chart Directory Structure
mychart/
├── Chart.yaml          # Chart metadata (name, version, description)
├── values.yaml         # Default configuration values
├── charts/             # Subcharts (dependencies)
├── templates/          # YAML templates for Kubernetes resources
│   ├── NOTES.txt       # Post-install notes (displayed after install)
│   ├── _helpers.tpl    # Template partials / reusable snippets
│   ├── deployment.yaml
│   ├── service.yaml
│   ├── ingress.yaml
│   └── ...
└── crds/               # Custom Resource Definitions (optional)
File-by-file Explanation
Chart.yaml: Contains metadata about the chart – name, version, appVersion, description, dependencies, etc.
apiVersion: v2
name: mychart
description: A Helm chart for Kubernetes
type: application
version: 0.1.0          # Chart version (Helm package version)
appVersion: "1.16.0"    # App version (your app's version)
dependencies:
  - name: mariadb
    version: 11.x.x
    repository: https://charts.bitnami.com/bitnami
values.yaml: Default configuration values for your chart. Users can override these.
replicaCount: 1
image:
  repository: nginx
  tag: stable
  pullPolicy: IfNotPresent
service:
  type: ClusterIP
  port: 80
templates/: This is where Helm finds the YAML definitions for your Services, Deployments, ConfigMaps, etc. Each file in this directory is passed through a Go template rendering engine. Helm extends the standard Go template language with many additional functions.
Inside templates/deployment.yaml, you’ll see something like:
apiVersion: apps/v1
kind: Deployment
metadata:
  name: {{ .Release.Name }}-{{ .Chart.Name }}
spec:
  replicas: {{ .Values.replicaCount }}
  template:
    spec:
      containers:
        - name: {{ .Chart.Name }}
          image: "{{ .Values.image.repository }}:{{ .Values.image.tag }}"
          ports:
            - containerPort: {{ .Values.service.port }}
_helpers.tpl: Contains named templates (partials) that you can reuse across multiple templates.
{{- define "mychart.labels" -}}
app: {{ .Chart.Name }}
release: {{ .Release.Name }}
{{- end -}}
Then in deployment.yaml:
metadata:
  labels:
    {{- include "mychart.labels" . | nindent 4 }}
NOTES.txt: A template that prints helpful information after installation (like how to access the app).
8. Helm Commands – Cheat Sheet
Here are the most important Helm commands for daily use:
| Category | Command | Purpose |
|---|---|---|
| Repository | helm repo add <name> <url> | Add a chart repository |
helm repo update | Update local repo cache | |
helm repo list | List repos | |
helm repo remove <name> | Remove repo | |
| Install | helm install <release> <chart> | Install a chart |
helm install <release> <chart> -f values.yaml | Install with custom values file | |
helm install <release> <chart> --set key=value | Install with inline overrides | |
helm install <release> <chart> --dry-run --debug | Simulate install (validate) | |
| Upgrade | helm upgrade <release> <chart> | Upgrade release |
helm upgrade --install <release> <chart> | Idempotent install/upgrade (CI/CD) | |
helm upgrade <release> <chart> -f values.yaml | Upgrade with new values | |
helm upgrade --atomic <release> <chart> | Auto-rollback on failure | |
| Rollback | helm history <release> | Show revision history |
helm rollback <release> <revision> | Rollback to revision | |
| Uninstall | helm uninstall <release> | Delete release |
helm uninstall <release> --keep-history | Uninstall but keep history | |
| Inspect | helm list | List releases |
helm list -A | List releases in all namespaces | |
helm status <release> | Show release status | |
helm get all <release> | Show values, manifests, hooks | |
helm get manifest <release> | Show rendered manifests | |
| Template/Debug | helm template <release> <chart> | Render templates locally |
helm lint <chart-dir> | Lint chart for errors | |
helm show values <chart> | Show default values for a chart | |
| Create/Package | helm create <name> | Create new chart scaffold |
helm package <chart-dir> | Package chart into .tgz |
9. Hands-On #1 – Nginx chart deploy aur customise karein
Let’s apply our knowledge with a real example – deploying Nginx via Helm.
Step 1: Add Bitnami repository (if not already added)
helm repo add bitnami https://charts.bitnami.com/bitnami
helm repo update
Step 2: Search for Nginx charts
helm search repo nginxStep 3: Install Nginx chart with default values
helm install my-nginx bitnami/nginxThis creates a new release named my-nginx.
Step 4: See the release
helm listStep 5: Get the service information
kubectl get servicesYou’ll see a LoadBalancer service (or ClusterIP depending on your cloud). Access the app via the external IP.
Step 6: Customise with custom values file
Create a file custom-values.yaml:
replicaCount: 3
service:
  type: NodePort
  nodePorts:
    http: "30080"
Upgrade the release with this config:
helm upgrade my-nginx bitnami/nginx -f custom-values.yamlCheck the pods: kubectl get pods → 3 replicas running.
Step 7: See release history
helm history my-nginxStep 8: Rollback to previous revision (if something breaks)
helm rollback my-nginx 1Step 9: Uninstall the release
helm uninstall my-nginx10. Helm Template Engine – Go templates samjhe
Helm uses the Go template language plus the Sprig template library (over 60 functions). The engine renders template files from the templates/ directory using values from values.yaml and built‑in objects.
Built‑in Objects
These are the main objects available inside any template:
| Object | Description | Example |
|---|---|---|
.Release | Metadata about the current release (Name, Namespace, IsUpgrade, etc.) | {{ .Release.Name }} |
.Chart | Information from Chart.yaml (.Name, .Version, .AppVersion) | {{ .Chart.Version }} |
.Values | User-supplied values (from values.yaml, --set, -f) | {{ .Values.replicaCount }} |
.Files | Access to non-template files inside the chart | {{ .Files.Get "config.ini" }} |
.Capabilities | Info about the Kubernetes cluster (version, API versions) | {{ .Capabilities.KubeVersion }} |
Example Template
templates/service.yaml:
apiVersion: v1
kind: Service
metadata:
  name: {{ .Release.Name }}-{{ .Chart.Name }}
spec:
  type: {{ .Values.service.type }}
  ports:
    - port: {{ .Values.service.port }}
      targetPort: http
  selector:
    app: {{ .Chart.Name }}
Pipelines and Functions
Pipelines allow you to chain functions (similar to Unix pipes). Example:
{{ .Values.appName | upper | quote }}This converts appName to uppercase and then wraps it in double quotes.
Flow Control (if/else, with, range)
if/else: Conditionally include parts of the template.
{{- if .Values.persistence.enabled }}
persistence:
  enabled: true
  size: {{ .Values.persistence.size }}
{{- else }}
# no persistence
{{- end }}
with: Sets the context scope to a specific value.
{{- with .Values.service }}
type: {{ .type }}
port: {{ .port }}
{{- end }}
range: Iterates over lists.
{{- range .Values.nodeSelector }}
node: {{ . }}
{{- end }}
11. Hands-On #2 – Custom Helm chart create karein (Node.js + MongoDB)
Now let’s create a custom Helm chart for a simple Node.js + MongoDB application.
Step 1: Create chart scaffold
helm create nodejs-mongodb-appStep 2: Customise values.yaml
Edit nodejs-mongodb-app/values.yaml:
replicaCount: 2
image:
  repository: myrepo/nodejs-app   # Your Node.js image
  tag: "1.0.0"
  pullPolicy: IfNotPresent

service:
  type: NodePort
  port: 80
  targetPort: 3000

mongodb:
  enabled: true
  auth:
    rootPassword: "root123"
    database: mydb
  service:
    port: 27017
Step 3: Create ConfigMap for database connection string
Edit templates/configmap.yaml:
apiVersion: v1
kind: ConfigMap
metadata:
  name: {{ .Release.Name }}-config
data:
  DB_HOST: "{{ .Release.Name }}-mongodb"
  DB_PORT: "27017"
  DB_NAME: {{ .Values.mongodb.auth.database | quote }}
Step 4: Modify existing templates/deployment.yaml to use environment variables
apiVersion: apps/v1
kind: Deployment
metadata:
  name: {{ .Release.Name }}-{{ .Chart.Name }}
spec:
  replicas: {{ .Values.replicaCount }}
  selector:
    matchLabels:
      app: {{ .Chart.Name }}
  template:
    metadata:
      labels:
        app: {{ .Chart.Name }}
    spec:
      containers:
        - name: {{ .Chart.Name }}
          image: "{{ .Values.image.repository }}:{{ .Values.image.tag }}"
          ports:
            - containerPort: {{ .Values.service.targetPort }}
          env:
            - name: MONGO_URI
              value: "mongodb://{{ .Release.Name }}-mongodb:{{ .Values.mongodb.service.port }}/{{ .Values.mongodb.auth.database }}"
Step 5: Add MongoDB subchart dependency
In Chart.yaml add:
dependencies:
  - name: mongodb
    version: 13.x.x
    repository: https://charts.bitnami.com/bitnami
Then run:
cd nodejs-mongodb-app
helm dependency update
This downloads the MongoDB chart into charts/ directory.
Step 6: Template rendering (test without installing)
helm template my-release ./nodejs-mongodb-appThis outputs all rendered YAML. Check that everything looks correct.
Step 7: Install the chart
helm install my-release ./nodejs-mongodb-app -f values.yamlStep 8: See all resources
kubectl get allYou should see your Node.js deployment + service, and MongoDB deployment + service + PVC.
Step 9: Upgrade (change image tag)
Edit values.yaml → image.tag: "2.0.0"
helm upgrade my-release ./nodejs-mongodb-app -f values.yamlStep 10: Rollback if needed
helm rollback my-release 112. Helm Dependency Management – Subcharts & dependencies
Helm charts can depend on other charts (e.g., your app may depend on a MongoDB chart). Dependencies are defined in Chart.yaml.
dependencies:
  - name: mariadb
    version: 11.x.x
    repository: https://charts.bitnami.com/bitnami
    condition: mariadb.enabled
  - name: redis
    version: 17.x.x
    repository: https://charts.bitnami.com/bitnami
condition: redis.enabledversioncan be a range (e.g.,^11.0.0,11.x.x)repositoryis the URL of the Helm repoconditioncontrols whether the subchart is enabled (from top-levelvalues.yaml)
Then values.yaml can override subchart values:
mariadb:
  enabled: true
  auth:
    rootPassword: secret
redis:
  enabled: false
This gives you full control over which components are deployed.
13. Helm Hooks – Jobs aur lifecycle management
Helm hooks allow you to run jobs at specific points in a release’s lifecycle (e.g., before installing, after upgrade). Common use cases: database migrations, pre-install checks, post-install notifications.
Hook Types
| Hook | When it runs |
|---|---|
pre-install | Before installing any resources |
post-install | After all resources are installed |
pre-upgrade | Before an upgrade |
post-upgrade | After an upgrade |
pre-delete | Before deleting the release |
post-delete | After the release is deleted |
Hook Example – Database Migration Job
Create templates/migration-job.yaml:
apiVersion: batch/v1
kind: Job
metadata:
  name: {{ .Release.Name }}-db-migration
  annotations:
    "helm.sh/hook": pre-install,pre-upgrade
    "helm.sh/hook-weight": "0"
    "helm.sh/hook-delete-policy": before-hook-creation,hook-succeeded
spec:
  template:
    spec:
      containers:
        - name: migration
          image: myrepo/migrate:latest
          command: ["node", "migrate.js"]
      restartPolicy: Never
Annotations:
helm.sh/hook: Specifies which hook phase(s) trigger this hook.helm.sh/hook-weight: Determines execution order (lower weight runs first).helm.sh/hook-delete-policy: When to delete the hook resource (e.g., after success).
14. Helm Registry – OCI support (AWS ECR, GHCR, etc.)
Helm v3.8+ introduced support for OCI (Open Container Initiative) registries. You can store Helm charts in Docker registries like AWS ECR, GHCR, or Harbor.
Login to OCI registry
helm registry login ghcr.io -u your-usernamePush chart to OCI registry
helm package ./my-chart
helm push my-chart-0.1.0.tgz oci://ghcr.io/your-org/charts
Pull chart from OCI registry
helm pull oci://ghcr.io/your-org/charts/my-chart --version 0.1.0Install from OCI registry
helm install my-release oci://ghcr.io/your-org/charts/my-chart --version 0.1.0This is great for production environments where you want to store charts alongside container images in the same registry.
15. Common Mistakes (aur Unka Solution!)
| Mistake | Why it’s wrong | Solution |
|---|---|---|
Forgetting to helm repo update before install | Helm uses stale chart versions | Always helm repo update before installing or upgrading |
| Hardcoding values in templates | Chart loses reusability | Use .Values everywhere. Templates should be parameterized |
Using :latest image tag | Unpredictable behaviour in production | Pin specific image tags in values.yaml |
| Not validating before install | Syntax errors in YAML or templates cause failures | Always run helm template --debug and helm lint first |
| Mismatching selectors in services and deployments | Service can’t find pods | Ensure matchLabels in service matches labels in deployment pod template |
| Accidentally uninstalling a release | Data loss if PVCs not protected | Use kubectl get pv to check for orphaned volumes; consider backup |
Upgrading without --atomic in CI/CD | Partial failure leaves cluster in bad state | Use helm upgrade --install --atomic in automation |
| Creating many releases in same namespace without specifying namespace | Confusing cluster state | Use -n flag or set namespace: in values |
| Hardcoding secret values | Secrets exposed in version control | Use --set or external secret management (Secrets Store CSI driver) with Helm |
16. Best Practices – Production-Ready Charts
✅ Use helm create to start – Provides a proper structure and helpful comments
✅ Parameterize everything – No hardcoded values in templates
✅ Use descriptive values.yaml comments – Document what each parameter does
✅ Provide sensible defaults – So users can install without any overrides
✅ Add appVersion to Chart.yaml – Semantically version your application
✅ Use templates/NOTES.txt – Show helpful post-install instructions
✅ Lint before packaging – helm lint catches many common issues
✅ Validate with helm template --debug – See exactly what will be deployed
✅ Use helm upgrade --install in CI/CD – Idempotent and atomic
✅ Pin dependency versions – Use version: ranges to avoid breaking changes
✅ Test with helm test – Create a test pod that validates the installation
✅ Store charts in a registry – Use OCI registries for distribution and versioning
✅ Use semver for chart versions – major.minor.patch
17. Resources – Cheat Sheet & Practice Prompts
Helm Commands Cheat Sheet
| Task | Command |
|---|---|
| Add repo | helm repo add bitnami https://charts.bitnami.com/bitnami |
| Update repo | helm repo update |
| Search repo | helm search repo nginx |
| Install chart | helm install my-release bitnami/nginx |
| Install with values | helm install my-release bitnami/nginx -f my-values.yaml |
| Upgrade release | helm upgrade my-release bitnami/nginx -f new-values.yaml |
| Upgrade with atomic rollback | helm upgrade --atomic my-release bitnami/nginx |
| Install/upgrade (idempotent) | helm upgrade --install my-release bitnami/nginx |
| List releases | helm list |
| Release history | helm history my-release |
| Rollback | helm rollback my-release 2 |
| Uninstall | helm uninstall my-release |
| Dry run (simulate) | helm install my-release ./my-chart --dry-run --debug |
| Template render | helm template my-release ./my-chart |
| Lint chart | helm lint ./my-chart |
| Create new chart | helm create my-chart |
Helm Charts Skeleton
# Chart.yaml
apiVersion: v2
name: my-app
description: A Helm chart for my app
type: application
version: 0.1.0
appVersion: "1.0.0"
dependencies:
  - name: postgresql
    version: 12.x.x
    repository: https://charts.bitnami.com/bitnami
Practice Prompts
Beginner:
- Bitnami repo add karo,
nginxchart search karo, install karo with default values। Check karo release list and upgrade to a differentvalues.yamlwith 3 replicas।
Intermediate:
helm create mywebappse chart scaffold generate karo। Modifyvalues.yamlto set image, service type, and replica count। Install chart with custom values using-fflag।
Advanced:
- Node.js + Redis chart banao। Redis dependency add karo (bitnami/redis)। Use ConfigMap for environment variables। Write a pre-install hook that runs a migration job। Push the chart to OCI registry (GHCR).
18. FAQ
Q1: Helm kya hai aur kyun use karein?
Helm Kubernetes ka package manager hai। Charts ke through applications को package, deploy, upgrade, और rollback करना easier हो जाता है। Helm helps avoid repetitive YAML writing and configuration drift।
Q2: Helm v3 aur Helm v2 mein kya antar hai?
v3 में Tiller component remove कर दिया गया (better security), OCI registry support added, improved upgrade mechanism। v2 deprecated है और security issues the।
Q3: Chart, Release, aur Repository mein kya antar hai?
Chart = package (recipe), Release = deployed instance of a chart (running cake), Repository = chart storage location (cookbook). Learn the difference in section 4.
Q4: Helm template engine kaise kaam karta hai?
Helm Go template language + Sprig functions use karta hai। Templates templates/ folder mein रहते हैं, values.yaml se data लेते हैं, और rendered Kubernetes YAML generate करते हैं।
Q5: Helm charts ko dependencies kaise manage karte hain?Chart.yaml mein dependencies: block में define करो। helm dependency update command subcharts download करता है। Values override करने के लिए values.yaml mein subchart name के under key-values define करो।
Q6: Kya main production mein Helm use kar sakta hoon?
Haan, 70% organisations production में Helm use करते हैं। Best practices follow करो: use --atomic flag, validate with helm template --debug, store charts in OCI registry, and version pin dependencies।
19. Conclusion – Ab Aapki Baari!
Bahut badhiya! Aapne aaj seekh liya:
✅ Helm Kubernetes tutorial Hindi – complete package management guide
✅ Chart vs Release vs Repository – concepts clear
✅ Helm v3 vs v2 – why v3 is the present and future
✅ Helm installation – 3 OSes पर step-by-step
✅ Helm commands – install, upgrade, rollback, uninstall, history
✅ Helm charts structure – Chart.yaml, values.yaml, templates/
✅ Helm template engine – built‑in objects, pipelines, flow control
✅ Hands-on Nginx deployment and customisation
✅ Custom Node.js + MongoDB chart with subchart dependency
✅ Helm hooks – jobs in release lifecycle
✅ Best practices & common mistakes
Helm is an essential skill for modern Kubernetes practitioners – 70% of organizations now use Helm to deploy applications on Kubernetes.
Aapki challenge: helm create से chart scaffold generate karo, apne favourite app (e.g., FastAPI + Redis) के लिए templates modify karo, helm install se deploy karo, aur helm upgrade se image tag update करके test karo।
Next topic kya chahiye?
- Kubernetes Operators (Custom Controllers)?
- CI/CD Pipeline with ArgoCD?
- Service Mesh (Istio / Linkerd) introduction?
Comment mein batao!
The Easy Master ke saath Helm seekhte raho। Happy charting! 🚢☸️
Resources
- Helm Official Documentation
- Helm Chart Template Guide
- Helm Commands Reference
- Bitnami Helm Charts
- Artifact Hub – Central Helm Chart Repository
- Helm GitHub Repository
Additional Resources
- MongoDB Setup – CRUD Operations समझे (Beginner Guide) 2026
- MongoDB Compass से GUI Database Manage करने का आसान तरीका | Beginner Tutorial 2026
- Node.js MongoDB Connection – Mongoose Setup समझे 2026
- MongoDB Data Modeling – Embedded Documents vs References 2026
- MongoDB Indexing – Query Speed बढ़ने करने का आसान तरीका
- MongoDB Aggregation Pipeline – Stages समझे | Practical Examples
- Express MongoDB CRUD – Complete REST API Example
- Mongoose ODM – Schema, Model, and Validation समझे 2026
- MongoDB Atlas – Cloud Database Free में Deploy करें 2026
- JWT Authentication MongoDB – User Login System कैसे बनाएं 2026
- Next.js App Router – Pages Router से क्या बदला? Complete Guide 2026
- Next.js Server Components – ‘use client’ कब और कहां Use करें
- Next.js Routing – Layouts, Dynamic Routes and Nested Routes 2026
- Next.js 16 New Features – Turbopack, Cache Components and proxy.ts
- Next.js Partial Prerendering – Static and Dynamic Content साथ में
- Next.js Authentication – JWT Session Management (App Router) 2026
- Next.js SEO – Metadata API and Image Optimization समझे 2026
- Next.js TypeScript – Full-Stack Type-Safe App कैसे बनाएं
- FastAPI Kya Hai? FastAPI Python Setup Aur Pehla API Hindi 2026
- FastAPI Path Parameters Hindi – शून्य से हीरो तक गाइड 2026
- Pydantic v2 Tutorial Hindi – Data Validation Master 2026
- FastAPI dependency injection Hindi – Code Reuse Ka Magic
- FastAPI Async Await Hindi – Non-Blocking Code 2026
- FastAPI PostgreSQL SQLModel Hindi – Async Guide 2026
- FastAPI JWT Authentication Hindi – Secure API Login
- FastAPI OpenAI Integration Hindi – AI Chatbot API 2026
- FastAPI Multi-Agent AI Hindi – LangGraph Zero to Hero
- FastAPI Deployment Hindi – Railway Zero to Hero 2026
- Docker Introduction in Hindi? Containers vs Virtual Machines
- Docker Images and Containers Hindi – Pehla Container
- Docker Compose Tutorial Hindi – Node.js + MongoDB
- Docker Volumes Networking Hindi – Data Persist कैसे करें
- Kubernetes Architecture Hindi – Pods, Nodes, Cluster
- Minikube Tutorial Hindi – Local Cluster कैसे बनाए
- Kubernetes Deployments Services Hindi – App Expose Karein
- K8s Ingress Tutorial Hindi – Domain se App Access
Views: 353