नमस्ते दोस्तों! 🙏
स्वागत है The Easy Master पर!
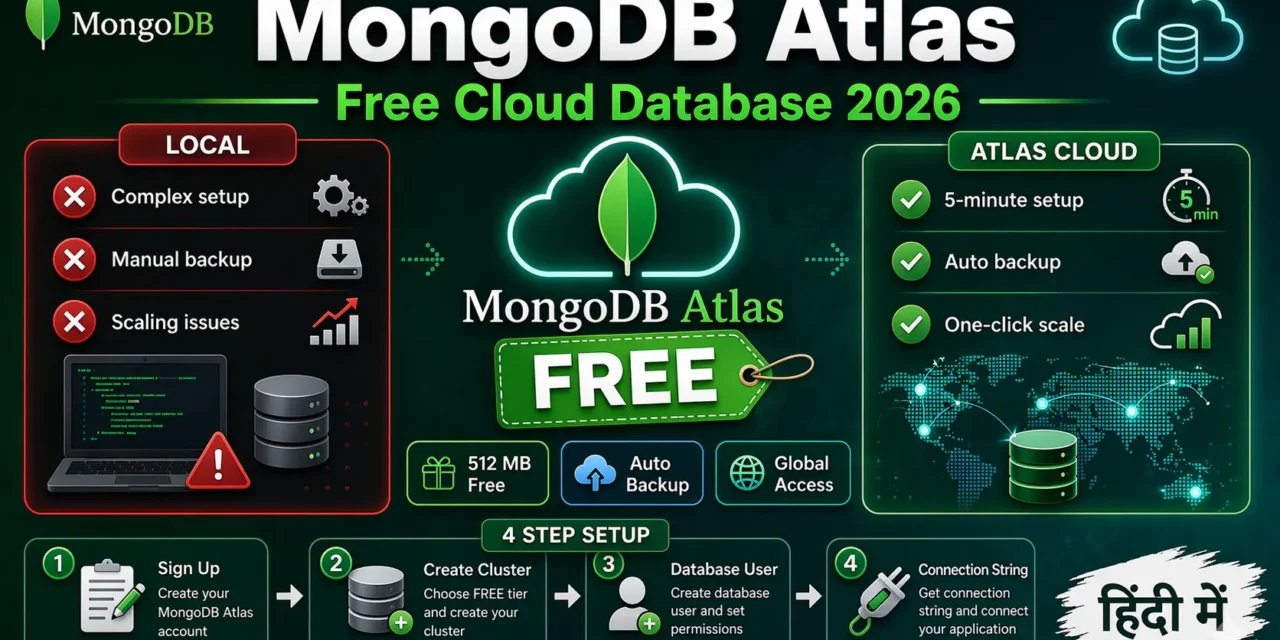
क्या तुमने कभी सोचा है – MongoDB ko apne computer par install kiye bina cloud par kaise use करें? Local installation mein bohot problems hain – setup complex, backup manual, scaling mushkil.
MongoDB Atlas ek cloud database service है – MongoDB ko fully managed cloud par deploy karne के लिए. Free tier में 512 MB storage free मिलता है!
MongoDB Atlas cloud database free Hindi में समझना बहुत जरूरी है क्योंकि:
- No installation – local MongoDB install nahi karna
- Free forever – 512 MB storage free
- Auto backups – data automatically backup होता है
- Global access – दुनिया में कहीं से भी connect कर सकते हो
- Interview mein पक्का cloud database questions puche jayenge
Aaj kya seekhoge?
| Topic | Kya Seekhega? |
|---|---|
| Atlas Kya Hai? | Cloud MongoDB service |
| Free Tier Features | 512 MB storage, shared cluster |
| Account Setup | Sign up process |
| Cluster Creation | Free cluster banayenge |
| Database User | Username/password create |
| IP Whitelist | Access configure karna |
| Connection String | Node.js se connect |
| Compass Connection | GUI se connect |
Kya tumhe pata hai?
MongoDB Atlas free tier mein tum ek cluster create kar sakte ho – 512 MB storage, shared RAM/CPU – production use के लिए enough नहीं, लेकिन learning और development के लिए perfect है!
तो चलिए शुरू करते हैं – MongoDB Atlas cloud database free Hindi सीखने का सफर! 🚀
Table of Contents
1. MongoDB Atlas Kya Hai? – Introduction
MongoDB Atlas MongoDB का official cloud database service है – जो AWS, Google Cloud, aur Azure par hosted है.
Atlas vs Self-Hosted MongoDB:
| Feature | Self-Hosted | MongoDB Atlas |
|---|---|---|
| Setup Time | Hours/Minutes | Minutes |
| Maintenance | Manual | Automatic |
| Backups | Manual setup | Automatic |
| Scaling | Manual | One click |
| Monitoring | Manual setup | Built-in |
| Security | Self-managed | Built-in |
| Cost | Server cost + effort | Pay as you go |
Atlas Architecture:
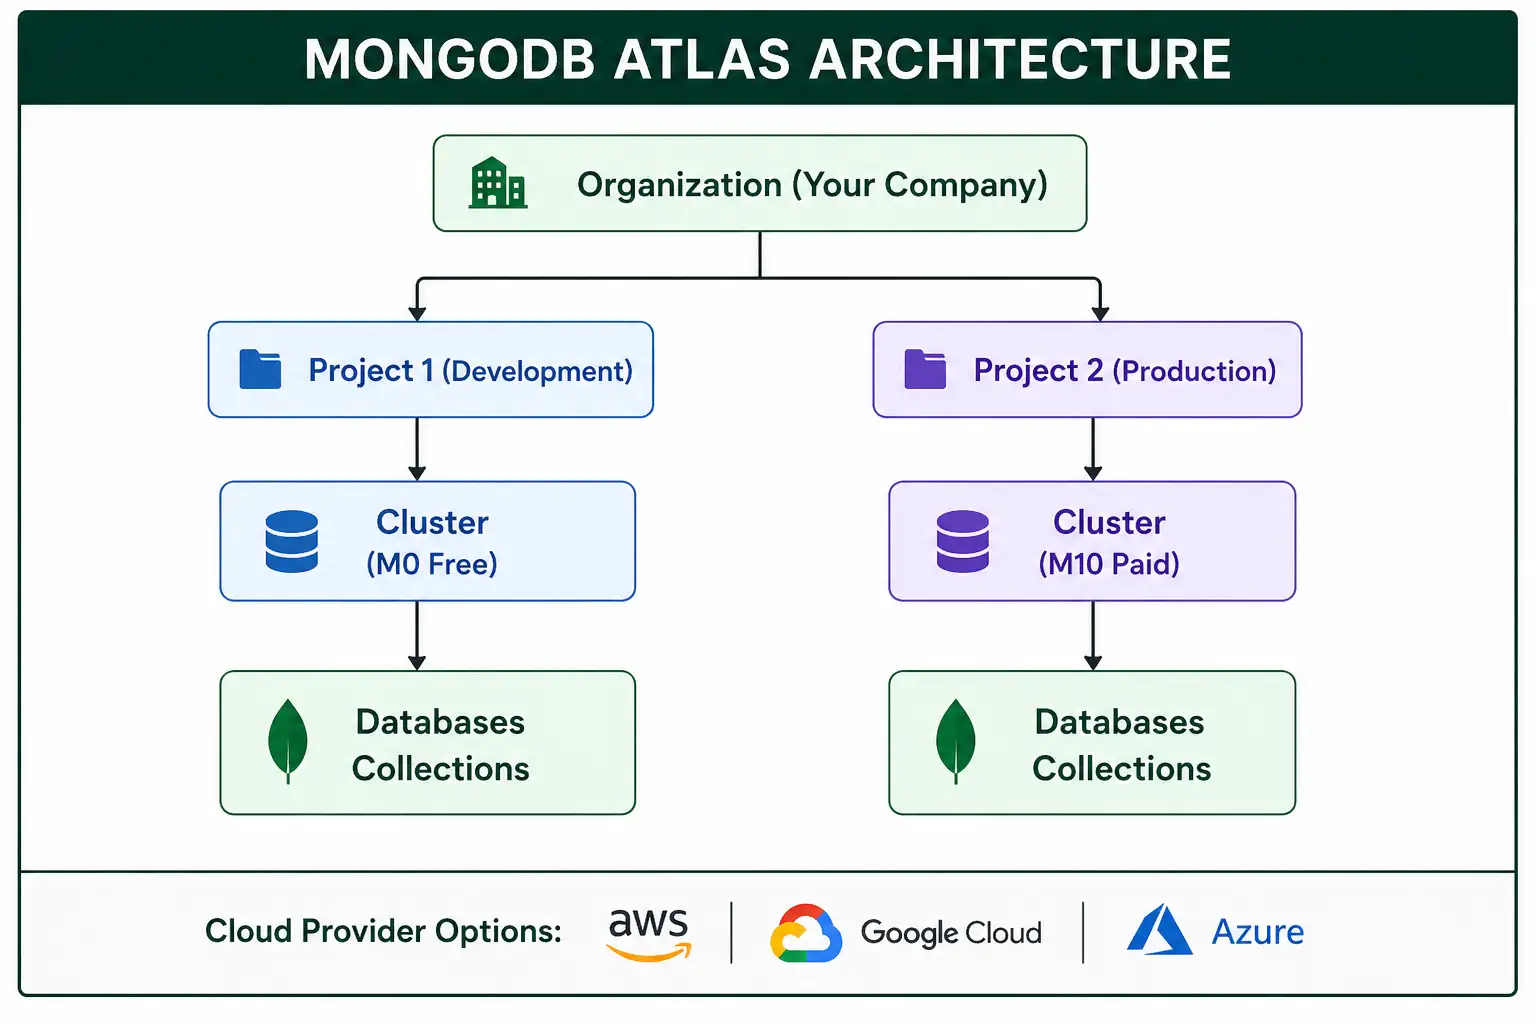
MongoDB Atlas cloud database free Hindi में हम free tier cluster setup करेंगे।
2. Free Tier Features – क्या मिलेगा Free में?
MongoDB Atlas Free Tier Specifications:
Free Tier Includes:
- 512 MB storage – learning और small projects के लिए enough
- Shared cluster – resources shared होते हैं
- Automated failover – high availability
- Encryption – data encrypted at rest and in transit
- Atlas Search – full-text search capability
- Atlas Charts – data visualization
Free Tier Does NOT Include:
- ❌ Dedicated resources
- ❌ Advanced backup features
- ❌ 24/7 phone support
- ❌ Multi-region deployment
3. Account Setup – Sign Up Kaise करें
Step 1: Go to MongoDB Atlas
Website: mongodb.com/atlas
Step 2: Sign Up
- Click “Try Free” or “Start Free” button
- Sign up options:
- Email and password
- Google account
- GitHub account
Step 3: Complete Registration
- Fill your details (name, email, etc.)
- Verify your email (check inbox)
- Choose free tier option
Step 4: Welcome Survey (Optional)
MongoDB पूछेगा:
4. Cluster Creation – Free Cluster बनाएं
Step 1: Create Cluster
Sign up के बाद, automatic “Create Cluster” screen आएगी।
- Select FREE tier (M0)
- Choose cloud provider:
- Choose region (ap-south-1 for Mumbai – closest to India)
- Click “Create Cluster”
Step 2: Wait for Cluster Creation
Cluster creation में 1-3 minutes lagte hain।
Status बदलेगा:
Creating...→Creating your clusterCreated→ Cluster ready!
Step 3: Cluster Dashboard
Cluster ready होने के बाद dashboard दिखेगा:
┌─────────────────────────────────────────────────────────────┐
│  Cluster: Cluster0 (M0 - Free)                            │
├─────────────────────────────────────────────────────────────┤
│  Cloud Provider: AWS                                       │
│  Region: Mumbai (ap-south-1)                              │
│  MongoDB Version: 7.0+                                    │
│  Status: Active ✅                                         │
├─────────────────────────────────────────────────────────────┤
│  Connection Methods:                                       │
│  • Connect to Compass                                     │
│  • Connect to Application (Node.js)                       │
│  • Connect via MongoDB Shell                              │
└─────────────────────────────────────────────────────────────┘
5. Database User – Username aur Password Create करें
Cluster create करने के बाद, database user बनाना जरूरी है।
Step 1: Create User
Step 2: Configure User
Authentication Method: Password
Username: myuser (choose any)
Password: (generate strong password or enter your own)
Authentication Database: admin

Database User Privileges:
- Read and write to any database (for learning)
- OR specific database access (for production)
Step 3: Save User
Click “Add User” – user create हो जाएगा।
⚠️ Important: Password save करके रखो – यह बाद में काम आएगा!
6. IP Whitelist – Access Configure करें
Security के लिए, Atlas IP whitelist use करता है – सिर्फ allowed IPs से connect कर सकते हो।
Step 1: Network Access
Step 2: Add IP Address
Options:
Option 1: Add Current IP Address (Recommended)
Option 2: Allow Access from Anywhere (For Development Only!)
Option 3: Specific IP Range
- Enter specific IP or CIDR range
Step 3: Save
Click “Confirm” – IP whitelist में add हो जाएगा।
Note: IP change होने पर तुम्हें नई IP add करनी पड़ेगी।
7. Connection String – Node.js Se Connect करें
Step 1: Get Connection String
- Cluster dashboard में “Connect” button click करो
- Select “Connect your application”
- Select “Node.js” as driver
- Version select करें (e.g., 5.0 or later)
Step 2: Connection String Format
mongodb+srv://<username>:<password>@<cluster>.mongodb.net/<dbname>?retryWrites=true&w=majorityStep 3: Update Connection String
// config/database.js
const mongoose = require('mongoose');

// Replace placeholders:
// <username> → your database username
// <password> → your database password
// <dbname> → your database name

const MONGODB_URI = 'mongodb+srv://myuser:mypassword@cluster0.abcde.mongodb.net/mydatabase?retryWrites=true&w=majority';

mongoose.connect(MONGODB_URI)
  .then(() => console.log('✅ Connected to MongoDB Atlas!'))
  .catch(err => console.error('❌ Connection error:', err));
Step 4: Environment Variable (Recommended)
# .env
MONGODB_URI=mongodb+srv://myuser:mypassword@cluster0.abcde.mongodb.net/mydatabase?retryWrites=true&w=majority// config/database.js
require('dotenv').config();
mongoose.connect(process.env.MONGODB_URI)
.then(() => console.log('✅ Connected to MongoDB Atlas!'))
.catch(err => console.error('❌ Error:', err));8. MongoDB Compass Connection – GUI Se Connect करें
MongoDB Compass GUI tool है – database को visually manage करने के लिए।
Step 1: Install MongoDB Compass
Download from: mongodb.com/products/compass
Step 2: Get Connection String for Compass
- Atlas dashboard में “Connect” click करो
- Select “Connect with MongoDB Compass”
- Copy connection string
Step 3: Connect Compass
Step 4: Create Database and Collection
Connected होने के बाद:
- Click “Create Database” button
- Enter database name (e.g.,
myapp) - Enter collection name (e.g.,
users) - Click “Create Database”
Step 5: Insert Sample Data
// Insert test document
{
  "name": "Rahul Sharma",
  "email": "rahul@example.com",
  "age": 25,
  "createdAt": "2026-04-19T10:30:00Z"
}
9. Project aur Organization Management
MongoDB Atlas Structure:
┌─────────────────────────────────────────────────────────────────────────┐
│                     ORGANIZATION (Your Company)                         │
├─────────────────────────────────────────────────────────────────────────┤
│                                                                          │
│   Project 1 (Development)          Project 2 (Production)               │
│   ├── Cluster (Free)               ├── Cluster (Paid)                   │
│   ├── Database Users               ├── Database Users                   │
│   ├── Network Access               ├── Network Access                   │
│   └── Alerts                       └── Alerts                           │
│                                                                          │
│   Project 3 (Staging)                                                 │
│   └── ...                                                               │                                                                         │
└─────────────────────────────────────────────────────────────────────────┘
Create New Project:
- Click “New Project” in Atlas UI
- Enter project name
- Add members (optional)
- Click “Create Project”
Delete Project:
Note: सिर्फ empty projects delete हो सकते हैं – पहले clusters delete करो।
10. Free Tier Limits – क्या क्या Limit है
M0 (Free Tier) Limitations:
| Limitation | Value |
|---|---|
| Storage | 512 MB |
| Connections | 100 max |
| Cluster | 1 per project |
| Backup | Basic snapshots only |
| Performance | Shared resources |
| Region | Single region only |
| Support | Community only |
When to Upgrade:
| Scenario | Upgrade To |
|---|---|
| Storage > 512 MB | M2 or M5 (Shared) |
| Need dedicated resources | M10+ (Dedicated) |
| Need 24/7 support | M10+ |
| Multi-region deployment | M30+ |
| Production workload | M10+ |
Pricing for Paid Tiers (2026):
| Tier | Type | Monthly Cost | Storage |
|---|---|---|---|
| M0 | Shared | Free | 512 MB |
| M2 | Shared | ~$9 | 1 GB |
| M5 | Shared | ~$15 | 2 GB |
| M10 | Dedicated | $57+ | 10 GB+ |
| Serverless | – | $0.10/million reads | Auto-scaling |
11. Pricing Overview – Paid Plans
Atlas Pricing Models:
1. Shared Tier (M0, M2, M5):
- Entry-level, affordable
- Shared resources
- Good for development, small apps
2. Dedicated Tier (M10+):
3. Serverless:
Cost Breakdown (2026):
| Service | Free Tier | Paid Tier |
|---|---|---|
| Compute | Shared | Dedicated |
| Storage | 512 MB | 10 GB+ |
| Backups | Basic | Advanced |
| Support | Community | 24/7 |
| Monitoring | Basic | Advanced |
12. Common Mistakes + Solutions
Mistake 1: Password not URL-encoded
// ❌ Special characters in password break connection
password: "p@ssw0rd#"

// ✅ URL encode special characters
// @ → %40
// # → %23
// $ → %24
Mistake 2: Wrong IP whitelist
# ❌ Can't connect
MongoNetworkError: connection refused

# ✅ Add your IP to whitelist
# Atlas → Network Access → Add IP Address
Mistake 3: Database name not specified
// ❌ Missing database name
mongodb+srv://user:pass@cluster.mongodb.net/

// ✅ Include database name
mongodb+srv://user:pass@cluster.mongodb.net/mydatabase
Mistake 4: Free tier storage exceeded
# Error: Storage limit exceeded (512 MB)
# ✅ Solution:
# - Delete old/unused data
# - Upgrade to paid tier
13. Quick Cheat Sheet
Atlas Setup Steps:
1. Sign up → mongodb.com/atlas
2. Create free cluster (M0)
3. Create database user
4. Add IP to whitelist
5. Get connection string
6. Connect with Node.js or Compass
Connection String Format:
mongodb+srv://<username>:<password>@<cluster>.mongodb.net/<dbname>?retryWrites=true&w=majorityImportant URLs:
| Resource | URL |
|---|---|
| Atlas Console | cloud.mongodb.com |
| Connection Guide | cloud.mongodb.com → Connect |
| IP Whitelist | Network Access tab |
| Database Users | Database Access tab |
14. FAQ
Q1: MongoDB Atlas cloud database free Hindi में सबसे important kya hai?
Free tier (M0) – 512 MB storage free में मिलता है। Learning और development के लिए perfect है।
Q2: Free tier production use कर सकते हैं?
Technical रूप से कर सकते हो, लेकिन recommended नहीं है। Production के लिए M10+ use करो।
Q3: Free tier में कितने clusters बना सकते हैं?
Per project 1 free cluster। Unlimited projects बना सकते हो।
Q4: Connection string में password कैसे pass karein?
Special characters को URL-encode करो (@ → %40, # → %23)।
Q5: IP whitelist kyun chahiye?
Security के लिए – सिर्फ allowed IPs से connect कर सकते हो।
Q6: MongoDB Compass kya hai?
GUI tool है – database को visually manage करने के लिए।
Q7: Atlas vs local MongoDB – kya use karein?
Learning/development – Atlas free tier। Production – Atlas paid या self-hosted।
Q8: Atlas backup automatic है?
Haan, basic snapshots automatic होते हैं। Advanced backup paid feature है।
Q9: Atlas India region में available है?
Haan, AWS Mumbai (ap-south-1) available है।
Q10: Free tier storage limit cross ho jaye toh?
Data delete करो या paid tier upgrade करो।
15. Conclusion
बहुत बढ़िया दोस्तों! आज हमने MongoDB Atlas cloud database free Hindi को पूरी detail में समझा।
Quick Recap:
| Step | Action |
|---|---|
| 1 | Sign up at mongodb.com/atlas |
| 2 | Create free M0 cluster |
| 3 | Create database user |
| 4 | Add IP to whitelist |
| 5 | Get connection string |
| 6 | Connect with Node.js |
Mera personal experience:
MongoDB Atlas use करने से पहले main local MongoDB install करता था – backup, maintenance, access – सब manage करना पड़ता था। Atlas के free tier ने development bohot easy कर दिया। बस 5 minutes में cluster ready, connection string मिल जाता है।
Tum bhi ye steps follow karo:
- ✅ MongoDB Atlas account banao
- ✅ Free cluster create करो
- ✅ Database user banao
- ✅ IP whitelist configure करो
- ✅ Connection string se connect करो
अब तुम्हारी बारी है!
नीचे comment में बताओ:
- क्या तुमने Atlas free tier use kiya है?
- तुम कौन सा cloud provider use karoge?
- अगला topic क्या चाहिए? (MongoDB Compass Deep Dive? Atlas Search? Data Modeling?)
The Easy Master पर बने रहो। Happy Cloud Database! 🚀🍃
Resources
Additional Resources
- Express.js Setup – पहला Server कैसे बनाएं (Step-by-Step) 2026
- Express.js Routing – GET POST PUT DELETE Complete Guide
- Express Middleware समझे – Application, Router, Error Middleware
- Express req and res Objects – Query, Params, Body, Headers Explained
- Express Static Files और Templating – EJS से Dynamic HTML Banaye
- Express Router – API Routes को Organize करें (Modular Code)
- Express.js में Environment Variables – .env File कैसे Use करें
- Express File Upload Multer Tutorial | Image PDF Hindi 2026
- Express Security – Helmet, CORS, Rate Limiting, Validation (2026)
- Express + TypeScript – Type-Safe API कैसे बनाएं 2026
- Express MongoDB CRUD – Complete REST API Example 2026
- Express Logging – Morgan और Winston से Debug करें
- Express API Testing – Supertest से Routes Test करें
- MongoDB Setup – CRUD Operations समझे (Beginner Guide) 2026
- MongoDB Compass से GUI Database Manage करने का आसान तरीका | Beginner Tutorial 2026
- Node.js MongoDB Connection – Mongoose Setup समझे 2026
- MongoDB Data Modeling – Embedded Documents vs References 2026
- MongoDB Indexing – Query Speed बढ़ने करने का आसान तरीका
- MongoDB Aggregation Pipeline – Stages समझे | Practical Examples
- Express MongoDB CRUD – Complete REST API Example
- Mongoose ODM – Schema, Model, and Validation समझे 2026